By: Agricultural DIY Report
Backyard farming has become one of the most practical ways for families to enjoy fresh eggs, sustainable living, and healthy poultry management. Today, we’ll walk you through two featured chicken coop designs (shown above):
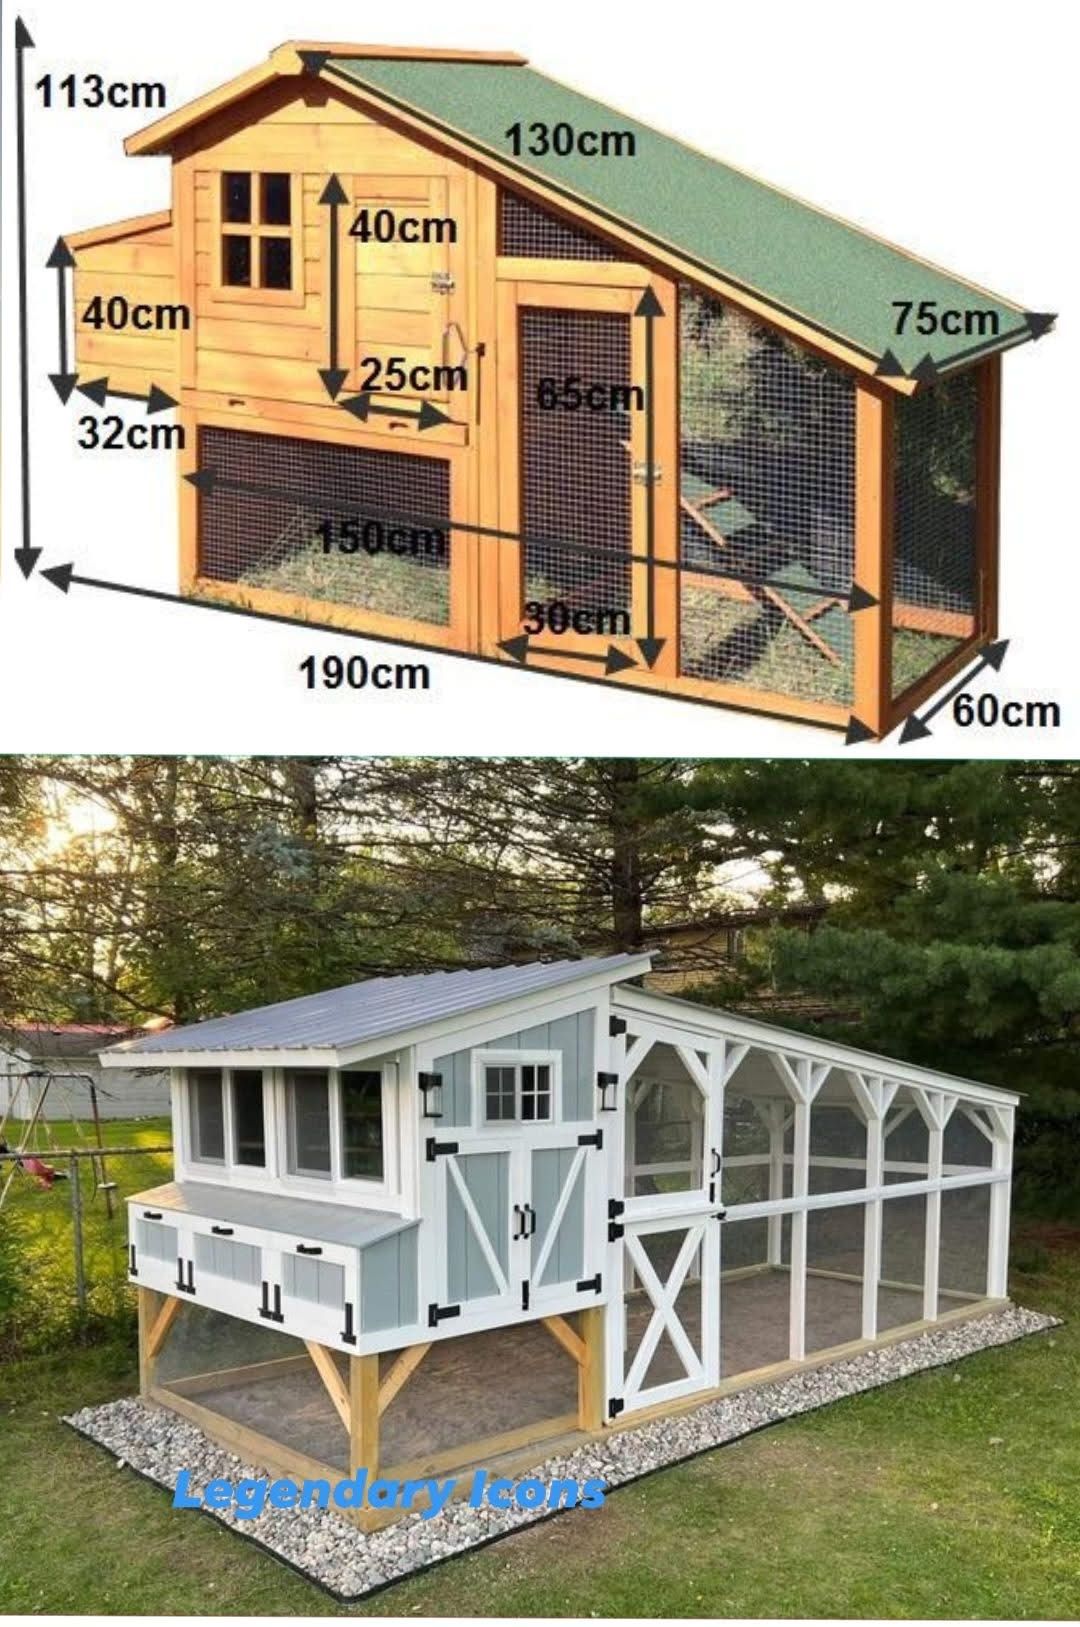
- Compact Slanted-Roof Wooden Coop (190 cm model)
- Modern Elevated Coop with Large Run (farmhouse style)
Both designs prioritize chicken safety, ventilation, and ease of maintenance—but they differ in scale and durability. Let’s break them down step by step.
1. Compact Slanted-Roof Wooden Coop (190 cm Model)
Key Dimensions
- Length: 190 cm
- Height: 113 cm (highest point)
- Run Depth: 60 cm
- Main Coop Depth: 130 cm
- Nest Box Size: 40 × 40 cm
- Door Height: 65 cm
- Ground Clearance: 32 cm under coop
This coop is excellent for small flocks (2–4 chickens) and tight backyards.
Step-by-Step Build Process
Step 1: Base & Frame
- Build a rectangular base: 190 cm long × 60 cm wide.
- Add vertical supports reaching 113 cm at the front and 75 cm at the back for the slanted roof.
Step 2: Coop House
- Create a raised wooden box for the chickens to roost in.
- Elevate by 32 cm for airflow and predator protection.
Step 3: Nesting Boxes
- Install 40 × 40 cm side boxes for egg-laying.
- Hinged tops make collection easier.
Step 4: Chicken Run
- Enclose the 150 cm × 60 cm area under and beside the coop with wire mesh.
- Add a 65 cm door for farmer access.
Step 5: Roof
- Fix slanted roofing (113 cm to 75 cm drop).
- Use waterproof shingles or corrugated sheets.
Step 6: Ramp & Access
- Add a 25 cm wide ramp from the coop door to the run.
- Ensure grip slats for chickens.
Advantages
✔ Compact for small spaces.
✔ Built-in run allows daily movement.
✔ Easy egg collection from side boxes.
2. Modern Elevated Coop with Large Run (Farmhouse Style)
This design is more professional and durable, suitable for 6–10 chickens.
Key Features
- Elevated coop on strong timber legs.
- Spacious screened run with a walk-in door.
- Wide nesting boxes accessible from the outside.
- Ventilated windows for airflow.
- Gravel base for drainage and predator-proofing.
Step-by-Step Build Process
Step 1: Foundation
- Lay down a gravel base for drainage.
- Build a strong wooden frame (treated lumber recommended).
Step 2: Elevated Coop
- Construct the upper coop section with windows, doors, and roosts.
- Elevation provides shade and predator safety.
Step 3: Nesting Boxes
- Install external hinged nesting boxes for easy egg collection.
Step 4: Walk-In Run
- Build a large covered run with full-height access doors.
- Frame with posts and cover with heavy-duty wire mesh.
Step 5: Roofing
- Use corrugated metal or weatherproof panels.
- Extend roof slope to protect both coop and run from rain.
Step 6: Finishing Touches
- Paint or stain for weather resistance.
- Add locks for predator security.
- Install perches and feeders inside.
Advantages
✔ Large and durable—long-term investment.
✔ Walk-in design makes cleaning easy.
✔ Comfortable for a medium flock (6–10 hens).
✔ Looks attractive in a homestead or suburban yard.
Final Comparison
| Feature | Compact Coop (190 cm) | Modern Elevated Coop |
|---|---|---|
| Capacity | 2–4 hens | 6–10 hens |
| Size | 190 × 60 × 113 cm | Large walk-in run |
| Maintenance | Moderate | Very easy |
| Durability | Medium (wood + mesh) | High (treated lumber + roofing) |
| Best For | Small backyards | Farms & large yards |
✅ Conclusion:
- If you have limited space and a small flock → Choose the 190 cm slanted-roof coop.
- If you want a long-lasting, farm-style structure → Invest in the modern elevated coop.
Both designs ensure healthy, happy chickens while keeping predators away.