By: Modern Homesteader Daily
Raising backyard chickens is more than just a hobby—it’s a step toward self-sufficiency, sustainability, and healthier living. Recently, detailed plans have emerged for a 20-foot chicken coop with an integrated run, offering both style and practicality for modern homesteads.
This guide breaks down the design, dimensions, and construction process step by step, so anyone can build this coop and ensure their flock lives in comfort and safety.
1. Overall Size & Dimensions
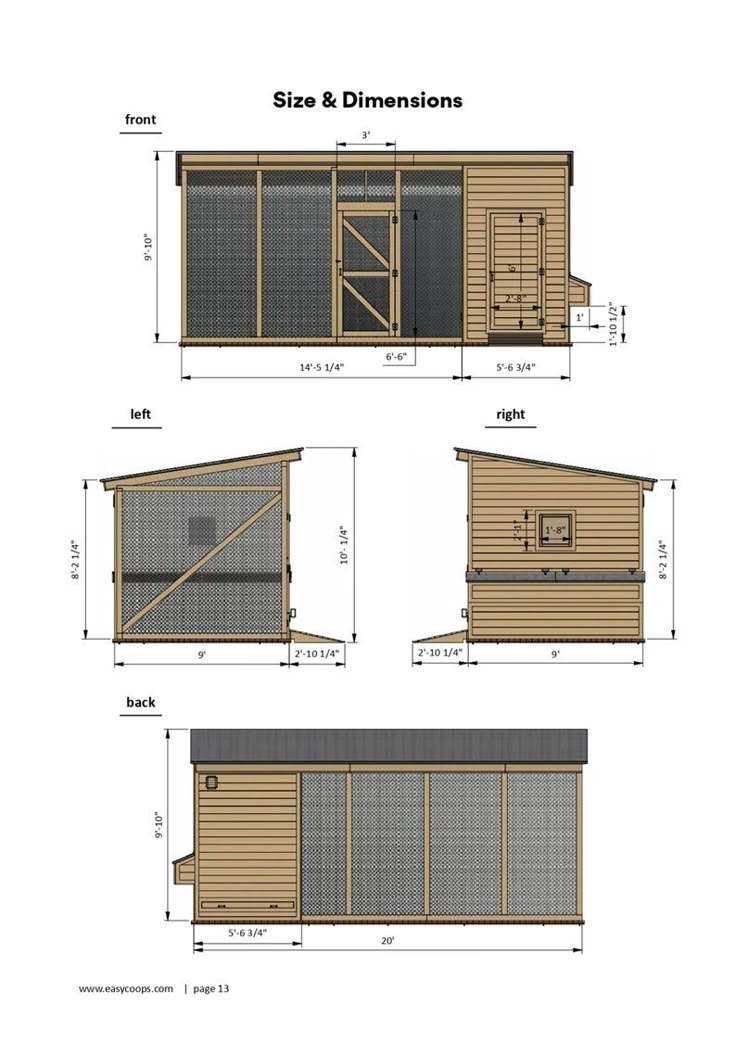
The coop combines a henhouse and an enclosed chicken run, with total measurements:
- Length: 20 feet
- Width: 9 feet
- Height: 8’2” to 10’1” (sloped roof for drainage)
This provides enough space for 10–15 chickens comfortably, giving them both indoor shelter and outdoor roaming protection.
2. The Front View
- The run area measures 14’5” long by 9’ wide, with a 6’6” entry section.
- A secure mesh-covered double door allows farmers easy walk-in access.
- The henhouse section (on the right) measures 5’6 ¾” wide, with its own access door.
- Nesting boxes are built-in, extending outward for easy egg collection.
3. The Side Views (Left & Right)
- Left Side:
- 9 feet wide with a sloped height (8’2”–10’1”).
- Fully mesh-covered for ventilation and predator protection.
- Reinforced bracing keeps the frame stable against wind and weight.
- Right Side:
- Shows the egg collection hatch (1’8” wide).
- This small hatch means eggs can be gathered without entering the coop.
- Nesting boxes extend outward with a slanted roof to prevent water pooling.
4. The Back View
- Full 20-foot span, half solid wall and half mesh enclosure.
- The henhouse (5’6 ¾” section) is fully enclosed for shelter.
- The remaining length is open-run, mesh-protected, ensuring the chickens get fresh air while staying safe.
5. Construction Breakdown (Step by Step)
Step 1: Foundation & Flooring
- Build a level 20’x9’ base frame using treated lumber.
- Raise the structure slightly off the ground to prevent flooding.
- Use either wood flooring (inside coop) and gravel/sand (for run).
Step 2: Frame & Walls
- Erect 2×4 wall studs for both the run and coop sections.
- Reinforce with cross-bracing for stability.
- Cover the run with ½-inch welded hardware cloth (not chicken wire, which is weaker).
Step 3: Roofing
- Install a slanted roof (10’1” down to 8’2”).
- Use corrugated metal or shingles for durability.
- Extend eaves slightly to protect walls from rain.
Step 4: Coop Interior
- Add roosting bars inside (about 2 feet off the ground).
- Install nesting boxes on the right-hand side, with exterior access.
- Include ventilation vents on both sides for airflow.
Step 5: Doors & Access
- Main walk-in door in the run (6’6” wide).
- Smaller door for chicken access with a ramp.
- Secure all doors with latches and predator-proof locks.
Step 6: Final Touches
- Add a removable litter tray for easy cleaning.
- Place feeders and waterers inside both coop and run.
- Surround the exterior base with hardware cloth to prevent digging predators.
6. Key Features & Benefits
✔ Walk-in height – Farmers can easily clean and maintain the coop.
✔ Predator-proof – Full mesh enclosure keeps out raccoons, foxes, and hawks.
✔ Spacious design – Enough room for hens to stay active and healthy.
✔ Easy egg collection – External nesting box hatch saves time.
✔ Sloped roof – Ensures water drainage and durability.
7. Why This Coop is Perfect for Modern Farms
This 20-foot chicken coop and run is not just about housing chickens—it’s about building a sustainable system. The design maximizes chicken comfort, farmer convenience, and predator safety.
Homesteaders across the country are adopting walk-in chicken coops like this one because they offer:
- Long-term durability
- Easy maintenance
- A stylish farmyard addition
✅ Final Note: Whether you’re a beginner chicken keeper or an experienced homesteader, this coop strikes the perfect balance of practicality and modern design. Built with the right materials, it can last 10+ years, ensuring healthy flocks and fresh eggs for the family.