By: DIY Farming Architecture Report
Backyard poultry farming is booming worldwide, and the demand for compact, easy-to-build chicken coops has never been higher. Today, we’ll review and explain a detailed blueprint-style chicken coop plan, complete with metric dimensions, ensuring you can construct this coop with accuracy and efficiency.
This design is perfect for small backyards, holding 4–6 chickens, and offers the right balance of shelter, ventilation, and easy access for cleaning and egg collection.
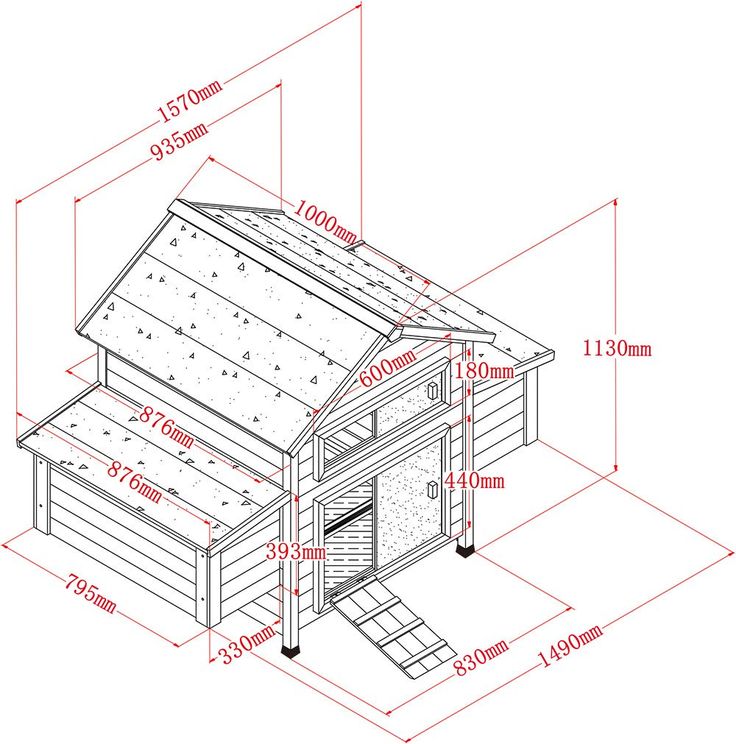
1. Dimensions at a Glance (All in mm)
- Total Width: 1490 mm (1.49 m / 4.9 ft)
- Total Depth: 935 mm (0.93 m / 3.0 ft)
- Total Height: 1130 mm (1.13 m / 3.7 ft)
- Front Ramp Length: 830 mm (0.83 m / 2.7 ft)
- Side Extensions: 876 mm each (nesting box sections)
- Roof Overhang: 600 mm + 180 mm (front and rear protection)
This makes it a compact and manageable coop, suitable for a family flock in both urban and rural settings.
2. Key Features
✔ Raised Structure: Elevated 393 mm above ground to protect against flooding and predators.
✔ Ramp Access: An 830 mm long ramp makes entry easy for hens.
✔ Dual Nesting Boxes: Two 876 mm-wide boxes on each side for laying.
✔ Ventilation Openings: Located under the roof (600 mm clearance) to keep airflow steady.
✔ Tall Front Doors (440 mm wide): Allow farmer access for cleaning.
✔ Sloped Roof (1570 mm peak length): Ensures rainwater runoff.
3. Step-by-Step Building Process
Step 1: Foundation & Elevation
- Prepare four support posts, raising the structure 393 mm off the ground.
- Use treated timber or concrete blocks to resist moisture and pests.
Step 2: Frame Assembly
- Construct a rectangular base: 1490 mm wide × 935 mm deep.
- Add vertical supports to reach 1130 mm in height.
- Reinforce corners for stability.
Step 3: Floor & Walls
- Install plywood flooring or weather-resistant timber.
- Side walls should include spaces for nesting boxes (876 mm each).
- Front wall should hold the 440 mm wide access doors.
Step 4: Nesting Boxes
- Extend the side walls outward by 876 mm.
- Roof these extensions separately but keep them lower for easy egg collection.
Step 5: Roof
- Install a sloped roof measuring 1570 mm front to back.
- Ensure a 600 mm front overhang for rain protection.
- Add a rear 180 mm extension for balanced ventilation.
Step 6: Ramp & Access
- Build a front ramp (830 mm long, 330 mm base height).
- Secure with slats so chickens can grip while climbing.
Step 7: Ventilation & Finishing
- Cut ventilation gaps under the roof eaves (covered with wire mesh).
- Paint or seal the coop with weatherproof coating.
- Add locks to prevent predators from entering.
4. Advantages of This Coop
- Compact but efficient: Fits in small yards but houses up to 6 chickens.
- Easy maintenance: Front access doors allow quick cleaning.
- Predator-safe: Raised structure + wire mesh ventilation.
- Weatherproof: Overhanging roof and sloped design keep the interior dry.
5. Why This Design Works Best
This coop is designed for urban homesteaders or beginners. The compact size means you can keep it in a backyard without overwhelming space, while still meeting the chickens’ needs. Its elevated floor prevents rot and flooding, while the wide roof ensures rain runoff.
It’s the perfect balance of low cost, easy construction, and high durability.
✅ Final Verdict: With only basic carpentry skills and materials, this 1490 mm × 935 mm × 1130 mm coop can be built in 2–3 days. It’s ideal for families wanting fresh eggs daily without investing in a massive structure.