By: Off-Grid Homestead News | August 5, 2025
As climate extremes intensify and food security becomes a global concern, one of the most sustainable, low-tech solutions is emerging from beneath the soil — quite literally. It’s called a walipini, a sunken greenhouse that combines ancient wisdom with modern resilience.
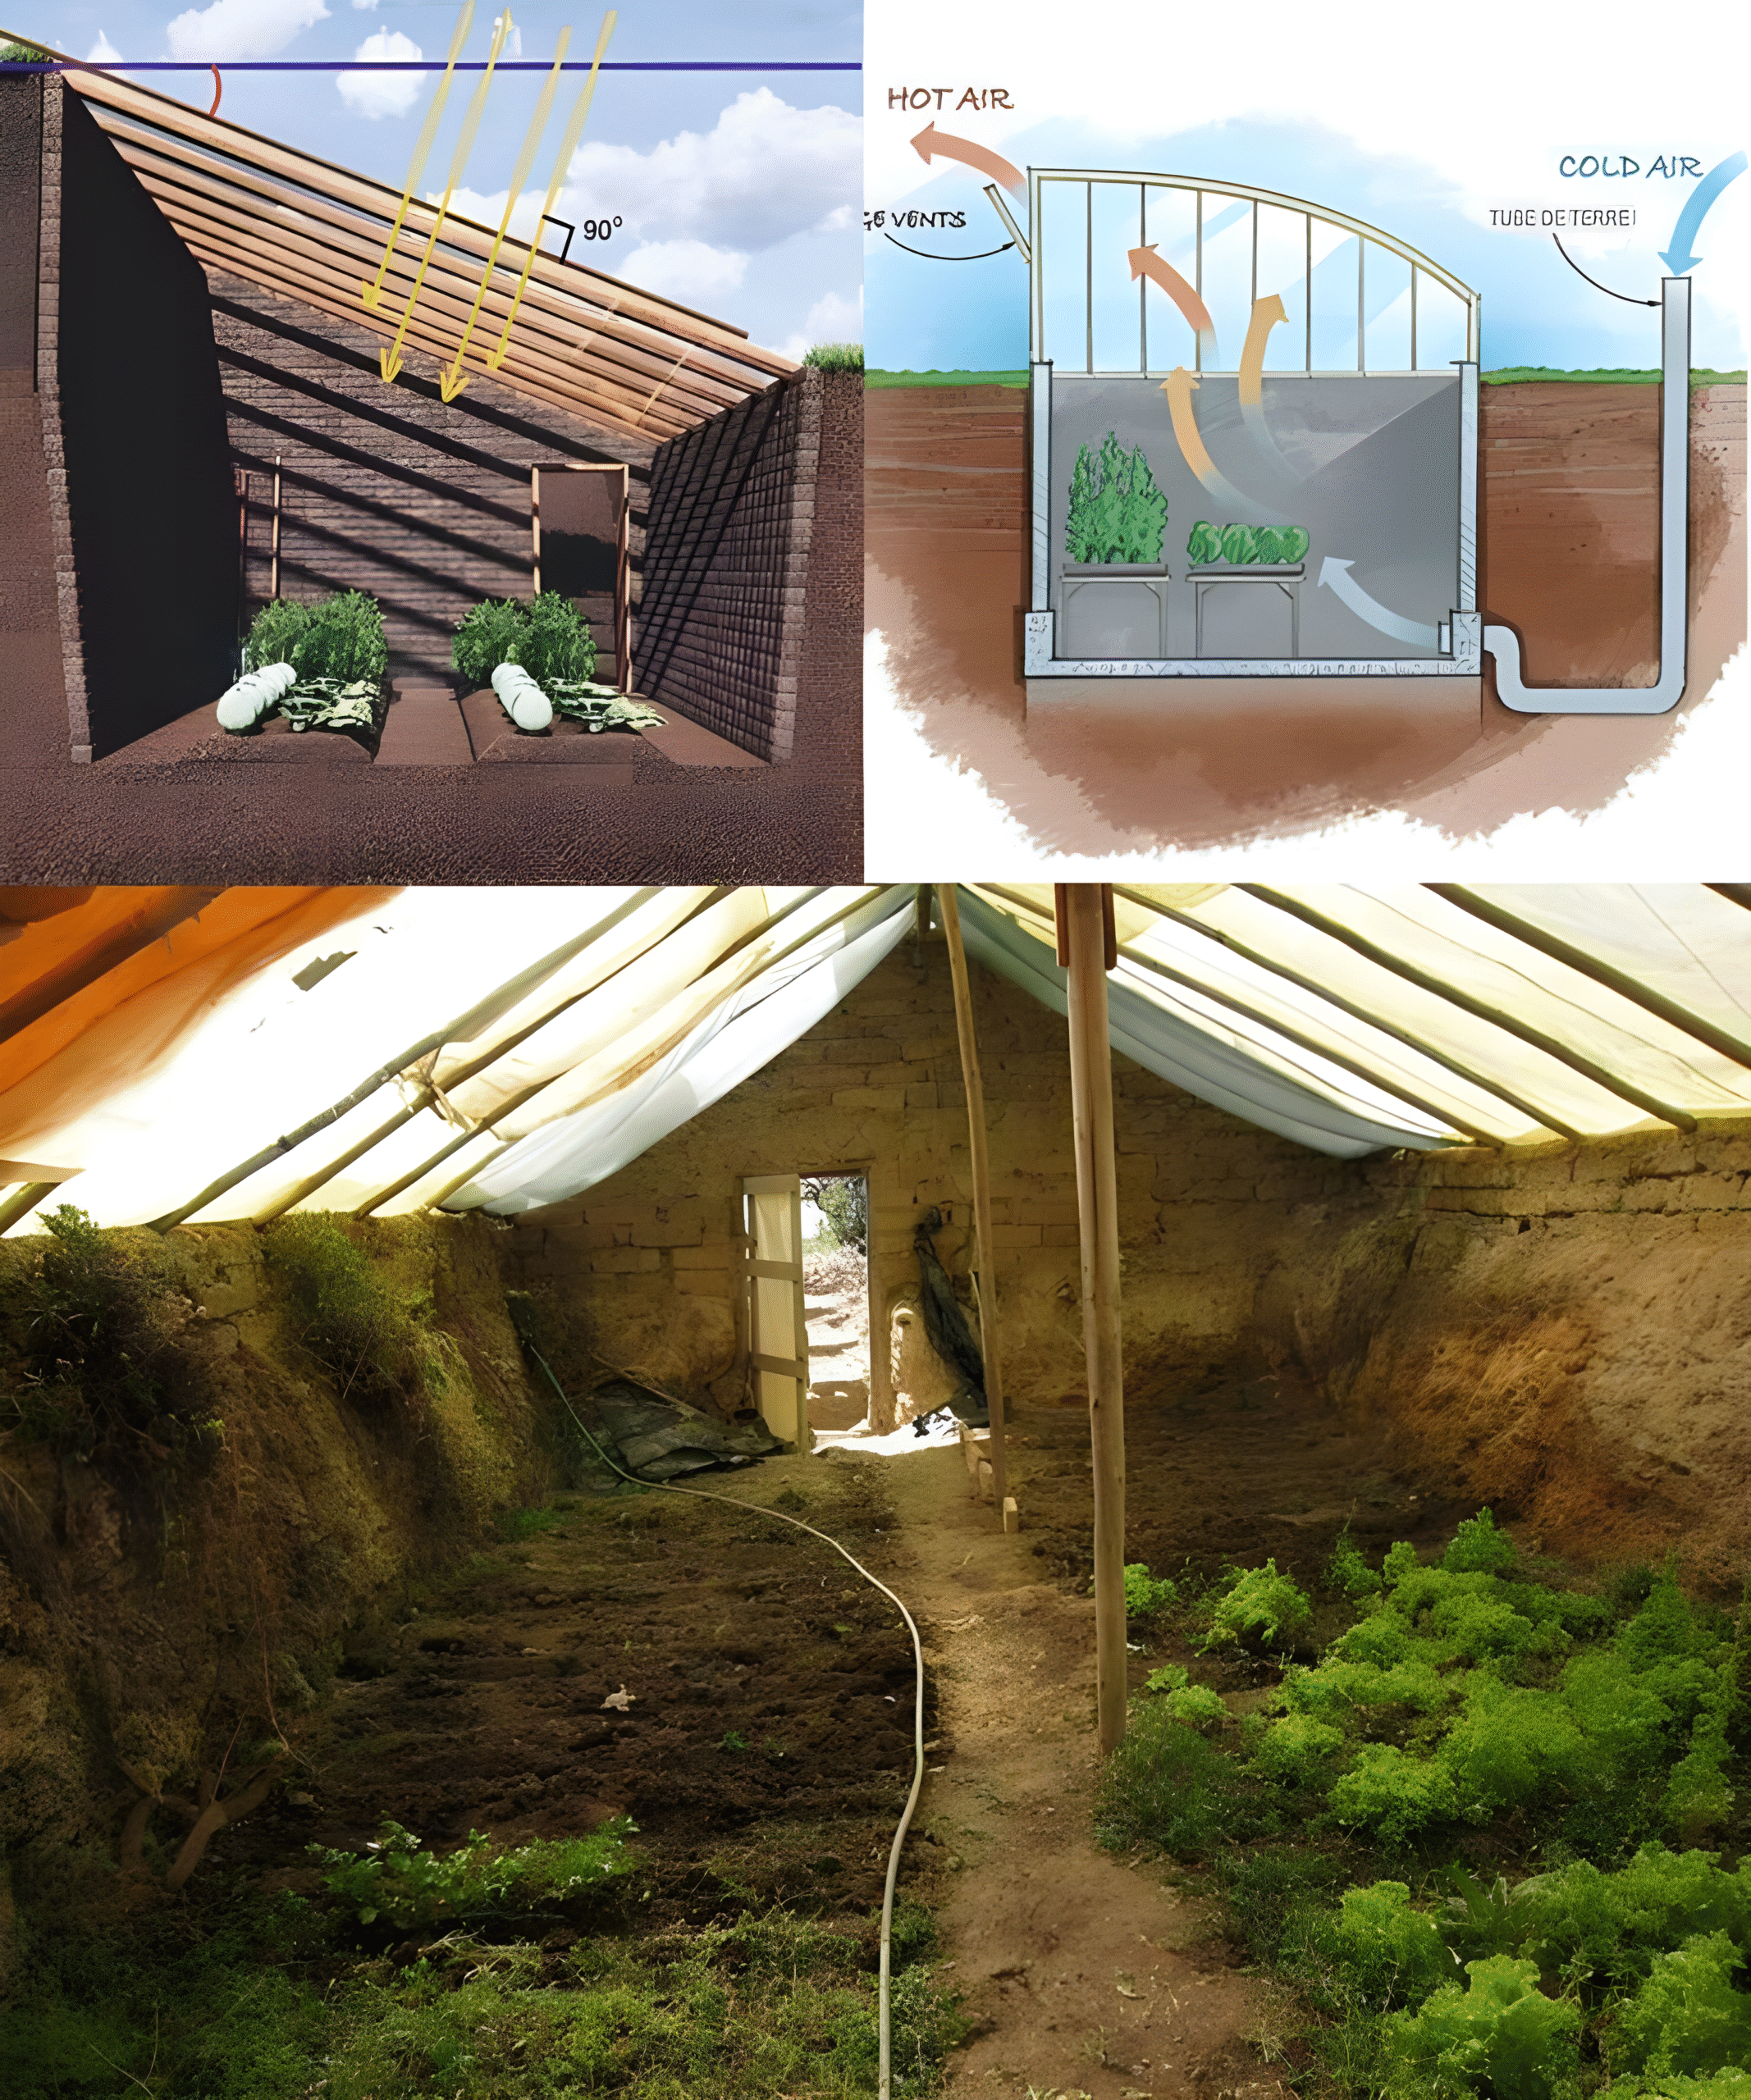
Derived from the Aymara word meaning “place of warmth,” walipinis are underground greenhouses designed to trap solar heat and protect crops from harsh external conditions — including snow, wind, and frost. The stunning example in the image above, complete with diagrams and a functioning interior, showcases how this system works and how it can be replicated by homesteaders, schools, communities, or urban farmers.
Let’s walk through how to build your own walipini, step-by-step, and understand why it’s becoming a cornerstone of sustainable gardening.
🧭 What Is a Walipini?
A walipini is an underground (or partially buried) greenhouse that maintains warm temperatures using thermal mass from the earth and passive solar heating. It’s built by digging a rectangular trench into the earth, installing a transparent, sloped roof, and creating a controlled microclimate below ground level.
Unlike surface greenhouses, walipinis offer:
- Natural insulation from the earth
- Protection from wind and snow
- Stable internal temperatures
- Year-round vegetable growing, even in freezing zones
🌞 How It Works: A Look at the Design
Based on the top-left and top-right diagrams:
- Solar angle optimization: The sloped roof (typically at 90° to winter sun) maximizes heat gain during cold months.
- Earth tube ventilation: Cold air is introduced via underground tubing, creating a circulation loop as warm air rises and escapes through roof vents.
- Thermal mass: The surrounding earth acts as a heat bank, stabilizing interior temperatures between 10°C–21°C (50°F–70°F) year-round.
🧰 Materials You’ll Need
Basic Materials:
- Shovels or excavation equipment
- Wood beams or bamboo (for roof framing)
- Transparent roofing (polycarbonate, greenhouse plastic, recycled windows)
- Earth bags, adobe blocks, or rammed earth (for side walls)
- PVC piping or large tubing (for ventilation system)
- Wood for doors, benches, or planting tables
- Shade cloth or thermal blankets (optional)
🛠️ Step-by-Step: How to Build a Walipini
Step 1: Choose the Right Location
Find a site with:
- Maximum winter sun exposure (south-facing in northern hemisphere)
- Natural wind protection (trees, slopes)
- High ground to avoid flooding
Use a compass or app to align the structure east–west, with the roof slope facing true north (in the southern hemisphere, reverse this).
Step 2: Excavate the Trench
As shown in the real-world photo:
- Dig a rectangular trench at least 6–8 feet deep.
- Typical size: 8 ft x 20 ft for small families; 10 ft x 40 ft for larger production.
- Excavate sloped side walls and flat planting beds.
Retain or repurpose removed soil for berms or side insulation.
Step 3: Build the Retaining Walls
Construct side and end walls using:
- Earthbags
- Adobe blocks
- Rammed earth
- Or wooden retaining boards
The walls should reach at least 2–3 feet above ground on the shaded side (typically south) to enhance warmth and support the sloped roof.
Step 4: Install the Roof Frame
Use strong, rot-resistant beams or bamboo to form a shed-style sloped frame. The slope should be between 35°–60°, depending on latitude, to capture optimal sunlight during winter.
- Cover with UV-stabilized greenhouse plastic, corrugated polycarbonate panels, or salvaged windows.
- Seal well to prevent water leakage.
Optional: Add hinged panels or venting flaps for heat control.
Step 5: Add the Ventilation System
Refer to the airflow diagram (top-right):
- Cold air intake: Bury a long PVC pipe 3–4 feet underground, feeding fresh air from outside into the walipini.
- Hot air exhaust: Install a roof vent or a chimney to allow rising hot air to escape.
This natural convection loop regulates humidity and prevents overheating.
Step 6: Insulate and Waterproof
- Line the base with gravel or sand for drainage.
- Use thermal mass (stone barrels, water jugs, or bricks) inside to absorb and re-radiate heat at night.
- If needed, add plastic sheeting or pond liner beneath the soil to prevent seepage.
Optional: Insulate doorways and add earth berms around the outer walls for extra thermal protection.
Step 7: Prepare the Growing Space
As shown in the interior photo:
- Create raised beds or ground rows
- Add compost-rich soil
- Organize tools, watering systems, and a bench or storage corner
- Install drip irrigation or use hand watering via rain barrels
🌱 Best Crops for Walipinis
Winter:
- Lettuce
- Spinach
- Kale
- Carrots
- Radishes
Year-Round:
- Tomatoes (with supplemental heating)
- Peppers
- Herbs
- Microgreens
- Strawberries
💡 Tips for Success
- Add a second layer of plastic or thermal curtain inside for extreme cold
- Monitor humidity levels to prevent mildew
- Rotate crops and amend soil with compost annually
- Use shade cloth in peak summer to reduce scorching
🧠 Why Build a Walipini?
This low-cost greenhouse can be built with $300–$1,500, depending on size and materials — far cheaper than commercial greenhouses. It can extend growing seasons, provide food independence, and even function as a classroom or therapy space.
In regions like the Andes, Nepal, Mongolia, and northern Canada, walipinis allow families to grow fresh food year-round, even when surface temps drop below freezing.
🌎 Global Impact
Non-profits and permaculture educators have adopted the walipini model to fight hunger and reduce dependence on imports. It’s now used in:
- Refugee camps
- Arctic villages
- Drought-prone regions
- Off-grid homesteads
The adaptability of the design means it can scale from a backyard project to a community farm.
🏁 Conclusion: Going Underground for a Sustainable Future
The walipini proves that some of the best innovations are hidden just below the surface. With simple tools, careful planning, and a willingness to work with nature rather than against it, anyone can transform a patch of dirt into a warm, fertile oasis — 365 days a year.
So whether you’re homesteading in the mountains, prepping for food security, or just dreaming of fresh salad in January, building your own walipini might be the smartest step toward a greener, more resilient future.