Step-by-Step Construction Breakdown for Classic & Modern Eaves — Functional and Aesthetic Solutions for Every Structure
Introduction: Protect Your Roofline with Style and Functionality
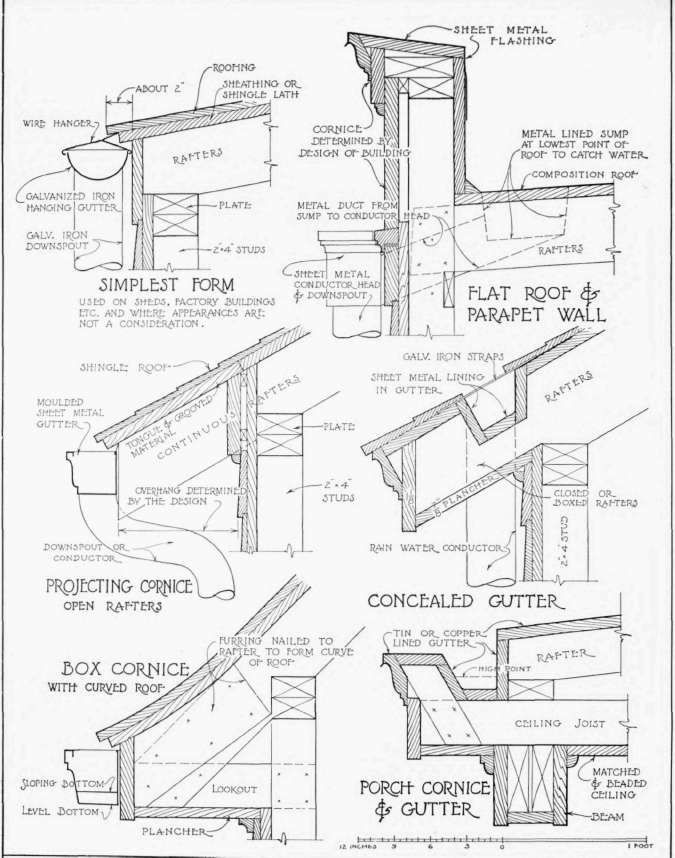
In the world of architecture and construction, the edges of a roof are where design meets durability. A well-constructed cornice and gutter system does more than just direct rainwater—it defines the character of a building, controls moisture, and protects structural integrity. Whether you’re a professional contractor, DIY enthusiast, or architecture student, understanding how to build different cornice and gutter types can transform the quality of your projects.
This detailed guide, inspired by the illustrated construction reference above, walks you through six popular roof edge configurations, their components, and how to build them step by step.
1. Simplest Form: Quick Utility for Basic Builds
This design is commonly found on sheds, factories, and industrial buildings.
Step-by-Step:
- Install Rafters: Fix the rafters to the wall plate on the 2×4 stud wall.
- Add Sheathing or Shingle Lath: Nail onto rafters as roof decking.
- Fix Wire Hangers: Hook and nail galvanized iron wire hangers along the eave edge.
- Hang Gutter: Place the galvanized iron hanging gutter in the hangers.
- Attach Downspout: Connect a galvanized iron downspout to direct rainwater away from the building.
Pro Tip: Keep a minimum 2″ overhang for adequate water runoff.
2. Flat Roof with Parapet Wall: Hidden Drainage for Clean Lines
Often used in urban or commercial buildings.
Step-by-Step:
- Frame the Flat Roof: Use rafters and cover with a composition roof.
- Create a Metal-Lined Sump: This collects rainwater at the roof’s lowest point.
- Install Sheet Metal Flashing: Overlap it with the roof edge and parapet wall for waterproofing.
- Add Conductor Head: Connect a duct from the sump to the sheet metal conductor head.
- Route to Downspout: Run the water through the downspout discreetly.
Pro Tip: Ensure proper slope in the roof to direct water efficiently into the sump.
3. Projecting Cornice with Open Rafters: Traditional Appeal
Perfect for Craftsman-style or rustic homes.
Step-by-Step:
- Build Extended Rafters: Let rafters project out beyond the wall.
- Frame the Overhang: Determine projection based on the architectural design.
- Install Continuous Cornice: Secure cornice board beneath the rafters.
- Fix Gutter System: Use moulded sheet metal and integrate into the overhang.
- Add Downspout: Position directly below gutter outlet for smooth water flow.
Pro Tip: This style works great when the aesthetic of exposed rafters is part of the visual appeal.
4. Concealed Gutter: Hide It, Don’t Sacrifice Function
This type keeps the gutter system invisible for a seamless look.
Step-by-Step:
- Frame Roof and Overhang: Allow enough depth to house the gutter internally.
- Insert Sheet Metal Lining: Inside the wooden gutter box to prevent leaks.
- Secure with Galvanized Iron Straps: Hold the gutter lining in place.
- Close Off Rafters: Use soffit boards to seal and conceal structure.
- Install Rainwater Conductor: Inside wall cavity or along corner to drain.
Pro Tip: Regular maintenance is key here. Hidden gutters require careful monitoring for clogs.
5. Box Cornice with Curved Roof: Sophisticated and Elegant
Used in historical or formal architecture.
Step-by-Step:
- Build Lookout Braces: Extend from wall to support the boxed cornice.
- Install Furring: Nail to rafters and curve them to create the desired profile.
- Apply Roof Sheathing: Fit over curved furring.
- Construct Soffit and Fascia: Use level and sloping bottom boards for boxed effect.
- Integrate Gutter System: Add discreet sheet metal within the cornice if needed.
Pro Tip: Curved forms require precision. Templates can help match curves across the structure.
6. Porch Cornice & Gutter: Elegance for Entryways
A blend of form and function for porches and verandas.
Step-by-Step:
- Frame Rafters and Ceiling Joist: Ensure a slight slope for water flow.
- Install Tin or Copper-Lined Gutter: Built into roof framing to catch runoff.
- Fix High Point Drainage Design: Directs water toward the outer edge.
- Add Matched Ceiling Boards: For a polished underside finish.
- Seal Joints: Use solder or silicone depending on gutter material.
Pro Tip: Copper is corrosion-resistant and visually striking, ideal for long-lasting results.
Construction Tips to Maximize Performance
- Slope is Critical: Ensure a consistent pitch in every gutter system.
- Material Choices: Galvanized iron, copper, or aluminum each have pros and cons. Match with building design and climate.
- Joint Sealing: Prevent leaks by sealing every seam thoroughly.
- Maintenance Access: Hidden systems should include cleanout points.
Final Thoughts
Roof edge details are often overlooked until it’s too late. But when built with skill, cornices and gutters not only protect—they impress. Whether you’re aiming for speed, minimalism, or classic beauty, these six systems provide a solid framework to build from.
Start with the right plan. Use the right materials. And always finish strong.