In the crisp light of a winter morning, a crew gathers around the outline of what will soon become a sturdy foundation for a backyard studio. Their mission: construct a spread-footing foundation—an age-tested method that transfers building loads safely into firm soil. Here’s the step-by-step story of how simple measurements, concrete and a handful of steel bolts combine to deliver a level, long-lasting base.
1. Surveying and Layout
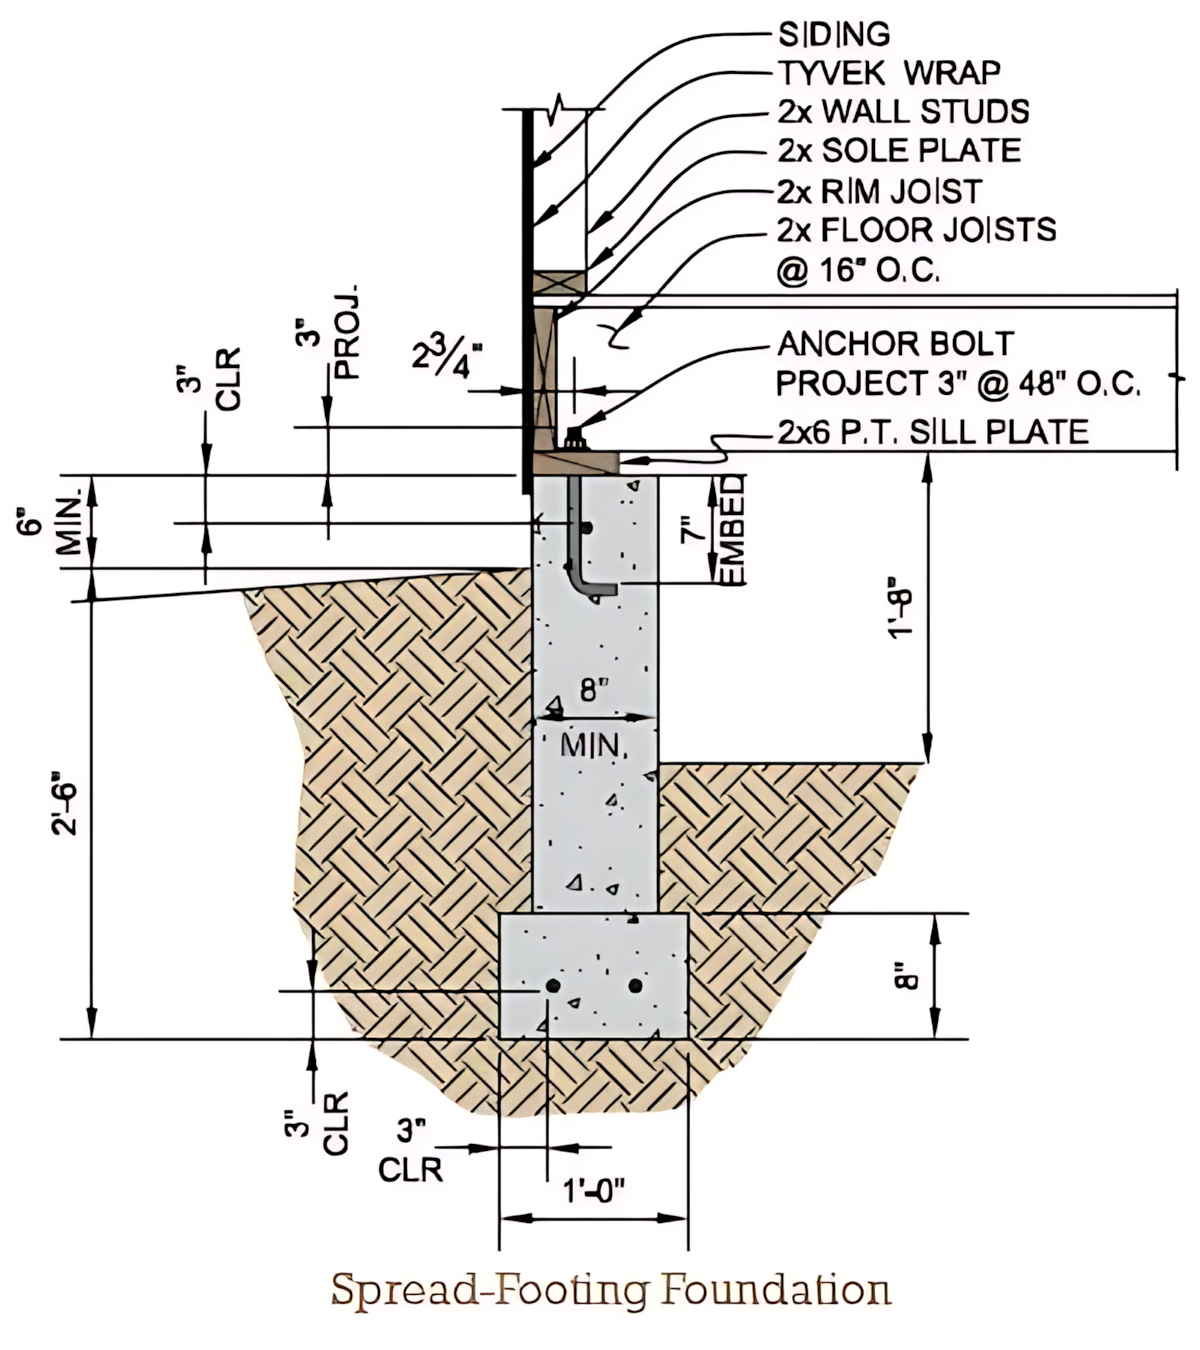
First, surveyors stake out the building corners, marking the exact footprint on the ground. With a builder’s level and string lines, they confirm perfect right angles and uniform dimensions. A 3-inch clearance from future finish grade and a minimum 6-inch space under the sill plate are noted: critical vertical offsets ensuring moisture protection and venting beneath the floor.
2. Excavation to Bearing Strata
Next, backhoe and shovels create a series of deep pits at each footing location. The drawing calls for at least 2 feet 6 inches of soil removal, ensuring the footing sits on undisturbed, load-bearing earth. An additional 8-inch trench is dug for the continuous stem wall, guaranteeing 8 inches of concrete thickness around the sill plate. Excavation teams double-check depths to meet local frost-line requirements.
3. Forming the Footing
With holes and trenches ready, carpenters build timber or steel forms for the 1-foot-wide by 8-inch-thick concrete footing. The bottom of each form is set a minimum of 3 inches from undisturbed soil walls to allow for compaction and drainage. Inside each footing form, two steel anchor bolts are positioned exactly 1 foot apart—these will later secure the pressure-treated sill plate.
4. Pouring Concrete and Embedding Bolts
Concrete trucks arrive as temperatures hover just above freezing. Teams pour high-strength mix into footings first, vibrating gently to remove air pockets. Before the concrete sets, the anchor bolts—each with a 7-inch embedment—are plunged into the wet mix and braced vertically. A quick level check ensures every bolt projects 3 inches above the future sill-plate surface and stands plumb for flawless plate installation.
5. Building the Stem Wall (Spread-Footing Column)
Once the footing has cured, forms are raised to build the vertical spread-footing wall: a continuous 8-inch-thick section that climbs 1 foot 8 inches above the final grade. Reinforcing steel (rebar) is set within, tying footing to wall. Concrete is poured again, creating a solid stem that prevents lateral soil pressure from creeping inward and provides a clean, level bearing surface for the sill plate.
6. Waterproofing and Drainage Prep
With forms stripped, the exterior of the stem wall receives a waterproof membrane—often a polymer-modified asphalt wrap or sheet. A trench around the perimeter is backfilled with free-draining gravel, ensuring water cannot pool against the foundation. A perimeter drain pipe channels any subsurface water away from the structure, protecting both footing and future floor.
7. Setting the P.T. Sill Plate
Pressure-treated 2×6 sill plates are cut precisely to length, with pre-drilled holes matching the embedded anchor bolts below. Carpenters slide the plate over the bolts—each gooseneck washer and nut tightened to specification, pulling the plate snug against the concrete. A 2¾-inch clearance to the interior sole plate is maintained to avoid rot and allow sealant. Tyvek wrap and sealant caulk the joint, preventing moisture wicking up into the framing.
8. Framing Floor Joists and Rim Joist
On top of the sill plate, carpenters install a double rim joist of 2×8 lumber, then brace and square it. The subfloor system is laid out next: 2× floor joists at 16-inch on-center spacing span the width, their ends seated into joist hangers anchored to the rim. Blocking between joists adds stiffness and prevents twisting. At this stage, a continuous vapour barrier may be unrolled across the joists if required by local code.
9. Sole Plate and Wall Studs
Inside the rim, a 2× sole plate is fastened down, aligned exactly above the sill plate. Wall studs—2×4 or 2×6 depending on design—are nailed at 16-inch centers into the sole and top plates. Openings for windows and doors are framed with doubled king studs and jack studs supporting headers. The Tyvek wrap, previously draped over the sill, is now pulled up and stapled to the walls, creating a continuous weather-resistive barrier.
10. Final Grading and Ventilation
Before backfilling, the ground level is sloped away from the foundation at a minimum 3-inch drop over 3 feet. This prevents water from pooling against the wall. Vents in the stem wall are cut to provide at least 6 inches of clearance under the floor, promoting air flow to inhibit mold and rot. Gravel fill is compacted in lifts, never exceeding 4 inches at a time, ensuring long-term stability.
Why It Matters:
A properly built spread-footing foundation anchors any small structure—studios, garden offices, or cottages—against ground movement, frost heaving and moisture intrusion. By following precise excavations, forming, pouring, waterproofing, and framing sequences, DIYers and contractors alike create a reliable base that will support walls, floors and roofs for generations.
Builder’s Tip:
Always verify local frost-depth requirements and soil-bearing capacities before digging. Use data from a geotechnical report when available. Missing these critical steps can lead to settling, cracking or structural failure.
With clear layouts, careful concrete work, and meticulous plate alignment, a spread-footing foundation transforms from blueprint into rock-steady reality—one scoop of dirt and one pour of concrete at a time.