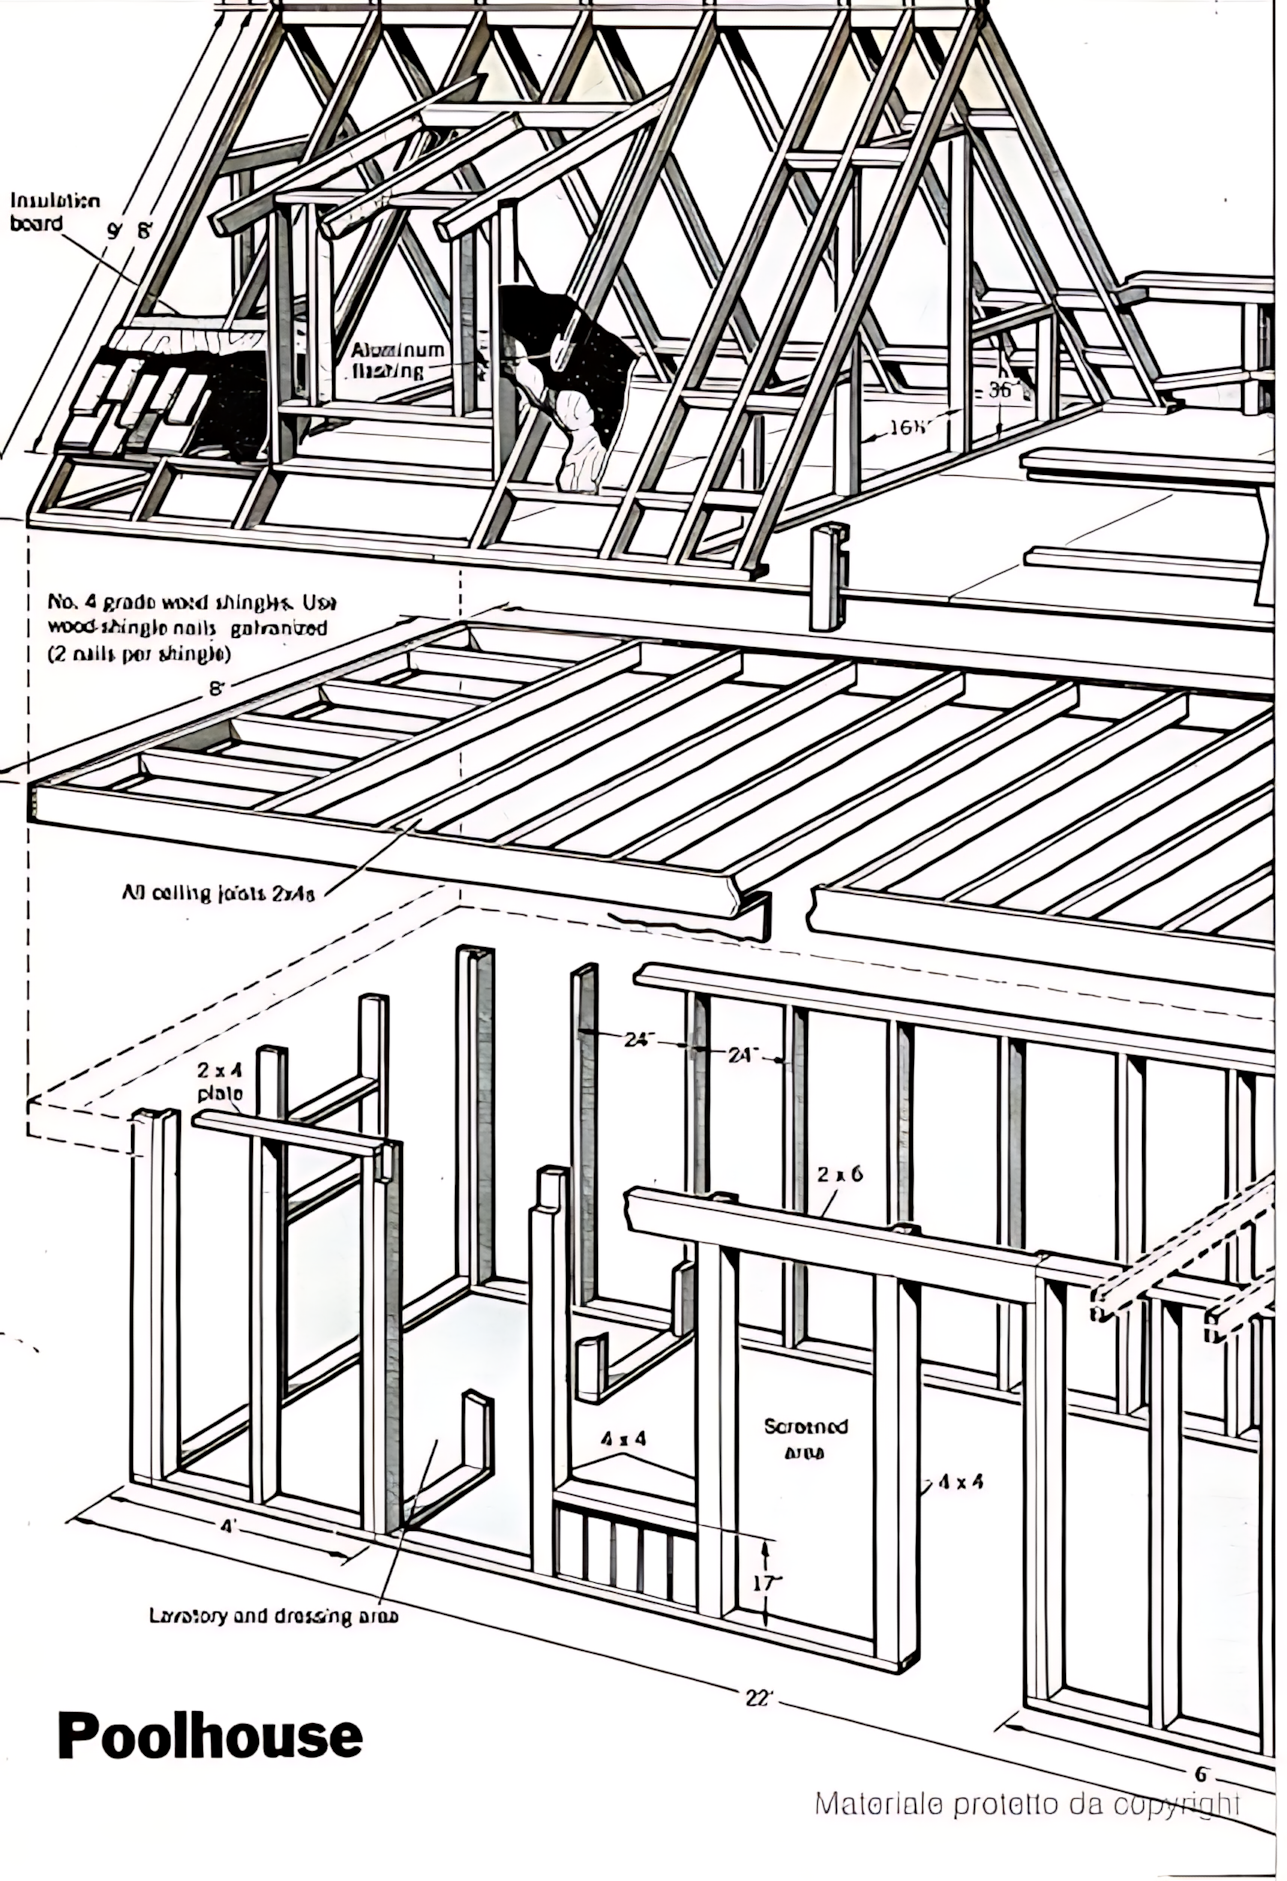
1. Laying Out the Footprint
On a sunny morning, the crew snaps chalk lines on the level soil for a 22-by-6-foot slab, marking the “laundry and dressing area” zone at one end. Batter-boards and taut strings confirm perfect right angles at every corner, ensuring the poolhouse will sit true alongside the pool’s edge.
2. Installing the Stem Walls and Floor Frame
Concrete stem walls—8 inches thick—are poured into pre-built forms to rise just above finished grade. Once cured, builders bolt down pressure-treated 2×4 sill plates, carefully aligning them with the chalk lines. Between the sill and the center beam, 2×8 floor joists are installed at 24-inch centers, their ends housed in metal hangers for a rock-solid platform.
3. Framing the Interior Walls
From the floor deck up, 2×4 studs are placed at 24-inch centers. At the laundry/dressing end, a short knee wall defines the entry and creates a cozy alcove. Openings for windows and a sliding door are framed with doubled header beams and jack studs, per the plan’s “screened area” detail that will follow in the next phase.
4. Building the A-Frame Roof Assembly
Above the main room, a classic A-frame takes shape: pairs of 2×6 rafters meet at a center ridge beam—set precisely 8 feet above the floor. Each rafter is nailed in place and braced with temporary cross-ties. The plan calls for eight evenly spaced rafters on each side, creating 36-inch-wide bays that will host ceiling joists and shingles.
5. Installing Ceiling Joists for Strength
To resist outward thrust, 2×8 ceiling joists are run between opposing rafters at roughly 24 inches on center. These joists tie the rafters into a stiff box and also serve as the future loft floor support. Metal hurricane ties secure each rafter heel back into the top plates, meeting code for uplift resistance.
6. Sheathing the Roof and Walls
With framing completed, 5⁄8-inch OSB roof sheathing is laid across the rafters, its edges glued and ring-shank-nailed tight. Walls receive 7⁄16-inch OSB sheathing, cut around openings and fastened into studs. This continuous layer braces the frame and readies it for moisture protection.
7. Adding Insulation and Rough-Ins
Before siding and roofing, contractors tuck R-13 batts between the wall studs and blow in loose-fill insulation over the ceiling joists. Electricians and plumbers rough-in conduit, outlets and drain lines in the dressing/laundry zone, pulling cables through drilled holes in the studs.
8. Extending the Screened Porch Section
At the opposite end, three bays remain open for a screened porch. Here, 2×4 posts are framed between floor and ceiling plates, spaced per the “screened area” detail. Narrow lattice strip stops and bottom rails are installed to receive insect-screen panels later, creating a breezy retreat.
9. Setting the Ridge and Eave Flashings
Once shingles cover the roof, aluminum ridge caps and eave drip edges are fitted to shed water. Builders install self-adhering peel-and-stick flashing at all wall-roof intersections, ensuring the poolhouse stays dry even in heavy summer downpours.
10. Finishing Touches and Trim
Exterior trim—pine furring around openings, corner boards, fascia and soffit panels—is cut to fit and painted. Screen frames slip into their stops and are secured with discreet screws. Finally, the laundry wall receives a sliding barn-style door, and the dressing area a pair of hinged doors for easy pool access.
Why It Works:
By marrying straightforward post-and-beam framing with strategic insulation, sheathing and screening details, this poolhouse shell goes from bare ground to a functional, code-compliant retreat in under a week. The raised A-frame ceiling invites cool breezes; the screened porch keeps bugs at bay; and the dressing/laundry zone keeps wet gear out of the main house—delivering a true poolside oasis.
Hello my loved one! I wish to say that this post is amazing, great written and include approximately all significant infos. I would like to peer extra posts like this . http://www.kayswell.com