In cutting-edge building practice, every junction—from concrete floor to wall cladding—must manage air, vapor and moisture with surgical precision. On a recent custom home project, our crew walked us through the installation of a “perfect wall” detail that marries subsurface insulation, taped air barriers, a self-adhering weather-resistive barrier and a ventilated rainscreen. Here’s the play‐by‐play:
1. Laying EPS Subslab Insulation
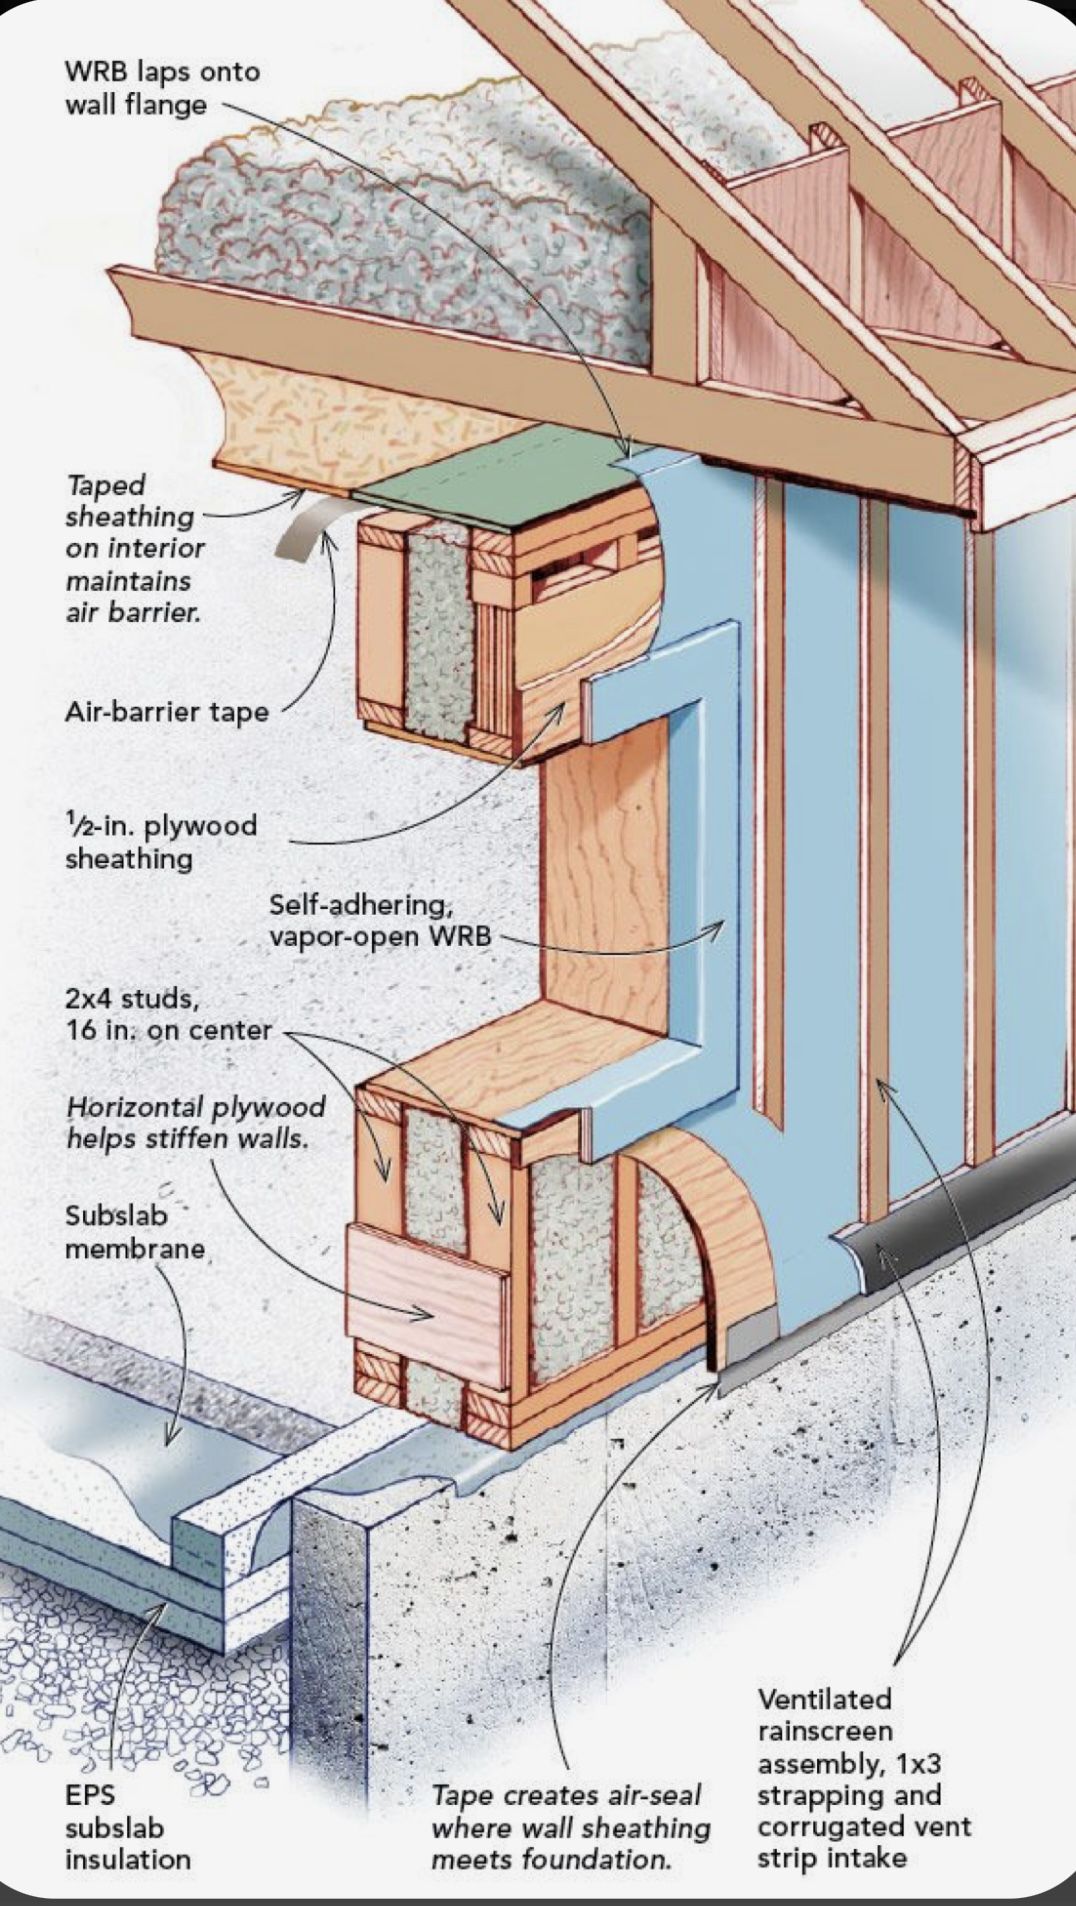
Before pouring the slab, crews roll out rigid extruded-polystyrene (EPS) panels across compacted gravel. This continuous layer beneath the 4″ concrete slab not only boosts R-value at the floor but also isolates slab moisture from the footing. Edges are tightly butted and seams sealed with tape to prevent thermal bridging.
2. Establishing the Interior Air Barrier
With the slab set, framers fasten ½″ plywood or OSB sheathing on the interior face of studs. All panel seams, corners and penetrations receive high-performance air-barrier tape, creating a continuous seal. This taped sheathing serves as the primary air barrier, blocking inward and outward air leaks.
3. Installing the Self-Adhering, Vapor-Open WRB
Outside the sheathing, carpenters roll out a peel-and-stick, vapor-open weather-resistive barrier (WRB). The bottom edge is tucked over the concrete wall flange and sealed with flashing tape, ensuring any moisture hitting the WRB drains harmlessly onto the slab edge or into the rainscreen cavity. Vertical WRB laps stack shingle-fashion to shed water.
4. Taping and Sealing Wall-to-Foundation Joint
At the critical wall-to-foundation seam, crews apply a generous strip of air-barrier tape where the interior sheathing meets the concrete. This prevents any air path around the sill plate and guarantees that the interior air barrier links seamlessly to the slab edge.
5. Attaching Vertical Strapping for Rainscreen
Over the cured WRB, 1×3 or 1×4 pine furring strips are fastened vertically into the studs. These strapping members create a uniform ¾″–1″ air gap behind the siding, enabling moisture that penetrates the cladding to drain down and evaporate, rather than becoming trapped against the wall.
6. Adding Corrugated Vent Strip at the Base
Along the sill, a corrugated plastic vent strip is installed on top of the furring strips. Its undulating profile admits outside air into the bottom of the rainscreen cavity while keeping out insects and debris. This intake vent pairs with upper vents (at soffits or eaves) to drive a continuous convective airflow.
7. Sheathing the Exterior with Horizontal Plywood Bracing
To stiffen the wall and resist racking, crews nail horizontal plywood blocking between stud bays at mid-height. These boards also serve as solid backing for attaching heavy cladding options. Their seams are taped against the WRB, maintaining the integrity of the drainage layer.
8. Sealing Around Penetrations and Edges
Every window flange, utility chase and framing member that punctures the WRB is meticulously flashed with self-adhering tape. Overlaps are at least 2″ and turned into the rainscreen cavity to channel water out—never in.
9. Final Checks and Cladding Ready
A laser level verifies that all furring strips are plumb and co-planar. Any stray fastener heads on the WRB are re-sealed. With the system fully detailed, siding crews can proceed—securely nailing through the furring strips without compromising the air or moisture barriers beneath.
Takeaway:
By combining subsurface insulation, interior taped sheathing, a vapor-open WRB, and a ventilated rainscreen gap, this assembly tackles thermal, air and moisture control in one elegant package. Each layer—EPS, air-sealing tape, self-adhering WRB, furring and vent strip—works in concert to deliver a wall that stays dry, energy-efficient and durable for decades.