By: Sustainable Living News | August 5, 2025
In the face of water shortages, climate shifts, and a renewed interest in homegrown food, gardeners across the world are turning to innovation beneath the soil — quite literally. The self-watering garden bed, shown in the diagram and photos above, is one of the most transformative upgrades for home gardening. It saves time, conserves water, improves yields, and drastically reduces maintenance.
Gone are the days of twice-daily watering, wilting plants during summer vacations, or inconsistent hydration. This underground water-reservoir system keeps your vegetables hydrated from the roots up — just as nature intended.
If you’ve ever wanted a set-it-and-forget-it garden system that virtually runs on autopilot, this one’s for you.
🌿 What Is a Self-Watering Garden Bed?
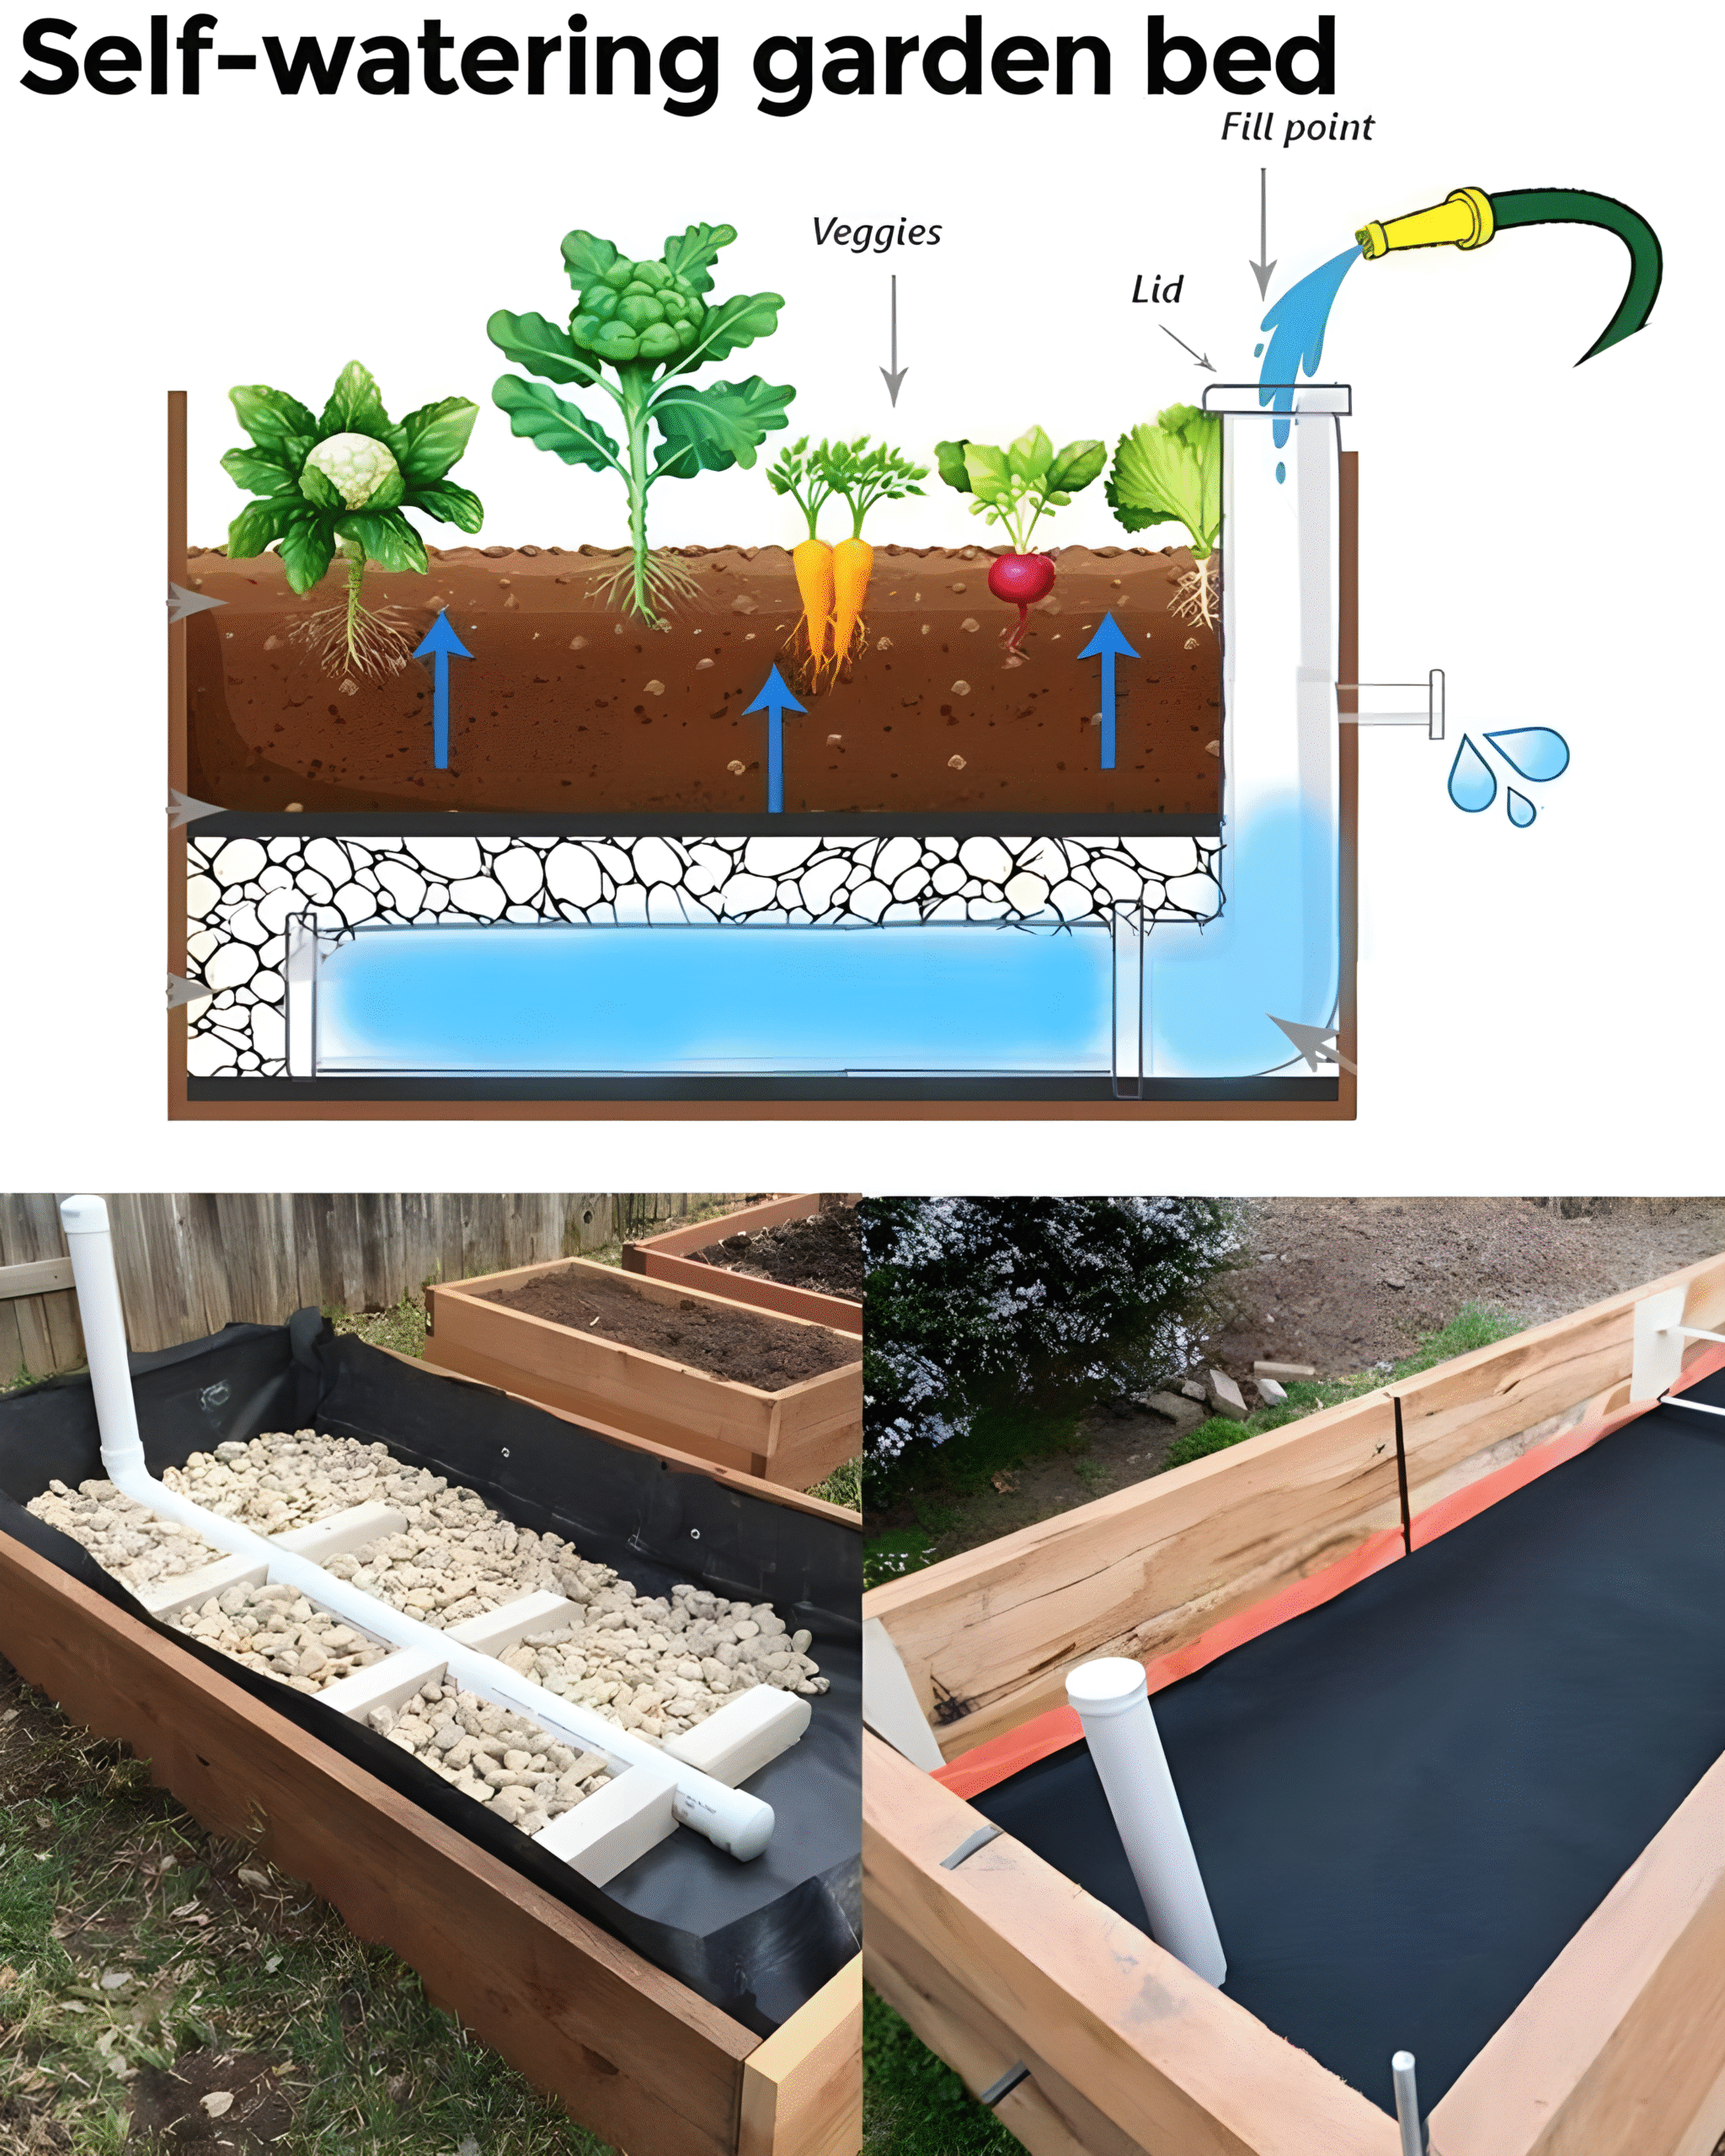
A self-watering raised bed, also called a sub-irrigated planter, is a gardening setup where water is stored in a reservoir at the bottom of the bed and drawn upward through capillary action. The plants “drink” from below as needed, ensuring consistent soil moisture without surface evaporation or waste.
💧 Why It Works So Well
- Water Conservation: Uses 40–70% less water than traditional beds.
- Less Frequent Watering: Refill every few days or even once a week.
- Healthier Roots: Promotes deep root growth and prevents overwatering.
- No Runoff or Soil Erosion: Keeps nutrients in place.
- Perfect for Veggies: Especially helpful for root crops, leafy greens, and herbs.
🧰 Materials You’ll Need
From the images, the setup includes both wooden framing and a water-holding layer underneath. Here’s a list of everything you’ll need:
Structure
- Wooden planks (for the raised bed walls)
- Screws, drill, brackets
Water Reservoir
- Pond liner or durable plastic sheeting (waterproof)
- PVC pipes (2”–4” diameter) for fill tube and air vent
- Drainage pipe with perforations (or a network like shown in lower left image)
- Landscape fabric
- Coarse gravel or drainage rock
Other
- Soil mix (topsoil + compost + coconut coir or peat)
- Plants or seeds
- Hose or watering can
🛠️ Step-by-Step Construction Guide
Step 1: Build the Raised Bed Frame
As seen in the images, construct a solid wooden rectangle using untreated lumber (safe for food). Typical size: 4 ft x 8 ft x 18 inches deep.
- Ensure the frame is square and level.
- Anchor it securely to the ground if needed.
Step 2: Line the Bottom with Pond Liner
Using pond liner or a heavy-duty plastic sheet, line the entire bottom and sides of the bed.
- This creates a sealed reservoir to hold water.
- Make sure to fold the corners and staple the liner snugly along the edges (seen in both bottom images).
- Leave 3–5 extra inches of liner above soil level to prevent leaks.
Step 3: Install the Water Reservoir System
This is the heart of the bed. It includes:
- A fill pipe
- Perforated drainage pipe (or a similar T-system) as in the lower left photo
- A gravel layer
Here’s how to do it:
- Lay down your perforated pipe system flat at the bottom — this distributes water throughout the bed.
- At one end, install a vertical PVC fill pipe (as shown) to pour water into.
- Add a small overflow hole a few inches above the base to allow excess water to drain — preventing rot.
- Fill the base with gravel or small stones, surrounding the pipe system. This layer should be about 4–6 inches deep.
Step 4: Add a Layer of Landscape Fabric
Place landscape fabric over the gravel layer.
- This prevents the soil from filtering down and clogging the reservoir.
- Cut slits for the fill pipe and overflow spout to protrude.
Step 5: Add Your Soil
Now add your planting soil — a mix of topsoil, compost, and coconut coir or peat moss works well.
- Fill until just below the top edge of the bed.
- Don’t compact too tightly — keep soil fluffy for capillary action.
Step 6: Plant Your Veggies
Now it’s time to bring life to your bed!
Great crops for self-watering beds:
- Lettuce, kale, spinach
- Carrots, radishes, beets
- Tomatoes, peppers
- Herbs like basil, oregano, and cilantro
Plant your veggies as usual and water the surface the first time to help roots establish.
Step 7: Fill the Reservoir
Using a garden hose or watering can:
- Fill the PVC pipe until water begins to drip from the overflow hole.
- This means the reservoir is full.
From now on, water will wick upward naturally, keeping your soil consistently moist.
🧼 Maintenance Tips
- Check water level every few days — top off as needed.
- Clear debris from the fill tube to prevent clogging.
- Flush the system at season’s end with vinegar or a hose to clean buildup.
🧪 Pro Tips for Better Performance
- Add a moisture indicator stick to monitor soil hydration.
- Paint or cover the fill tube to prevent algae growth.
- Mulch the topsoil to further reduce evaporation.
🌱 Real-World Results
Gardeners using this method report:
- 25–40% faster plant growth
- Fewer weeds
- Minimal water loss even during heatwaves
- Higher yields from thirsty crops like tomatoes and cucumbers
Families, schools, and even community gardens have begun implementing self-watering beds to ensure food security, especially in dry or urban environments.
🧠 Why It’s Ideal for Beginners
If you forget to water, travel frequently, or live in a dry region — this system takes away the stress. With a well-maintained bed, even weekly watering can be enough, allowing you to focus more on harvesting and less on maintenance.
🏁 Conclusion: The Future of Raised Bed Gardening
The self-watering garden bed is more than just a clever trick — it’s a leap forward in water-smart agriculture. By building a reservoir under your soil, you create a self-sustaining system that helps plants thrive while cutting down on effort, waste, and cost.
As climate change challenges how we grow food, systems like this empower us to grow smarter, not harder — one drop at a time.