By: Structural Carpentry News | August 5, 2025
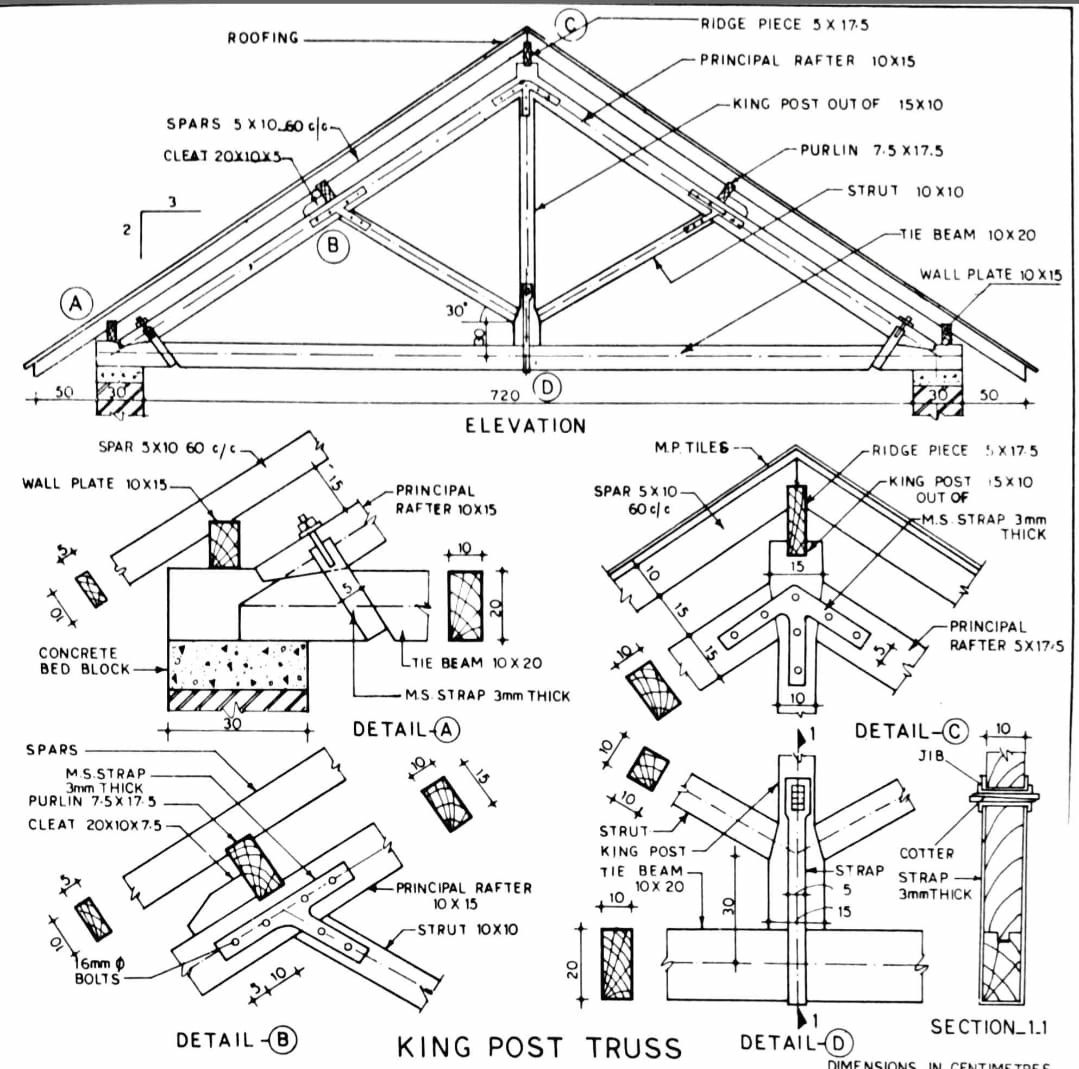
In timber framing, the king post truss stands out as a model of simplicity, strength, and elegance. Its clean lines and straightforward geometry have supported roofs from medieval halls to modern garden pavilions. The blueprint above—a fully dimensioned king post truss design—lays out every member: principal rafters, tie beam, king post, struts, purlin, collar, and spars. In this comprehensive, news-style guide, we’ll walk you through each critical step—from laying out your timbers to raising the finished truss—so you can master this classic roof system yourself.
Why the King Post Truss?
- Minimal Members: Just seven main elements—easy to source and cut.
- Efficient Span: Spans up to 7.2 m (720 cm) without intermediate supports.
- Elegant Profile: Central king post (15×10 cm) acts as both tension rod and ridge support.
- Historic Provenance: Time-tested in cottages, barns, and great halls for centuries.
Step 1: Gather Materials & Tools
Timber (all dimensions in cm):
- Principal Rafters: 10×15
- Tie Beam (Catenary): 10×20
- King Post: 15×10
- Struts: 10×10
- Purlin: 7.5×17.5
- Collar (Cleat): 20×10×5
- Spars: 5×10, at 60 cm centers
Hardware & Fasteners:
- M.S. steel strap, 3 mm thick, at all critical joints
- 16 mm steel bolts with washers and nuts for principal connections
- M.S. cotter and strap at ridge
Tools:
- Tape measure and chalk line
- Carpenter’s square & sliding bevel set to 30° roof pitch
- Circular saw or handsaw, chisel set
- Auger or spade bit for bolt holes
- Drill and driver
- Lifting tackle or gin pole for raising
Step 2: Full-Scale Layout & Marking
- Establish the Span
On your shop floor, snap a chalk line at 720 cm to represent the finished tie beam length between wall plates. - Find the Center
Mark the midpoint (360 cm) for the king post location. - Set the Roof Pitch
Your blueprint calls for a 30° pitch. Use a sliding bevel at 30° to strike plumb and level lines from both ends and the center, guiding your rafter and king post cuts.
Step 3: Prepare the Tie Beam (10×20 cm)
- Cut to Length
Crosscut the tie beam to exactly 720 cm, square at both ends. - Drill King Post Mortise or Bolt Hole
At center, drill a 16 mm hole through the beam for the king post bolt (see Detail D). Place it flush with the top face so the post sits neatly atop. - Mark Strut Seats
From center, measure out to where your struts meet (as shown in the elevation). Mark and chop 30° seats on each face for the 10×10 cm struts.
Step 4: Cut the Principal Rafters (10×15 cm)
- Rafter Length & Heel Cuts
Measure from the underside of the ridge cut down to the bird’s-mouth seat on the tie beam. Mark and plumb-cut the heel at 30°, creating a level bed and a cheek that sits flush against the tie beam’s top corner. - Ridge Plumb Cut
At the top end, plumb-cut both faces so the two rafters meet squarely at the ridge. - Drill Bolt Holes for Straps
In each rafter near the heel and strut location, drill 16 mm holes to match the bolt-and-strap connections in Detail B.
Step 5: Fabricate the King Post (15×10 cm)
- Cut King Post to Height
From layout, the king post spans from the tie beam to the ridge. Cut it to length plus allowance for the ridge strap. - Prepare the Ridge Connection
At the top, drill a vertical 16 mm hole for the ridge bolt. Under the hole, notch a shallow seat for the ridge piece (5×17.5 cm), as shown in Detail C. - Bolt Hole for Tie Beam
Drill a matching 16 mm hole near the base to secure to the tie beam with a through-bolt and strap.
Step 6: Shape the Struts (10×10 cm)
- Determine Length & Angle
Each strut connects from the rafter-strut intersection down to the tie beam seat. Use the baseline angles (30° pitch, θ or α from details) to chop accurate bevels at both ends. - Drill Attachment Holes
In both ends, drill 16 mm holes for through-bolts with M.S. straps per Detail B.
Step 7: Cut and Fit the Collar Tie & Purlin
- Collar Tie (Cleat 20×10×5 cm)
This cleat ties the two principal rafters just above the struts. Drill matching bolt holes and seat it with a slight recess in each rafter. - Purlin (7.5×17.5 cm)
Situated midway, it carries the roof “spars.” Notch the rafters at this point and bolt through with 3 mm M.S. straps.
Step 8: Dry Assembly on the Ground
- Assemble the Truss
Lay out the tie beam on saw horses. Bolt the king post into its center hole. Mount each principal rafter onto the king post and tie beam using bolts and M.S. straps at Details C and D. - Attach Struts and Collar
Bolt in the struts at their notches on the tie beam and rafters (Detail B). Fit the collar cleat, ensuring all members are flush and square. - Install Purlin and Spar Cleats
Bolt on the purlin and fit the 20×10 cleats at 60 cm spacing for the roof deck. - Check Geometry
Use a level and square to verify the ridge is true, the base is level, and all joints are tight with no binding.
Step 9: Raising the Truss
- Rig the Lifting Point
Attach a gin pole or chain hoist at the ridge-piece bolt. - Hoist into Place
With helpers guiding the rafter tips, lift the truss upright until rafter heels seat neatly onto the wall plates, 50 cm back from the masonry face. - Secure Heels
Through-bolt or nail the principal rafters into the 10×15 cm wall plate, using M.S. straps as shown in Detail A.
Step 10: Final Tie-In & Roof Decking
- Lock Down Tie Beam
Bolt the tie beam into its concrete bearing blocks below, preventing any outward thrust on the walls (Detail A). - Fit Roof Spars
Nail 5×10 cm spars at 60 cm centers across the purlin and rafters to form the roof deck. - Install Roofing
Lay your chosen roof covering—tiles, shingles, or metal—and finish at the ridge with the ridge piece (5×17.5 cm), locked down with an M.S. cotter strap (Detail C).
Maintenance Tips
- Annual Bolt Check: Retorque all 16 mm bolts and inspect 3 mm straps for corrosion.
- Wood Treatment: Seal all cut ends and bolt holes with exterior wood preservative.
- Moisture Control: Ensure adequate attic ventilation above the collar tie to ward off condensation.
By meticulously following these ten steps—from full-scale layout and precise cutting to robust bolted connections and careful erection—you’ll build a king post truss that’s not only structurally sound for spans up to 7.2 m but also carries forward a legacy of carpentry craftsmanship. Whether for a rustic barn, garden pavilion, or workshop, this classic truss will elevate your build—literally and figuratively—for decades to come.