By: Rural Living News | August 5, 2025
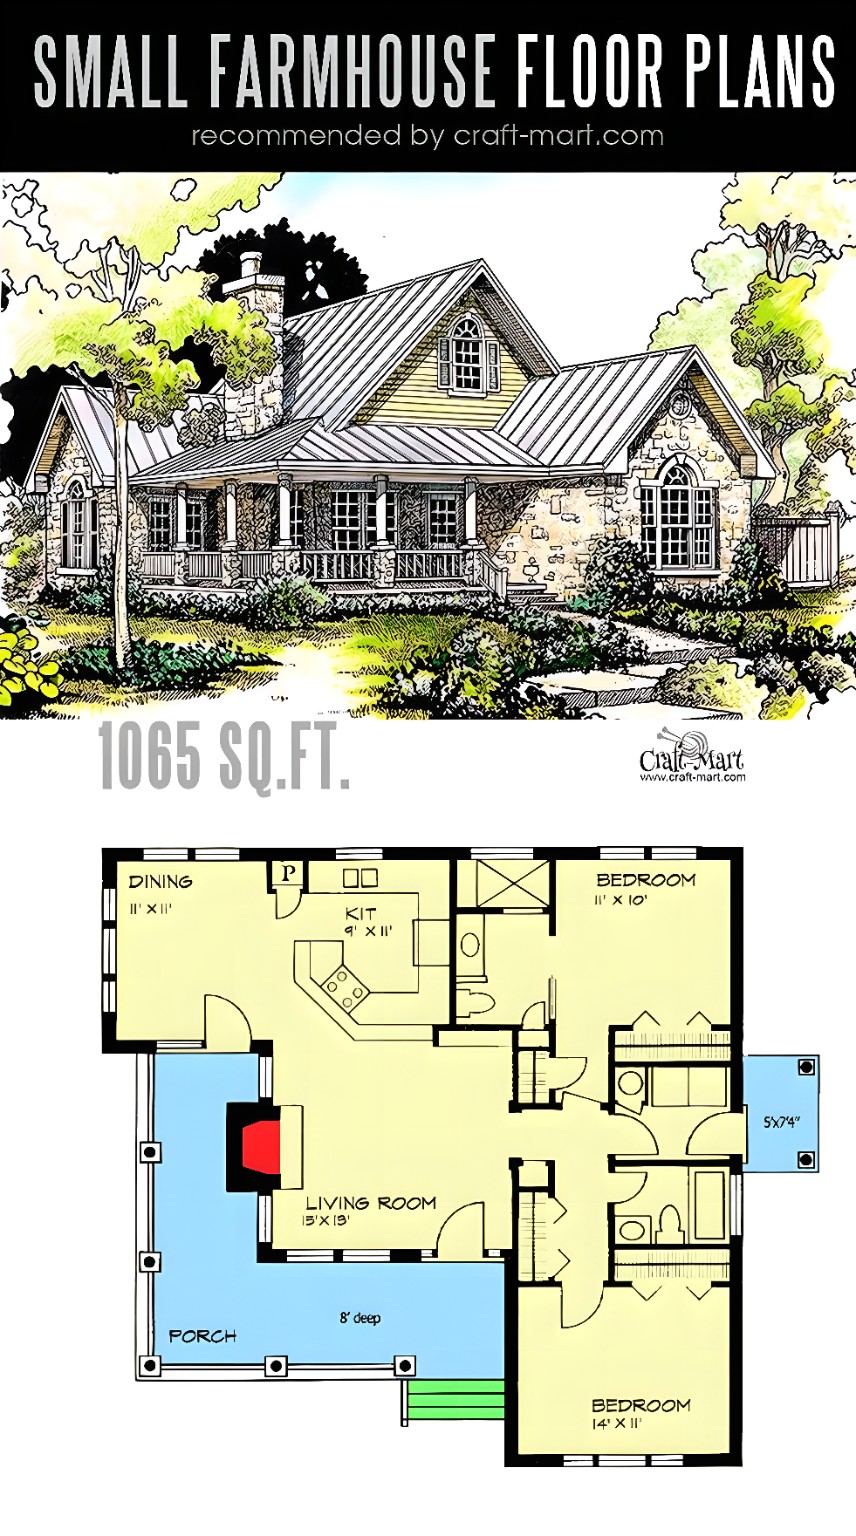
In an age where minimalist living meets rustic charm, small farmhouses are enjoying a renaissance. Craft-Mart’s 1,065 sq ft “Small Farmhouse” plan offers a perfect blend of cozy comfort and efficient design—featuring two bedrooms, two baths, an open living area, and a wrap-around porch that invites you outdoors. Whether you’re a seasoned builder or an ambitious DIYer, this step-by-step guide will walk you through turning that rendered plan into your very own haven.
Step 1: Site Preparation & Foundation Layout
- Select Your Site
- Choose level ground with good drainage and a southern exposure for maximum daylight.
- Clear away brush, rocks, and topsoil to reach firm subgrade.
- Stake Out the Footprint
- The plan measures roughly 30 ft by 36 ft (plus porch).
- Drive stakes at each corner, then snap chalk lines between them.
- Excavate & Install Footings
- Dig trenches for continuous footings—12 in deep by 16 in wide.
- Pour concrete footings below frost line (check local code), embed anchor bolts every 4 ft.
Step 2: Foundation & Floor System
- Build Stem Walls or Pier Blocks
- For crawlspace: form and pour stem walls to a 16 in height above grade.
- For slab-on-grade: compact gravel, install vapor barrier, lay rebar grid, and pour slab.
- Install Sill Plates
- Anchor pressure-treated 2×6 sill plates to footings using the embedded bolts.
- Seal between concrete and wood with insect-resistant sill seal.
- Lay Floor Joists
- For a raised floor: set 2×10 joists at 16 in OC across the sill plates.
- Install rim joists, then secure ¾ in subfloor plywood with ring-shank nails.
Step 3: Framing Walls & Windows
- Frame Exterior Walls
- Build 2×6 stud walls on the ground, 16 in OC, with double top plates.
- Cut out openings for three south-facing windows in the living room and smaller windows in the bedrooms.
- Erect and Brace
- Raise walls in sequence, plumb and temporarily brace each.
- Nail the bottom plate to the floor and the top plate to a ledger or gable end.
- Rough-In Window Headers
- Use engineered lumber or double 2×10 headers above each opening, supporting with jack studs.
Step 4: Roof Framing & Porch Structure
- Install Ridge Beam & Rafters
- Center a 2×12 ridge beam along the house’s length, supported at gable ends or by a center post.
- Cut 2×10 common rafters at a 30° pitch (per the rendering), seat into bird’s-mouth cuts on wall plates, and nail to the ridge beam.
- Frame the Porch Roof
- Extend rafters 8 ft beyond the living room wall.
- Support the overhang with 4×4 posts and a ledger attached to the main framing.
- Install Collar Ties & Bracing
- Fit 2×6 collar ties between rafters in the attic area to prevent spreading.
- Add diagonal bracing in each attic wall bay for lateral stability.
Step 5: Sheathing, Roofing & Weather Barrier
- Sheath Walls & Roof
- Cover exterior walls with ½ in OSB or plywood, and the roof with ⅝ in plywood decking.
- Wrap & Flash
- Install house wrap over wall sheathing, tape all seams.
- Flash windows and doors with self-adhesive flashing tape.
- Lay Roofing
- Secure synthetic underlayment, then install standing-seam metal panels or architectural shingles—your choice for farmhouse style.
Step 6: Porch Decking & Railings
- Deck Frame
- On the porch joist extensions, install 2×8 joists at 16 in OC, with rim joists.
- Decking Material
- Lay 2×6 cedar or composite decking boards perpendicular to the joists, screwing each board to every joist.
- Finish Railings
- Attach 4×4 posts at 6 ft centers, then fit horizontal rails (2×4 top and bottom) and balusters at 4 in spacing.
Step 7: Insulation & Air Sealing
- Insulate Walls & Ceiling
- In walls, install R-20 fiberglass batts between studs.
- In the ceiling/attic floor, add R-49 blown-in cellulose or batts.
- Seal Gaps
- Use expanding foam around window frames, sills, and at top plates.
- Caulk all penetrations: plumbing, electrical, and HVAC boots.
Step 8: Rough Mechanical, Electrical & Plumbing
- Plumbing Layout
- Run PEX or copper supply lines from the mechanical room to the kitchen (9×11 ft) and two baths.
- Install 2 in PVC drain-waste-vent piping beneath the subfloor to main stack.
- HVAC Ductwork
- For a small home, a mini-split heat pump or high-efficiency electric baseboards could suffice.
- If central ducted, run rectangular or flex ducts into each main zone: living room, bedrooms, kitchen.
- Electrical Rough-In
- Wire for general lighting, outlets every 12 ft, dedicated circuits for kitchen appliances, and GFCI in the porch and bathrooms.
- Install ceiling-box wiring for overhead lights and fans.
Step 9: Interior Finishes
- Drywall & Trim
- Tape, mud, and sand drywall; then prime and paint walls in neutral, farmhouse-friendly hues.
- Install 5¼ in baseboards, 3¼ in casing around windows and doors, and crown molding where desired.
- Flooring
- In living and dining (11×11 ft), lay hardwood or vinyl-plank flooring.
- In bedrooms, carpet or wood; in wet areas (kitchen and baths), ceramic tile or waterproof vinyl.
- Cabinets & Fixtures
- Install shaker-style kitchen cabinets in the 9×11 ft kitchen, with a central peninsula layout.
- Fit bathroom vanities, toilet, and tub/shower assemblies per plumbing plans.
Step 10: Landscaping & Porch Accents
- Foundation Plantings
- Along the porch perimeter, plant low shrubs and perennials; reserve a path to the porch steps.
- Lighting & Hardware
- Mount farmhouse-style sconces flanking the front door.
- Install a ceiling fan or pendant in the porch ceiling for summer comfort.
- Finishing Touches
- Stain or paint the porch railings and posts.
- Hang a porch swing or rocking chairs to enjoy your new farmhouse’s front-porch bliss.
Conclusion
In just 1,065 sq ft, this Small Farmhouse plan delivers efficient living, seamless indoor-outdoor connections, and the timeless warmth of a wrap-around porch. By following these ten methodical steps—from site prep and framing through finishing and landscaping—you can build not only a house but a home where family memories will grow for generations. Ready to break ground on your dream farmhouse? The tools, the plan, and now this guide are all you need.
Happy building!