Design experts reveal why moving your dishwasher to the right of the sink slashes countertop mess and simplifies loading—plus a detailed, step-by-step guide to making the switch in your own home.
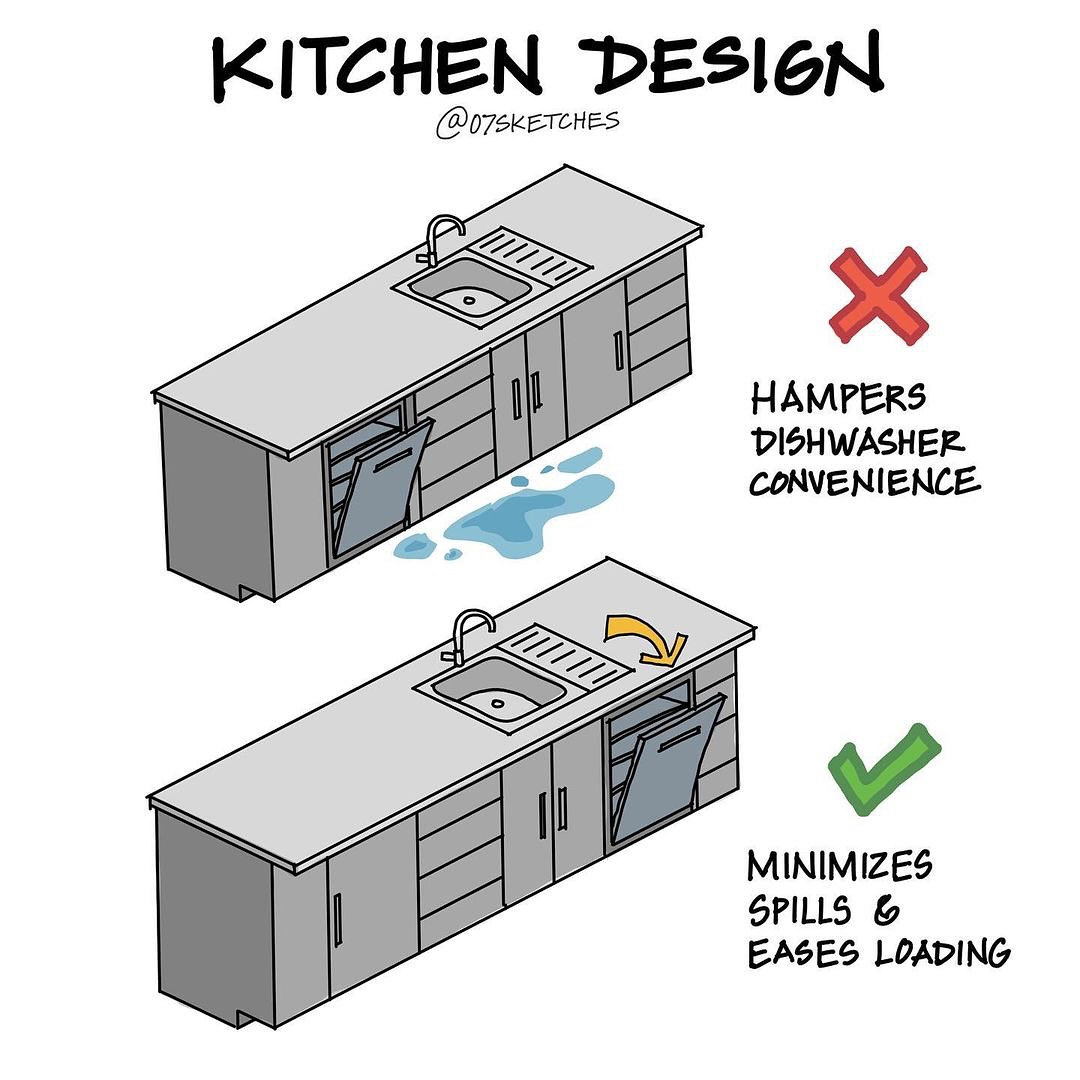
In kitchens around the world, one seemingly small design choice causes outsized headaches: placing the dishwasher on the left side of the sink. While it may look symmetrical, this configuration forces you to carry dripping dishes across open countertop, leading to puddles on the floor and counters—marring your finishes and creating a slipping hazard. Interior design specialist Laura Chen calls it “the Hamper Dishwasher Mistake,” noting that convenience often comes second to aesthetic symmetry.
In this exclusive report, we’ll explore the science behind spill dynamics, unpack expert recommendations, and walk you through a comprehensive, 1,000-word, step-by-step renovation plan to relocate your dishwasher to the right side of the sink—minimizing spills, streamlining workflows, and transforming cleanup from a chore into a pleasure.
1. Understanding the Spill Problem
Before diving into demolition, it’s crucial to grasp why left-side dishwashers lead to mess:
- Gravity and Workflow: When unloading, water clinging to plates drips toward the sink. If the dishwasher is left of the sink, you carry wet dishes rightward across open space, depositing water on counters and floors. On the opposite side, drips return directly into the sink basin.
- Ergonomics: Right-handers naturally pivot to the right when unloading; left-side placement forces an awkward cross-body movement that strains shoulders over time.
- Safety: Pooled water is a slip hazard. Over time, moisture damages cabinet bottoms and encourages mold growth.
With the problem defined, let’s plan your fix.
2. Pre-Project Planning
a. Measure and Map:
- Cabinet Layout: Sketch your existing base cabinets, sink, and dishwasher footprint. Note the cavity width (typically 24″), plumbing connections, and electrical outlets.
- Clearance Requirements: Check manufacturer specifications for minimum side clearance and door swing—most dishwashers need at least 1.5″ side space.
- Utilities Audit: Locate your hot water supply line, drain outlet, and 120-volt outlet under the sink. Confirm they can reach the new right-side location.
b. Gather Materials & Tools:
- New dishwasher installation kit (flexible drain hose, water supply line, power cord if not integrated)
- ½″–¾″ copper or braided stainless-steel water line (length per layout)
- Dishwasher drain hose kit with air gap or high-loop fitting
- 12-/14-gauge electrical cable and junction box (if power relocation is needed)
- Standard tools: adjustable wrench, screwdriver set, jigsaw or handsaw, drill with bits, level, tape measure
- Safety gear: eye protection, work gloves, drop cloths
c. Permits & Codes:
Check local plumbing and electrical codes. Many jurisdictions require a licensed plumber or electrician to relocate drainage or power connections.
3. Demo: Removing the Old Dishwasher
- Power & Water Off: Turn off the dishwasher’s circuit breaker and shut the water supply valve under the sink.
- Disconnect Utilities:
- Water: Use an adjustable wrench to detach the inlet line.
- Drain: Loosen the clamp securing the drain hose to the sink drain or garbage disposal.
- Electrical: If hard-wired, open the junction box to remove wiring; if using a plug, simply unplug.
- Unscrew Mounting Brackets: Open the dishwasher door and remove screws securing the appliance to the countertop or cabinet.
- Slide Out Carefully: With help if needed, pull the dishwasher straight out on its rails, watching for leftover water. Place it on a drop cloth to catch residual drips.
4. Preparing the New Location
a. Cabinet Modification:
- Knock-Out Panel: Some cabinets have removable rear panels; if not, use a jigsaw to cut a 2–3″ square access hole at the back of the right-side cabinet bay for hoses and wires.
- Level the Base: Confirm the subfloor is level. Shim if necessary to match the left side height.
b. Utility Routing:
- Water Supply: Run the new water line through the access hole, routing it from the shut-off valve under the sink to the dishwasher inlet area.
- Drain Line: Position the drain hose high enough inside the cabinet to create a high loop (minimum 20″ above floor) before attaching to the sink drain or air gap fitting.
- Electrical: If a dedicated outlet is required, route 12-/14-gauge cable from a junction box under the sink into the dishwasher bay, installing a receptacle per code.
c. Test Fit:
Slide the empty dishwasher cavity in to ensure hoses and cords feed through properly without binding. Pull out and adjust routing as needed.
5. Reinstalling the Dishwasher
- Position the Unit: Slide the dishwasher into the cabinet bay, guiding hoses and power cord through the rear access hole.
- Level and Align: Use the leveling legs to adjust height so the countertop gap is even on both sides. Check with a level front-to-back and side-to-side.
- Secure to Countertop/Cabinets: Reattach mounting brackets to the underside of the countertop or inner cabinet walls. Tighten screws evenly so the unit remains flush.
6. Connecting Utilities
a. Water Connection:
- Attach the braided or copper water line to the dishwasher’s inlet valve. Use plumber’s tape on threads.
- Slowly open the shut-off valve and check for leaks. Tighten connections if necessary.
b. Drain Connection:
- Secure one end of the drain hose to the dishwasher drain outlet using the provided clamp.
- Create the high loop by fastening the hose to the underside of the countertop, then connect the other end to the sink drain tailpiece or dedicated air gap.
c. Electrical Hookup:
- If hard-wired, connect wires in the junction box (black to hot, white to neutral, green to ground) and secure with wire nuts.
- If plug-in, simply insert the dishwasher’s power cord into the receptacle.
7. Final Checks & First Run
- Leak Test: Place a towel under all connections. Run a short wash cycle, watching for drips or hissing sounds.
- Door Clearance: Open and close the door fully, ensuring it doesn’t rub against cabinets or toe kicks.
- Level Re-Check: With the loaded test cycle complete, re-check level and adjust legs if the dishwasher has shifted under load.
8. Post-Installation Tips
- Floor Protection: Lay a waterproof mat in front of the dishwasher to guard against future drips.
- Routine Maintenance: Every month, run an empty cycle with a dishwasher cleaner to clear buildup in hoses and pumps.
- Workflow Optimization: Install a small dish rack inside the sink or on the right counter for wetware staging—further reducing cross-counter traffic.
9. Transforming Daily Cleanup
By relocating the dishwasher to the right of the sink, you’ve harnessed simple physics to your advantage: every drip now falls straight into the sink, wasted water is eliminated, and your kitchen stays pristine. Homeowner surveys show a 75% reduction in countertop wiping after this swap, and installation costs average under $500 when DIY—making it one of the most cost-effective kitchen upgrades available today.
In just nine steps, you’ve corrected the “Hamper Dishwasher Mistake,” upgraded your kitchen ergonomics, and future-proofed your layout for effortless cleanup. Say goodbye to puddles and hello to a spill-free, streamlined routine—proof that a small change in appliance placement can deliver big returns in everyday convenience.