Design gurus reveal how to position your refrigerator, sink, and cooktop in a perfect triangular layout—follow this comprehensive, step-by-step, guide to transform your kitchen into a culinary powerhouse.
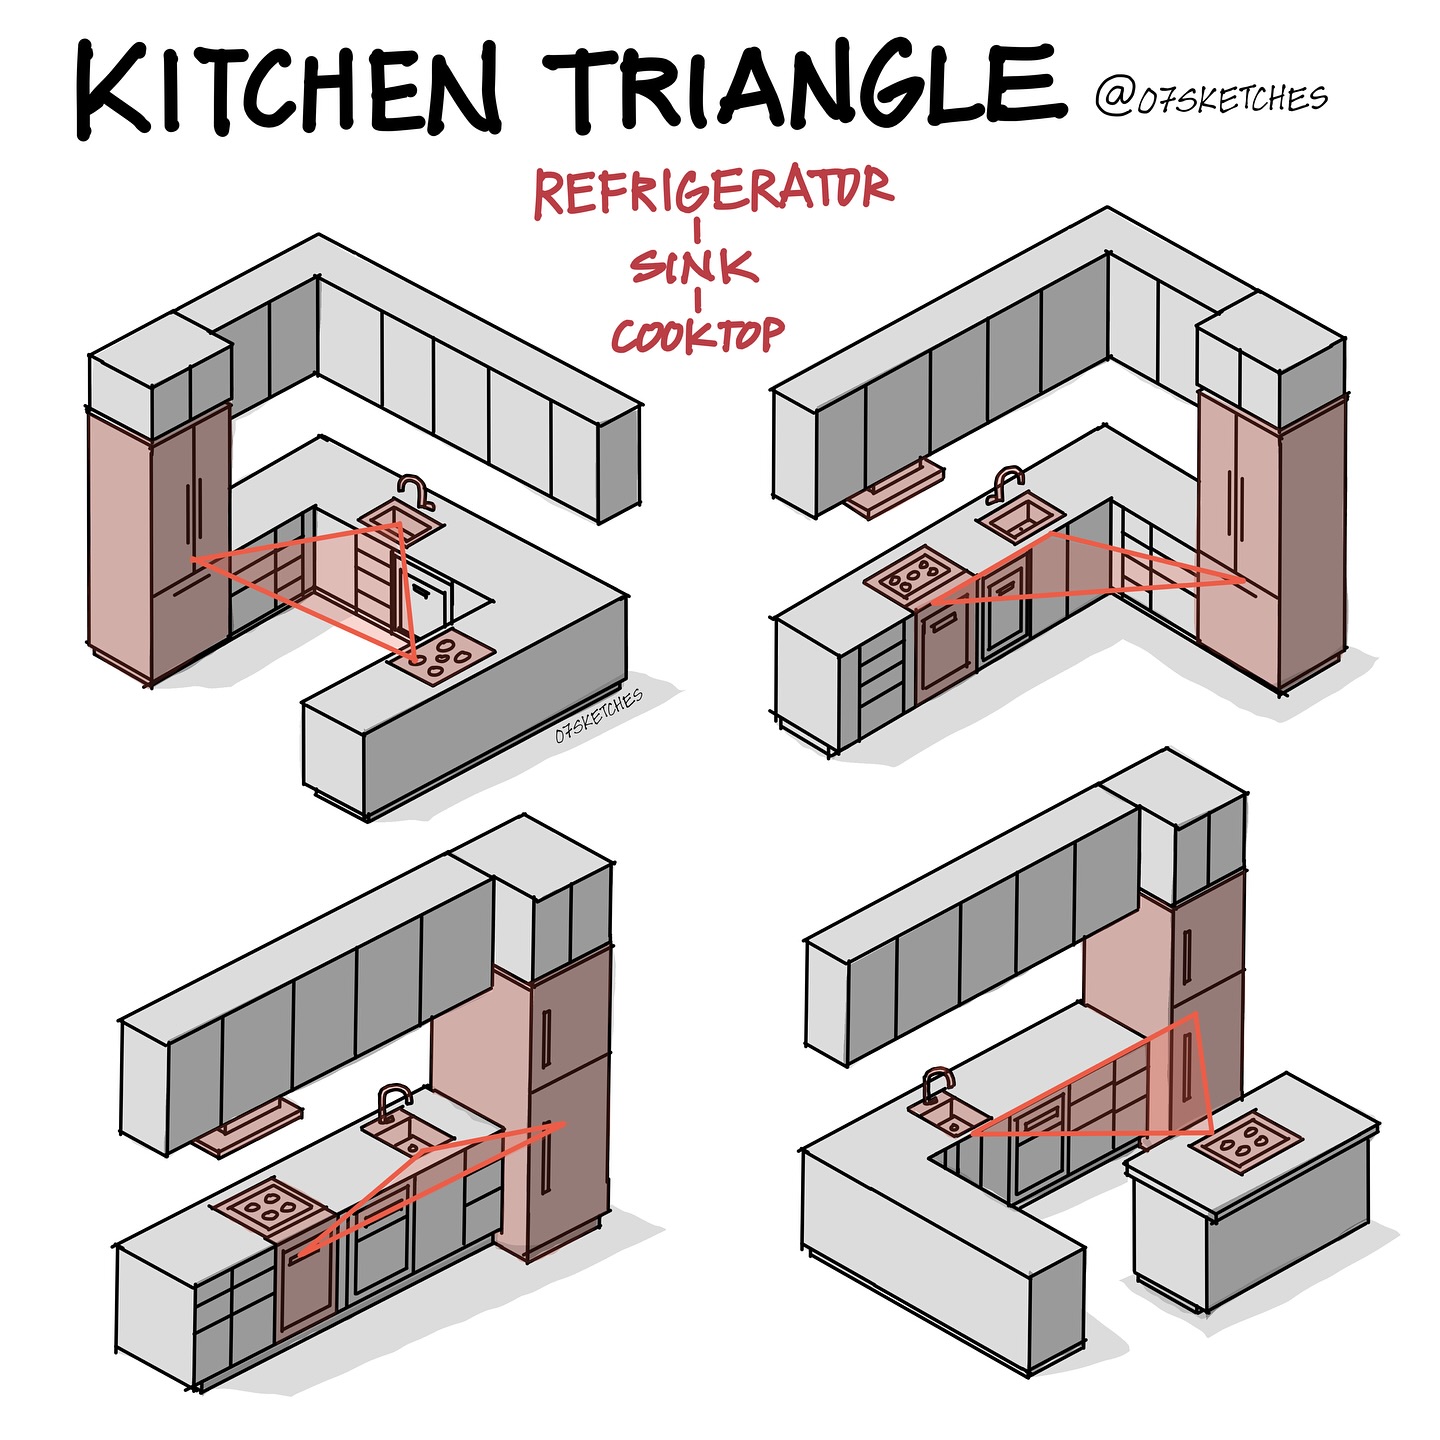
In every well-designed kitchen, three key work zones—the refrigerator, sink, and cooktop—must dance in harmonious proximity. Dubbed the “kitchen triangle,” this layout principle traces back to 1940s architectural research, which found that placing these three stations at the corners of an ideal triangle (with each leg between 4 and 9 feet, and the total perimeter between 13 and 26 feet) slashes wasted steps and elevates cooking efficiency. Yet, countless modern kitchens flout this golden rule—and the result is a clunky, congested workspace where meal prep becomes a workout.
Interior design expert Marcus Lee explains, “When your fridge, sink, and stove sit too close, you bottleneck one another; too far apart, and you’re hoofing it back and forth like a long-distance runner.” In this detailed guide, we’ll diagnose the four common triangle-layout pitfalls, unpack ergonomic best practices, and walk you, in 1,000 words, through a phased renovation plan—complete with measuring techniques, cabinetry tweaks, and finishing touches—to help you craft your perfect kitchen triangle.
1. Diagnosing the Four Triangle Mistakes
Before remodeling, pinpoint which of these layouts matches your kitchen:
- Collapsed Triangle (All-in-One Wall): Refrigerator, sink, and cooktop sit on the same wall—forcing you to pivot or stride laterally for every task.
- Extended Triangle (Separated Zones): Stations are on three walls, but the distances exceed the recommended 9 feet, turning simple ingredient grabs into marathon sprints.
- Bottleneck Triangle (Intersecting Traffic): The triangle cuts through the kitchen’s main thoroughfare, leading to constant cross-traffic and collisions.
- Obstructed Triangle (Blocked Sightlines): An island or peninsula intrudes into the triangle’s open space, creating blind spots and interrupting workflow.
Sketch your existing plan on graph paper, marking the locations of each station. Label the center points and draw straight-line measurements between them, noting the lengths. Compare against these ideal parameters:
- Leg lengths: 4′ (minimum) to 9′ (maximum)
- Perimeter sum: 13′ (minimum) to 26′ (maximum)
2. Pre-Renovation Planning
a. Measure Twice, Plan Once:
- Locate Station Centers: Determine the exact geometric center of your fridge doors, sink basin, and cooktop burners.
- Measure Leg Distances: Use a laser tape measure for precision. Record the three distances (A–B, B–C, C–A).
- Assess Traffic Flow: Draw existing footpaths—how do you enter the kitchen, and where does the traffic primarily flow?
b. Define Your Goal:
- Efficiency Focus: Aim for a perimeter between 15′ and 22′ for most home cooks, with equal leg balance to avoid any one trek dominating.
- Clearance & Sightlines: You’ll need at least 42″ of clear walkway in the triangle’s interior and 48″ in multi-cook households.
- Storage Adjacencies: Keep heavy-use storage (pots, pans, dishes) near the cooktop and sink for seamless transitions.
c. Gather Your Team & Permits:
- Professionals: Depending on the scope—moving plumbing, re-routing gas lines, or rewiring—you may need a plumber, electrician, or contractor.
- Permits: Check local building codes for plumbing and electrical relocations.
3. Phase 1: Repositioning the Refrigerator
- Identify a New Fridge Bay: Look for a location that brings the fridge within 4–6 feet of the sink. Ideal spots: adjacent to the sink cabinet, at the end of a run parallel to the sink wall, or on a nearby island.
- Clearance Requirements: Ensure a 90° door swing at least 36″ wide, with no obstructions behind or beside the fridge.
- Utility Access: Refrigerators require a standard 120-volt outlet. If no outlet exists, have your electrician install one within cabinetry for a clean look.
- Cabinet Modification: If moving the fridge into a custom cabinet surround, verify the opening width (minimum 36″ for counter-depth models) and height, including ventilation space (¼″ on sides, 1″ at top).
- Slide & Level: With helpers, slide the fridge into its new bay. Use a level and adjustable feet to ensure tilt-back stability (roughly a ¼″ upward tilt) so doors close properly.
4. Phase 2: Relocating the Sink
- Choose the Sink Position: Ideally, the sink sits at the triangle’s central point—between fridge and cooktop—so it forms the triangle’s “hinge.”
- Plumbing Work:
- Drain & Vent: Have your plumber cut and reroute the P-trap to the new location. Maintain or add proper venting per code.
- Water Supply Lines: Extend hot and cold lines using flexible braided hoses, securing them to the cabinet’s back wall.
- Countertop Cutout:
- Mark the sink outline with painter’s tape.
- Use a jigsaw to cut through the countertop material (laminate, stone, or wood).
- Clean and smooth edges; apply silicone sealant before setting the sink.
- Install & Seal: Lower the sink into the cutout, attach mounting clips, and seal perimeter with food-safe silicone. Connect supply and drain lines, and check for leaks.
5. Phase 3: Repositioning the Cooktop or Range
- Selecting the Cook Zone: Look for a spot 4–9 feet from the sink, ideally near a vent hood or an island.
- Gas vs. Electric:
- Gas: Shut the gas supply and have a licensed technician cap the old line and extend a new one. Install a shutoff valve within 6 feet of the cooktop.
- Electric: Ensure a dedicated 240-volt circuit with 10- or 12-gauge wiring.
- Ventilation Installation: Position your hood or downdraft vent directly above the cooktop. Calculate CFM requirements based on stove width (100 CFM per linear inch).
- Counter & Cabinetry: If installing a built-in cooktop, cut the countertop to the manufacturer’s template. Reinforce cabinet framing underneath for weight support.
- Connect & Test: Plug or hard-wire the cooktop. For gas, pressure-test the line. Power on each burner or element and verify even heat distribution.
6. Phase 4: Fine-Tuning the Triangle
- Verify Leg Lengths: Re-measure the three center-to-center distances. Adjust if any leg falls outside the 4′–9′ range; minor tweaks in cabinetry positions or appliance choices may be needed.
- Check Perimeter: Sum the three legs—target 13′–26′ total. For compact kitchens, aim closer to 13′–17′; for spacious layouts, 17′–22′ keeps steps efficient.
- Clearance & Walkways: Confirm 42″ of unobstructed space inside the triangle. Remove any protruding handles or obstacles.
- Optimize Storage Adjacencies:
- Place pull-out drawers under the cooktop for pots and pans.
- Allocate lower cabinets near the sink to dishware racks.
- Keep a small prep station (cutting board) adjacent to the fridge for unloading groceries.
7. Phase 5: Ergonomics & Workflow Enhancements
- Countertop Landing Zones: Ensure at least 15″–18″ of countertop adjacent to each station for staging—cold items next to the fridge, drying space beside the sink, and utensil holders by the cooktop.
- Lighting Plan: Install under-cabinet lighting at all three stations. A well-lit triangle reduces eye strain and safety risks.
- Floor Mats & Comfort: Place cushioned anti-fatigue mats in the triangle’s center to reduce leg fatigue during long cook sessions.
- Accessory Placement: Wall-mounted spice racks near the cooktop, drawer-dividers for utensils by the sink, and small appliance garages near the fridge keep essentials at arm’s reach.
8. Final Walkthrough & First Cook
- Dry-Run Workflow: Simulate meal prep—grab ingredients from the fridge, wash and chop at the sink, cook on the stove. Note any awkward reaches or missing landing zones.
- Adjust & Refine: If a step feels clumsy, consider micro-adjustments: sliding a cart, installing a narrow cabinet, or relocating small appliances.
- Celebrate Your Triangle: With optimized distances, clear walkways, and thoughtful staging, your daily kitchen routine becomes a fluid choreography—minimizing steps, reducing spills, and maximizing joy in cooking.
Conclusion
By correcting one of the most pervasive design mistakes—ignoring the kitchen triangle—you’ll unlock a level of efficiency that professional and home chefs alike crave. This step-by-step guide demystifies the process, whether you’re tackling a full remodel or a strategic appliance swap. Embrace the triangle, and watch your kitchen transform into a seamless, safe, and supremely functional heart of the home.