Experts unveil a step-by-step, renovation plan to align cooking, cleaning, storage, and prep zones—transforming chaotic layouts into seamless culinary workflows.
A modern kitchen is far more than countertops and cabinets—it’s a precisely choreographed workstation where every appliance and surface must pull its weight. Yet too often, homeowners end up with a jumbled arrangement: the refrigerator tucked away in one corner, the sink in another, and the cooktop awkwardly wedged between deep storage. The result? Constant back-and-forth trips, cluttered counters, and a maddening lack of flow.
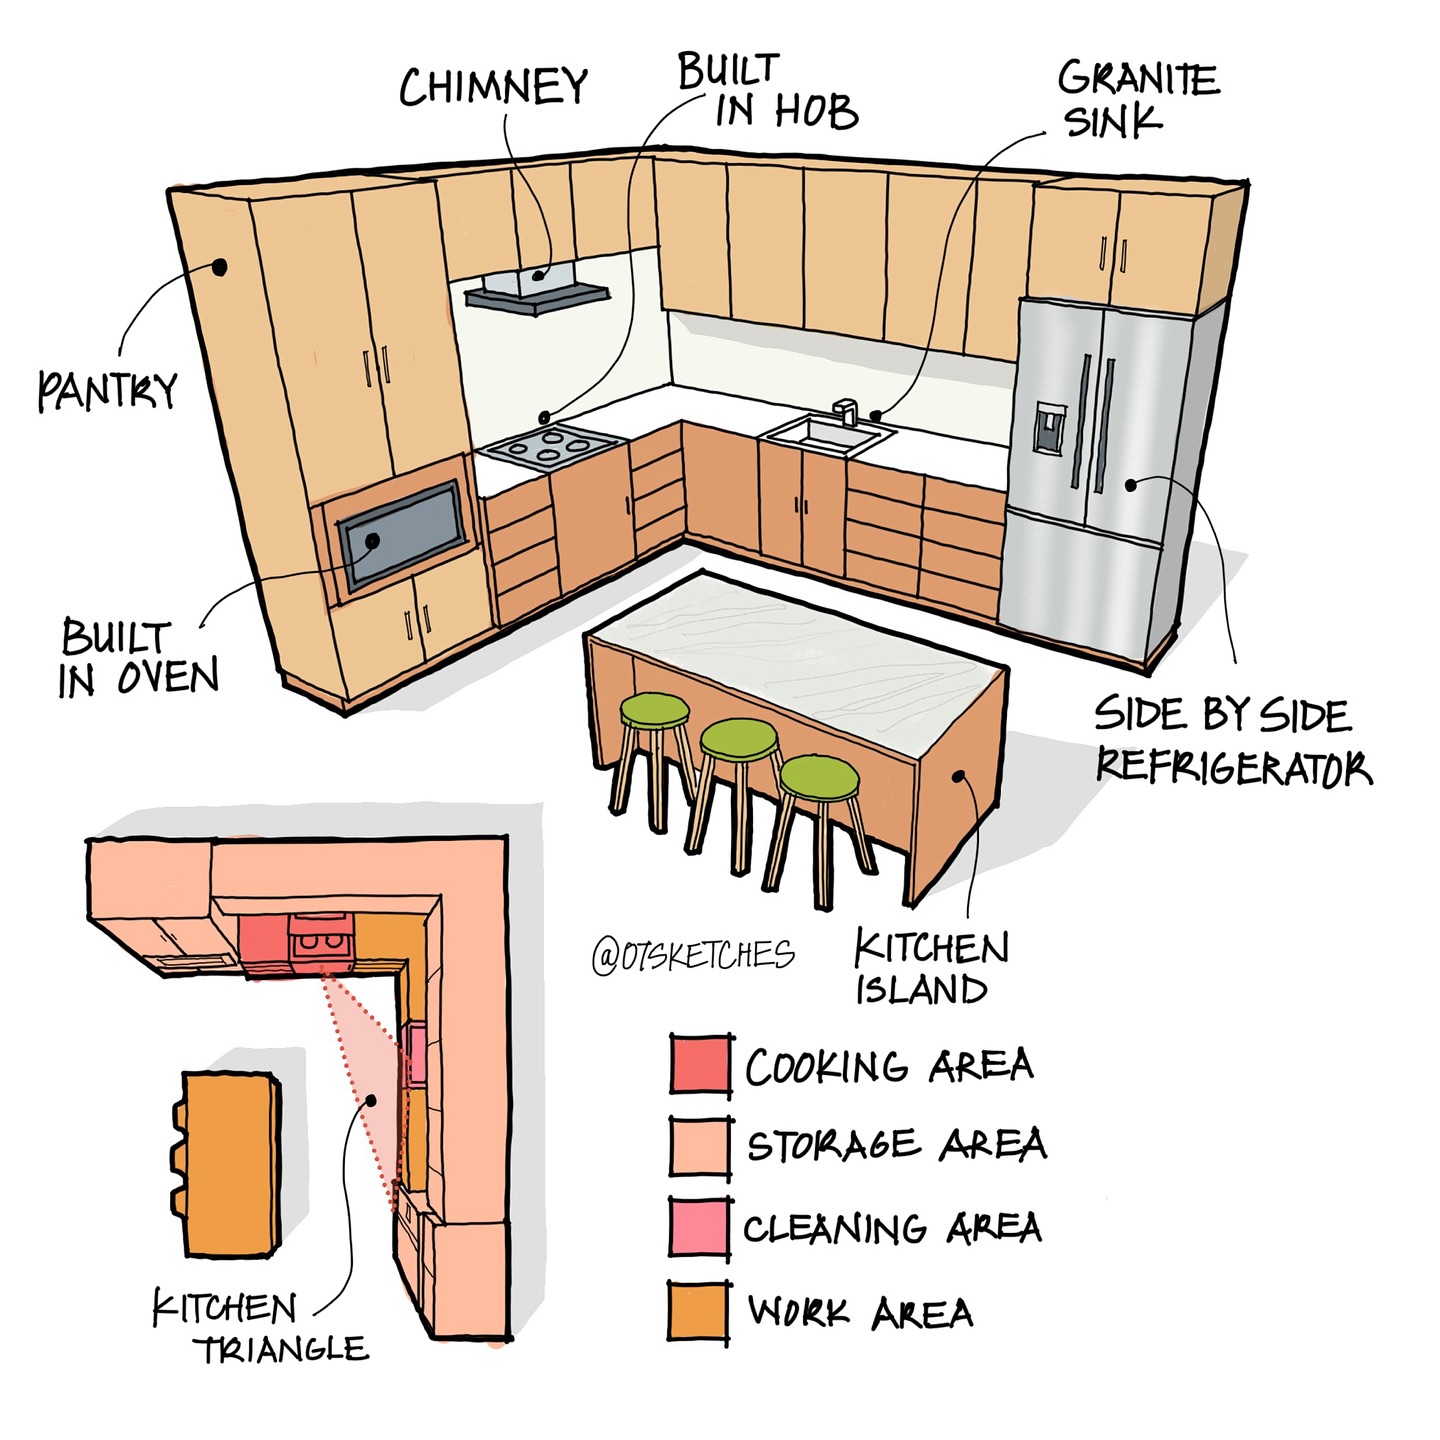
Design veteran Alexis Monroe calls this the “Kitchen Zone Mix-Up,” noting that “without clear, dedicated areas for cooking, cleaning, prepping, and storing, you spend half your time just navigating the room.” The cure is deceptively simple: divide your kitchen into four distinct zones—storage, cleaning, cooking, and work—and arrange them in a logical sequence that mirrors your culinary routine.
In this exclusive, 1,000-word exposé, we break down the science of kitchen zoning, diagnose common mistakes, and guide you through a seven-phase makeover to assign—and optimize—each zone in your own home.
1. The Four Essential Kitchen Zones
Before swinging a hammer, you must recognize the roles each zone plays:
- Storage Area (Pantry & Refrigerator): Where ingredients and cookware live when not in use.
- Cleaning Area (Sink & Dishwasher): The hub for washing produce, rinsing dishes, and disposal.
- Cooking Area (Cooktop & Oven): The fiery heart of meal execution.
- Work Area (Countertops & Island): The staging ground for chopping, assembling, and plating.
When these zones operate in concert—rather than scattershot across the room—cooking becomes a dance instead of a dodgem car ride.
2. Diagnosing Your Current Layout
Grab a notebook and sketch a bird’s-eye view of your kitchen footprint, marking doors, windows, and structural supports. Then overlay your existing zones:
- Storage (Pantry/Refrigerator): Are these side-by-side, or is one tucked far away?
- Cleaning (Sink): Is it adjacent to the storage, or isolated on its own run?
- Cooking (Hob/Oven): How far does the cleanup flow travel to reach the cooktop?
- Work (Countertops/Island): Do you have a dedicated prep counter near both the cleaning and cooking stations?
Note each “leg” between zones in feet. Optimal distances are:
- Storage → Cleaning: 2–4 ft
- Cleaning → Work: 2–3 ft
- Work → Cooking: 1–2 ft
If any leg exceeds 6 ft—or if you must backtrack through another zone—you’ve uncovered inefficiencies that warrant correction.
3. Phase 1: Repositioning Your Storage Hub
Objective: Bring pantry and fridge into immediate proximity to unloading and cooking prep.
- Select the Prime Wall: Identify a wall run near your kitchen entry—this minimizes foot traffic across your workspace when unloading groceries.
- Pantry Cabinetry: Install tall, pull-out pantry units (24″–30″ wide) directly beside the refrigerator to create one continuous storage corridor.
- Counter-Depth Fridge: If space permits, swap in a counter-depth model to avoid protrusions into walkways.
- Ventilation & Doors: Ensure refrigerator doors can open a full 90° unobstructed; pantry doors should not collide with refrigerator handles.
By uniting these two storage elements, you’ll cut down the distance from carry-in to prep—eliminating trips across the room.
4. Phase 2: Centralizing the Cleaning Zone
Objective: Anchor the sink and dishwasher between storage and work areas for effortless transfer.
- Locate Under the Window: If you have a window, prioritize placing the sink beneath it for natural light and visual relief.
- Dishwasher Placement: Position the dishwasher on the side closest to the prep area—ideally the right side of the sink if you’re right-handed—to minimize drips.
- Plumbing Check: Line up the hot/cold supply and drain with your new sink location, adding flexible braided lines and an air-gap fitting per code.
- Drop-in vs. Undermount: Select an undermount sink for seamless wiping of crumbs directly into the basin; match your countertop material for a cohesive look.
With cleaning sandwiched between storage and prep, you’ll move ingredients into the sink for washing, then straight onto your island or counter for chopping—never doubling back.
5. Phase 3: Defining Your Work Surface
Objective: Carve out a dedicated countertop “launch pad” that borders both the cleaning and cooking zones.
- Minimum Width: Allocate at least 24″ of contiguous counter space next to the sink for drying racks and initial veg prep.
- Island Integration: If your layout allows, center an island (4′–6′ long, 3′ deep) 42″–48″ from perimeter counters. This becomes your main work zone.
- Task Lighting: Add pendant lights or recessed fixtures directly above the island and primary prep counters to eliminate shadows.
- Storage Underneath: Fit deep drawers or pull-out trays beneath the work surface to house mixing bowls, cutting boards, and small appliances—keeping your counters decluttered.
By giving yourself a true staging ground, you streamline every recipe step from wash to chop to plate.
6. Phase 4: Optimizing the Cooking Station
Objective: Position cooktop and oven so they’re an easy step away from work and cleaning.
- Cooktop Location: Place the hob on a clear run adjacent to the prep zone but at least 18″ away from sidewalls to meet safety clearances.
- Downdraft vs. Chimney Hood: A ceiling-mounted chimney hood above the cooktop vents steam and grease more effectively than island downdrafts—especially in high-heat cooking.
- Built-In Oven: Wall-mounted ovens at eye level reduce bending; if stacking double ovens, consider a shallow lower cabinet below for storing sheet pans.
- Landing Zones: Ensure 12″–15″ of countertop on either side of the cooktop for hot-dish staging and utensil rests.
Anchoring cooking next to prep and cleanup completes the “work triangle” within your larger zoning plan, minimizing turns and transfer time.
7. Phase 5: Harmonizing Traffic Flow
Objective: Keep the “kitchen triangle” uninterrupted by through-traffic and dead-end corridors.
- Clear Pathways: Maintain at least 42″ of clearance between opposing cabinet runs; widen to 48″ in multi-cook households.
- Entry Point Buffer: If your main kitchen door swings into the space, install a pocket door or reorient hinges to avoid interruptions.
- Island Positioning: Sit the island far enough from perimeter cabinets to allow walking behind seated guests—typically 4′ of clearance.
- Sightline Management: Avoid tall pantry or fridge placements that block views into zones; sightlines keep the space feeling open and allow instant awareness of messes.
By safeguarding these routes, you’ll keep meal prep moving smoothly—even when family members wander through.
8. Phase 6: Accessorizing for Efficiency
Objective: Elevate each zone with smart storage and tools that shave seconds off every task.
- Pull-Out Drawers: Under the cooktop for pots and pans; beneath the sink for cleaning supplies.
- Spice Rack Inserts: Inside cabinet doors near the cooktop.
- Utensil Trays & Knife Blocks: In the prep zone for instant access to essential tools.
- Vertical Dividers: In pantry cabinets for trays, cutting boards, and baking sheets.
- Built-In Trash & Recycling: Adjacent to the sink to corral waste without extra steps.
These micro-optimizations ensure that every tool you need is mere inches away—no more frantic drawer-diving while a sauce simmers.
9. Phase 7: Final Inspection & First Cook
- Dry Run: Simulate your go-to recipe, moving from fridge to sink to prep to cook. Time each leg; optimal zones should take no more than two strides.
- Adjust Minor Irritants: If you find yourself reaching awkwardly, swap drawer handles, shift small appliances, or add a rolling cart for supplemental landing space.
- Celebrate & Refine: Invite family or friends for your first post-renovation meal; their feedback often highlights tweaks you might have missed.
Conclusion
By deliberately carving your kitchen into storage, cleaning, work, and cooking zones—and arranging them in an intuitive sequence—you’ll slash meal-prep time, banish countertop chaos, and transform your kitchen into a high-performance workspace. This seven-phase, roadmap empowers you to diagnose your current missteps, reposition key elements, and add finishing touches that delight both home cooks and guests alike. Embrace the power of zoning—and watch every meal unfold with newfound ease.