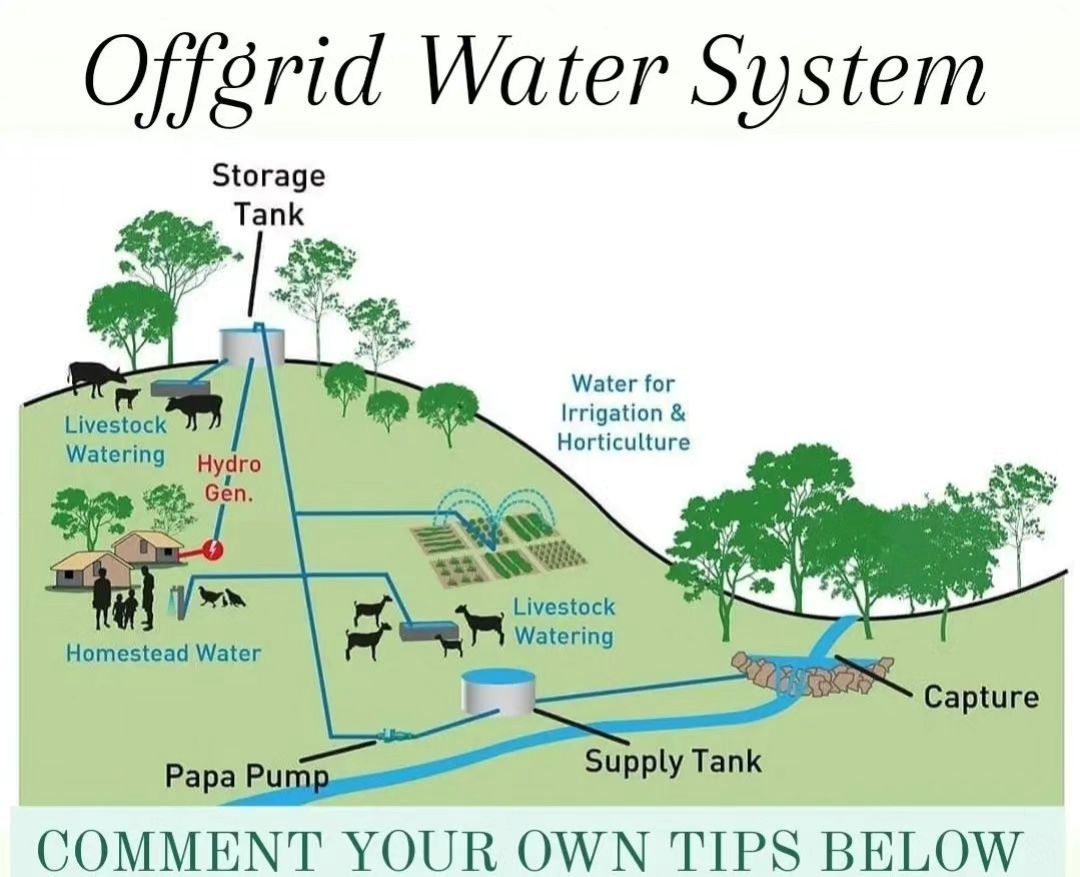
Here are several practical tips and best practices to get the most out of an off-grid gravity–fed water system like the one shown:
1. Optimize Your Capture Point
- Check Intake Debris Screens
Install a fine mesh or perforated screen at the creek intake to keep out leaves, sticks and sediment. Clean it weekly after heavy rains. - Use a Rock Weir or Small Dam
Build a low rock dam or weir upstream of your intake to raise the water level slightly. That gives you a more consistent flow into the supply tank, even in low‐water stretches.
2. Design a Proper Supply Tank
- Sizing
Aim for at least 1–2 days’ worth of storage beyond your highest‐use day. Calculate your household’s peak demand (for example, 400 L/day) and size accordingly (800 L–1,200 L). - First-Flush Diverter
If your supply tank is fed by rainwater (roof catchment), install a first-flush diverter to dump the initial, dust- and bird-contaminated runoff. - Settling Chamber
Consider a two-chamber tank: a small “pre-tank” where heavy particles settle, and then overflow into the main storage. This reduces sediment in the big tank and lengthens filter life.
3. Maintain Your Papa Pump (Foot Valve)
- Check the Foot Valve Seal
The one-way valve at the end of your suction line must stay airtight. Inspect it monthly—replace worn rubber flaps to avoid losing prime. - Install a Transparent Primer Port
Fit a small clear-plastic fitting near the pump inlet so you can visually confirm it’s full of water before starting.
4. Keep Your Supply Lines Clean and Protected
- Buried or Insulated Piping
Bury your suction and delivery lines below the frost line (where applicable) or wrap with closed-cell foam to prevent freezing. - Slope for Drain-Back
If you expect freezing weather, run pipes with a slight fall back toward the supply tank. Open a small drain-valve at the lowest point when systems are shut down for winter.
5. Elevate Your Storage Tank for Pressure
- Height = Pressure
Every meter of elevation gives roughly 0.1 bar (1.5 psi) of water pressure. To get 2 bar (~30 psi) at your faucets, place the tank at least 20 m (65 ft) above the house’s inlet elevation. - Tank Foundation
Ensure the stand or tower supporting the tank is on a compacted, level pad of gravel and crushed stone—this prevents settling and tilting over time.
6. Hydro Turbine Generator Tips
- Run-of-River vs. Inline Turbine
A small Pelton or Turgo wheel placed in a bypass pipe off the main feed can deliver 12 V–24 V DC at just a few liters per second. Inline “watermill”-style turbines often clog and need more flow. - Electrical Over-Speed Protection
Fit a simple dump load resistor or battery charge controller that will divert excess current when batteries are full—this protects the turbine and regulator from runaway speeds.
7. Filtration & Treatment for Homestead Water
- Sediment Pre-Filter
Before your house plumbing, install a 50–100 μm sediment filter to catch silt. Clean or replace quarterly. - Activated-Carbon or Ceramic Filter
For microbiological safety, use a UV-only purifier or a two-stage system: ceramic (0.2 μm) followed by activated carbon to remove bacteria, protozoa, and chemical tastes. - Backup Chlorination
Keep a small chlorine feed pump or gravity feeder on hand to shock-treat the tank if you detect contamination after heavy rains or animal access.
8. Livestock Watering Strategies
- Separate Troughs
Instead of letting animals drink directly from the main line, supply them to dedicated troughs with float valves. This prevents backflow contamination and makes cleaning easier. - Automatic Fill-Level Alarms
A simple float switch connected to a small solar-powered alarm can notify you if a trough runs dry—critical in winter when impromptu tank inspections are dangerous.
9. Routine Inspection & Winterization
- Monthly Walk-Throughs
Check all valves, fittings, and visible pipe runs for leaks or damage. Look especially at joints and flex-hose connections. - Pre-Winter Shutdown
Drain pipeline low points, open all faucets to let air in, and insulate above-ground segments. If possible, bypass the hydro turbine to avoid ice blockages.
10. Monitoring & Automation
- Level Sensors
Fit ultrasonic or float‐type sensors in your supply and storage tanks, with readouts in the house (or even a simple GSM‐based SMS alert) so you never run dry unexpectedly. - Automated Valves
Electrically actuated ball-valves can switch flows between irrigation, homestead, and livestock with a timed controller—ideal for crop rotation or seasonal watering schedules.
By integrating these tips—careful siting and screening of your intake, smart tank design, well-maintained pump valves, freeze protection, optimized elevation for pressure, robust filtration, and livestock safeguards—you’ll build an off-grid water system that’s reliable, low-maintenance, and delivers clean water and power year-round.