A step-by-step, guide to diagnosing uneven airflow, relocating and reinstalling your ceiling fan, and fine-tuning blade pitch and height for optimal cooling—and ultimate sleep comfort.
In bedrooms and living rooms across the globe, ceiling fans promise relief from stagnant, warm air—but all too often, homeowners find themselves plagued by hot spots, drafty corners, and restless nights. The culprit? Poor fan placement. When a fan is installed off-center from the main seating or sleeping area, airflow becomes lopsided, creating zones of discomfort rather than uniform cooling. In this in-depth report, we’ll diagnose the problem, explore the physics of airflow distribution, and walk you, in a clear, seven-phase, 1,000-word tutorial, through repositioning your fan for perfectly even air circulation—no HVAC overhaul required.
1. Diagnosing Uneven Air Distribution
1.1 Spot the Hot and Cold Zones
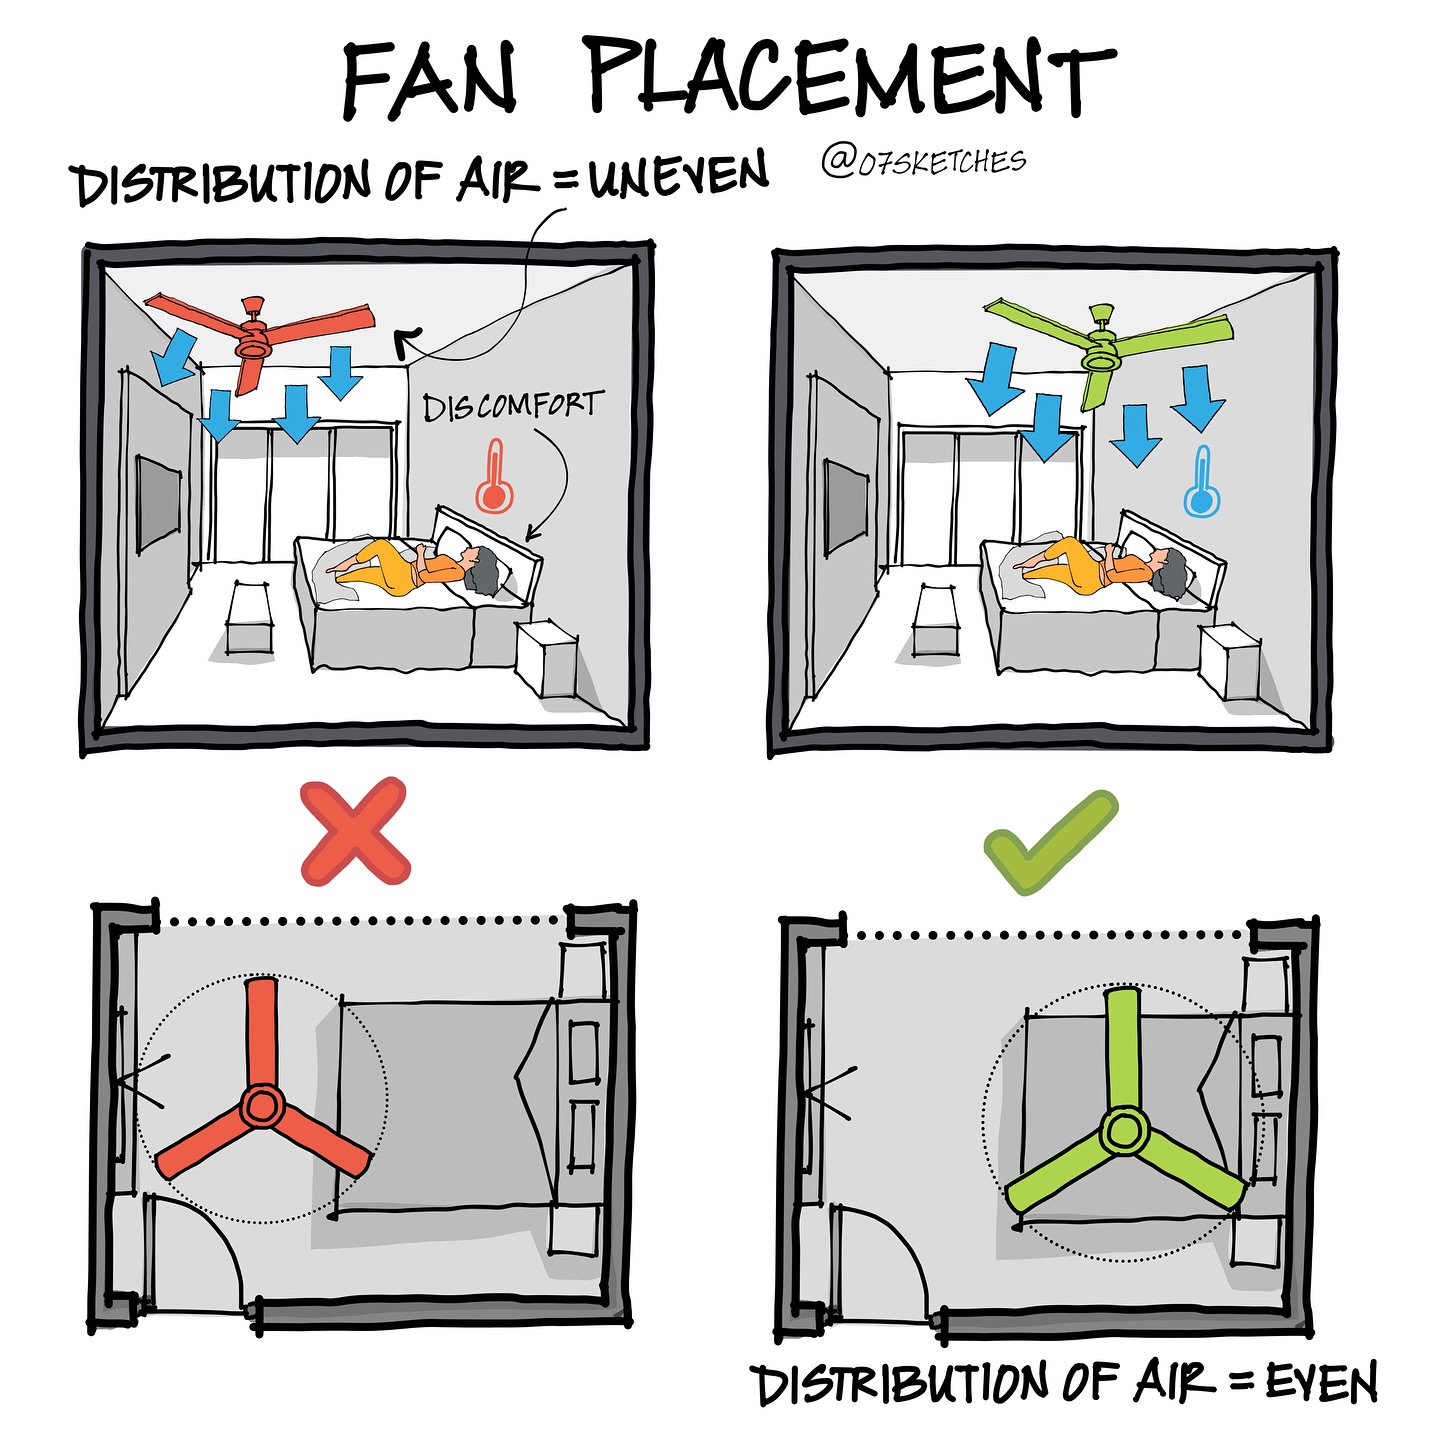
Start by sleeping or sitting in your usual spot with the fan running at medium speed. Draw a simple overhead sketch of your room (a rectangular outline) and mark where you feel strong airflow versus weak airflow. Typically, you’ll find a circular “jet” of air directly under the blades’ path and stagnant corners elsewhere—just as the illustration’s red fan shows.
1.2 Measure the Discrepancy
Using a handheld thermal anemometer (available for under $30), record the airflow speed (in feet per minute, FPM) at three points:
- Directly beneath the fan
- At your primary seating or sleeping position
- At the farthest corner or wall opposite the fan
A healthy, well-positioned fan should deliver at least 300–500 FPM at your seating zone. Anything below 200 FPM indicates insufficient cooling.
1.3 Understand the Airflow Pattern
Ceiling fans move air in a horizontal “pancake” pattern that extends roughly one and a half times the blade diameter. If your fan is too close to one wall or corner, as shown in the “wrong” layout, the airflow cone intersects the wall, reflecting and dissipating before reaching the center of the room.
2. Planning the Repositioning Project
2.1 Gather Your Tools and Materials
- Stud finder
- Tape measure
- Plywood mounting box or UL-rated fan brace
- Ceiling fan installation kit (downrod, mounting bracket)
- Drywall saw
- Phillips and flat-head screwdrivers
- Wire strippers and connectors
- Level and laser line (optional but helpful)
2.2 Locate a Central Structural Member
Your new fan location must align with a joist or cross-beam capable of supporting 35–50 lbs. Use the stud finder to trace the joist direction above the ceiling. Mark the center of the room’s length and width to find the geometric midpoint—this is your target position.
2.3 Account for Lighting and Wiring
Confirm that existing electrical wiring can be rerouted to the new location. If you’re combining the fan with a light kit, ensure the circuit can handle the additional load (most fans draw less than 100 W). Plan to install a fan-rated junction box or reinforced electrical box that meets code.
3. Removing the Old Fan Assembly
3.1 Power Down Safely
Turn off the breaker feeding the fan’s circuit and verify power is off with a non-contact voltage tester at the switch and fixture box.
3.2 Disassemble the Fan
- Remove the fan blades first by unscrewing their brackets.
- Detach the canopy to expose the mounting bracket and wiring.
- Carefully lower the motor housing, supporting its weight as you disconnect the wiring connectors (black to hot, white to neutral, green or bare to ground).
3.3 Remove the Old Mounting Bracket
Unscrew the bracket or fan brace from the ceiling box. Patch the old opening with a drywall plug and skim-coat as needed. Let it dry fully before cutting the new hole.
4. Installing the New Ceiling Box and Bracing
4.1 Cut the New Opening
At your midpoint mark, use a drywall saw to cut a hole sized for a standard octagon or pancake fan box.
4.2 Reinforce with a Fan-Rated Brace
Insert a telescoping fan brace between the joists. Tighten it per instructions so its ends bear firmly against rafters. Attach the UL-rated ceiling box to the brace.
4.3 Level the Box
Use a level or laser line to ensure the box sits perfectly horizontal—this will keep your fan blades balanced. Secure all screws snugly.
5. Rewiring and Mounting the Fan
5.1 Run New Cable
Feed a 14/3 NM cable (if you want separate light/fan switches) or 14/2 NM for a single-switch operation from the wall switch to the new box. Staple the cable 8 inches from the box and secure carefully to avoid damaging insulation.
5.2 Wiring Connections
Inside the ceiling box, connect:
- Hot lead(s): Black (fan) and blue (light) to their corresponding switch legs.
- Neutral: White to white.
- Ground: Bare copper to the metal box and green ground screw on the bracket.
Twist connectors clockwise, then tape with electrical tape for redundancy.
5.3 Hang the Fan Motor
Attach the mounting bracket per the manufacturer’s instructions. Hang the motor housing on the bracket hook or slot, ensuring it seats fully before tightening the canopy screws.
6. Adjusting Height, Blade Pitch, and Balance
6.1 Downrod Length
Optimal fan performance occurs when blade tips are 8–9 feet above the floor and 10–12 inches below the ceiling. Adjust or swap your downrod to meet these clearances.
6.2 Blade Pitch Check
Most residential fans ship with a 12°–15° blade pitch. If yours is adjustable, maximize pitch (up to 18° if possible) to increase airflow volume.
6.3 Balance the Blades
Use the included balancing kit:
- Run the fan at high speed.
- Identify the blade that lags (most wobble).
- Attach the adhesive weight clip near its outer end.
- Test and reposition until wobble is below 0.1 in of amplitude.
7. Verifying Even Airflow and Fine-Tuning
7.1 Post-Installation Airflow Test
Repeat your airflow measurements from Phase 1. Record FPM at:
- Fan center
- Outlying seating/sleeping areas
- Previously stagnant corners
Your goal: readings within 10–15% of each other, ideally above 300 FPM in all occupied zones.
7.2 Sound and Vibration Check
Run the fan through all speeds. Listen for unusual rattles or hums. Tighten loose screws on blades, canopy, and switch housing.
7.3 Thermostat Integration (Optional)
For enhanced control, add a wall-mounted smart fan control that can adjust speeds based on room temperature or occupancy sensors—further leveling the thermal comfort.
Conclusion
By centering your ceiling fan—aligning it with the room’s midpoint and primary seating area—you transform uneven, spotty drafts into a broad, gentle airflow that envelops every corner. Follow this seven-phase roadmap: accurately diagnose your existing imbalance, plan the relocation, remove the old assembly, reinforce with a UL-rated box and brace, rewire and remount, tune blade pitch and balance, and verify performance with precise measurements. The result is a perfectly balanced, whisper-quiet fan that delivers consistent cooling where you need it most—keeping you comfortable, energy bills in check, and sleep undisturbed.