A comprehensive, step-by-step, guide to properly siting, constructing, and maintaining your rural well—avoiding contamination, optimizing recharge, and ensuring reliable access to clean groundwater.
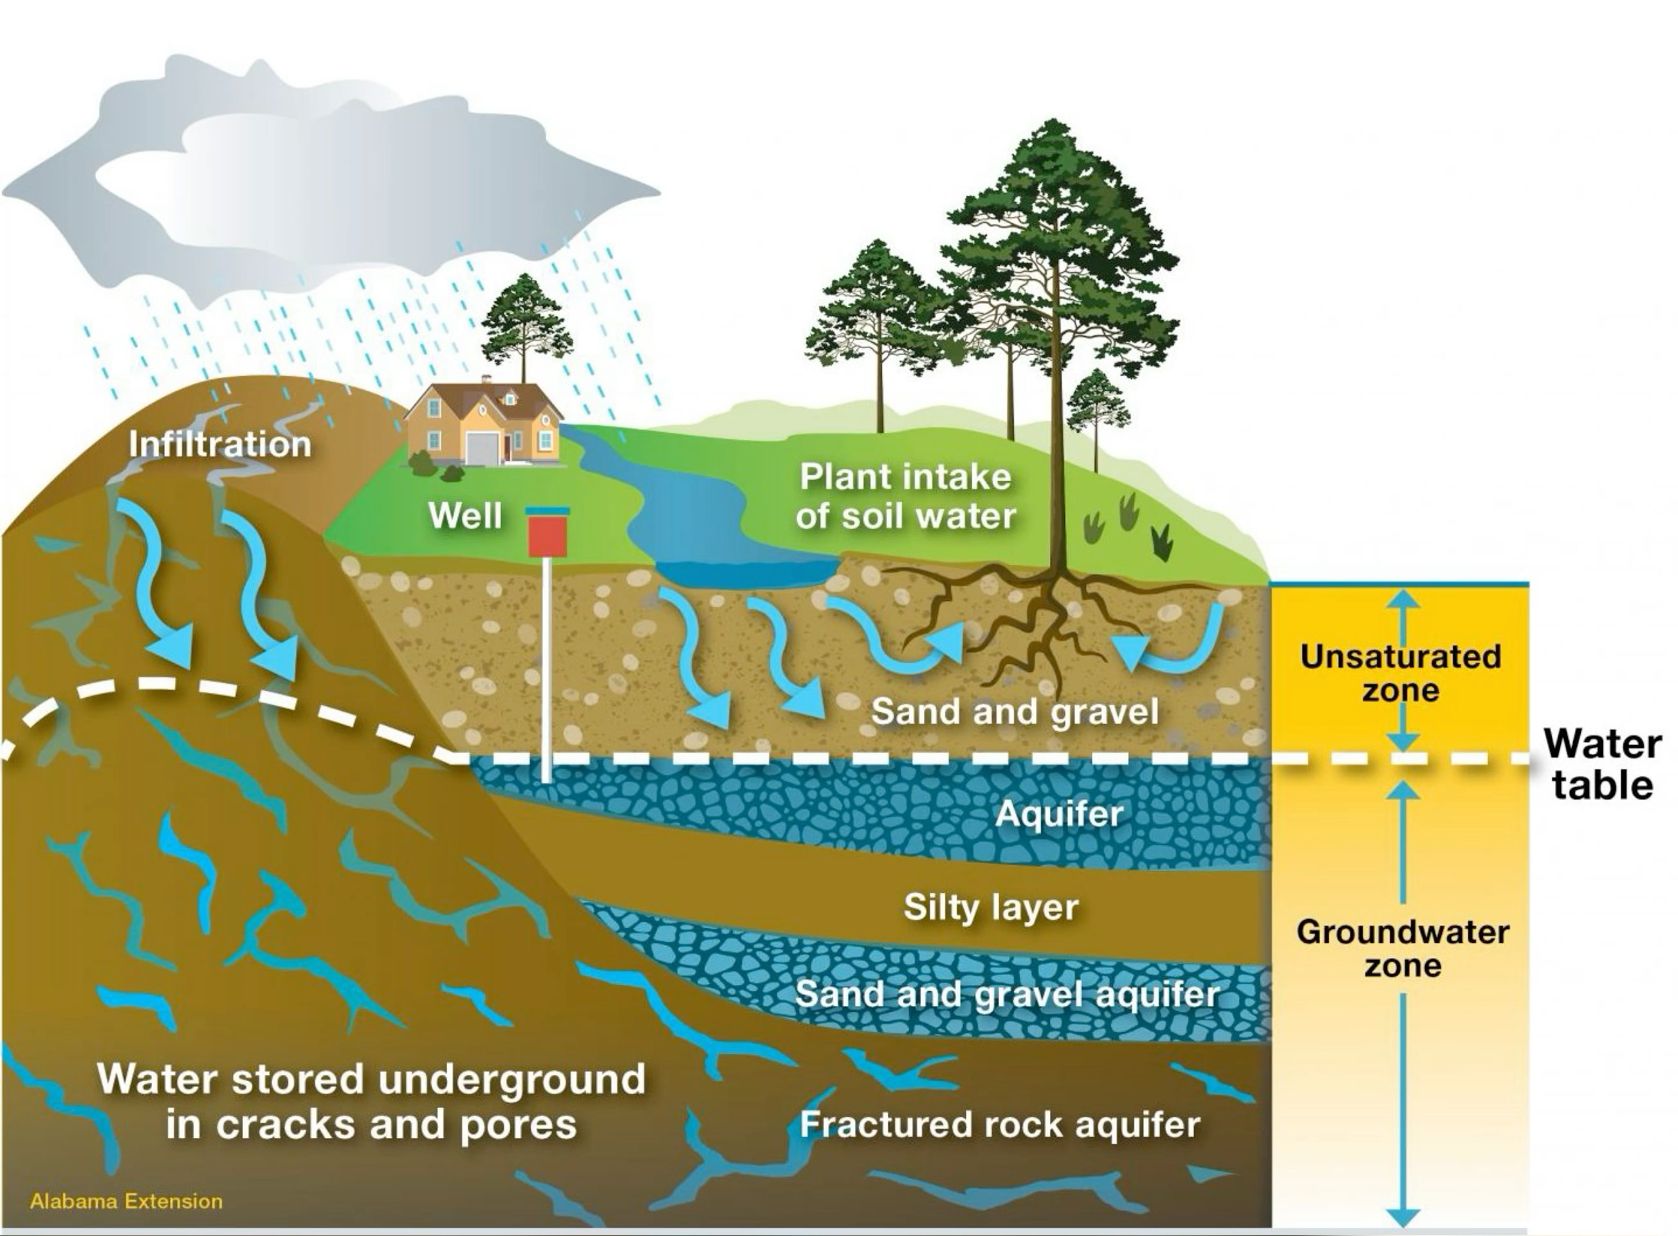
In rural and suburban landscapes worldwide, private wells are the lifeline for drinking water, irrigation, and household use. Yet too often they’re compromised by poor siting, inadequate sealing, or misunderstood aquifer dynamics—leading to microbial contamination, low yields, and costly repairs. The diagram above illustrates the journey of rainwater from surface infiltration, through the unsaturated zone, into sand-and-gravel and fractured‐rock aquifers, and ultimately to your well. In this in-depth, seven-phase guide, we’ll diagnose the most frequent errors in well construction and groundwater management, then provide a clear, step-by-step blueprint to correct these mistakes and secure a safe, sustainable water supply.
Phase 1: Intelligent Well Siting to Protect the Recharge Area
Common Mistake: Locating wells too close to septic systems, livestock yards, or surface runoff channels—creating direct pathways for pathogens into the aquifer.
- Map Potential Contaminant Sources
- Identify all on‐site hazards: septic tanks, manure piles, fuel storage, and livestock watering troughs.
- Using local codes as a baseline, maintain minimum setbacks of 50–100 ft from septic systems, 100–200 ft from livestock areas, and 50–100 ft uphill of any surface water body.
- Assess Recharge Pathways
- Observe natural infiltration zones—places where the land surface is permeable (sandy soils, gravel beds). Position your well such that its recharge “capture zone” lies over clean, uncontaminated ground.
- Use Topographic and Hydrogeologic Data
- Consult regional well logs and geological maps to target sand-and-gravel aquifers with proven yield. Avoid drilling directly over fractured rock without proper casing and grouting, as cracks can transmit surface contaminants rapidly.
Phase 2: Proper Drilling and Casing Techniques
Common Mistake: Installing a perforated casing without a sanitary seal, allowing surface water and contaminants to bypass the protective annulus.
- Select the Right Casing Material
- Use Schedule 40 PVC or stainless steel casing rated for drinking water wells. PVC resists corrosion and is easy to seal.
- Drill to the Correct Depth
- Penetrate the saturated sand-and-gravel aquifer by at least 10–20 ft below the static water level, ensuring adequate drawdown capacity during pumping.
- Install a Sanitary Surface Seal
- Grout the annular space from the surface down 20–50 ft (or into an impermeable clay layer) with bentonite or neat cement grout. This barrier prevents surface water and shallow soil contaminants from migrating along the outside of the casing into the aquifer.
Phase 3: Screen and Gravel Pack Installation
Common Mistake: Omitting a properly sized gravel pack, leading to rapid silting of the well and clogging of the screen.
- Choose the Correct Well Screen
- Select a stainless steel or PVC wire‐wrapped screen with slot openings matched to the predominant grain size of your aquifer (e.g., 0.010″–0.020″ slots for medium sand).
- Install a Filter Pack
- Surround the screen with a 2–4 ft thick gravel pack of uniformly sorted, rounded sand or pea gravel—graded slightly coarser than the formation sand. This pack acts as a pre‐filter and maintains the open space behind the screen.
- Seal the Bottom
- Place a gravel‐filled blank sub‐base below the screen to facilitate uniform flow into the screen slots and prevent fine sediment from settling at the well bottom.
Phase 4: Ensuring Effective Wellhead Construction and Protection
Common Mistake: Leaving the well cap and casing exposed and unsealed, allowing insects, small animals, or surface runoff to enter the well.
- Install a Vented Sanitary Well Cap
- Use an approved, gasketed well cap with a screened vent to keep out vermin and insects while allowing air release.
- Elevate the Wellhead
- Extend the casing at least 12–18 inches above the ground or concrete pad to prevent ponded water from dripping down the exterior.
- Construct a Concrete Pad and Drainage Collar
- Pour a 2 ft diameter, 4″‐thick concrete pad around the well casing. Form a gentle bevel so rainwater flows away.
- Embed a 6″ drainage collar of pea gravel around the pad’s edge to further disperse surface water.
Phase 5: Pump Installation and Water Quality Safeguards
Common Mistake: Using a pump without proper check valves or neglecting post‐installation water quality testing.
- Select the Right Pump
- Choose a submersible pump sized to your well’s yield and drawdown characteristics. Oversized pumps can over‐pumped the aquifer; undersized pumps cause cavitation.
- Include a Foot Valve and Check Valve
- Below the pump drop pipe, install a foot valve to maintain the water column and prevent the well from losing prime.
- At the discharge line, mount a brass check valve to stop reverse flow back into the well when the pump shuts off.
- Perform Initial Water Quality Tests
- After installation, collect samples for bacterial (Total Coliform and E. coli), chemical (nitrates), and physical (turbidity) analysis.
- If coliform bacteria are present, disinfect the well with a shock chlorination procedure before resampling.
Phase 6: Managing Aquifer Recharge and Well Yield
Common Mistake: Failing to monitor water table fluctuations and recharge rates, leading to over‐pumping and well fouling.
- Conduct a Step‐Drawdown Test
- Measure drawdown at incremental pumping rates to identify the sustainable pumping rate without excessive drawdown or turbidity.
- Install a Monitoring Port
- Add a dedicated pressure‐tight port in the wellhead for a dedicated water‐level transducer. Automated loggers can track daily fluctuations and help you avoid pumping during low‐recharge periods.
- Implement Managed Aquifer Recharge (MAR)
- Where local regulations allow, divert clean roof or surface runoff via infiltration trenches positioned uphill of the well recharge zone. This boosts aquifer levels during dry spells.
Phase 7: Routine Maintenance and Long-Term Protection
Common Mistake: Neglecting annual inspections and failing to maintain setbacks as land use evolves.
- Annual Wellhead Inspection
- Check the sanitary seal, well cap, pad, and drainage collar each year. Repair cracks in concrete pads and reseal beneath the cap as needed.
- Periodic Water Testing
- Test for coliform bacteria and nitrates annually—even in previously “safe” wells. After any major flooding event, resample before consuming the water.
- Maintain Setbacks and Vegetative Buffers
- Keep the 100-ft setback zone around the well free of new septic fields, chemical storage, and heavy livestock traffic.
- Plant deep-rooted grasses or shrubs in this zone to stabilize soil and filter runoff.
- Record Keeping
- Log all drilling, grouting, pump servicing, and water testing. These records help diagnose future yield changes and protect resale value.
Conclusion
By rigorously applying this seven-phase approach—intelligent siting, robust casing and sealing, precise screen and gravel pack installation, wellhead protection, pump and water-quality safeguards, aquifer recharge management, and diligent maintenance—you can correct the most pervasive mistakes in private well construction. The result is a reliable, safe, and sustainable groundwater supply that meets household and irrigation needs while preserving the health of your local aquifer for generations to come.