August 8, 2025 – As the afternoon sky darkens and another torrential downpour begins, thousands of residents across Phnom Penh perform a familiar ritual. They listen for the tell-tale drip… drip… drip, scan their ceilings for dark, spreading stains, and strategically place buckets to manage the leaks. For owners of buildings with flat roofs—a ubiquitous feature of the city’s architecture from classic shophouses to modern villas—the rainy season is often a long and stressful battle against water intrusion.
A simple, clear construction diagram that has been shared among architects and builders provides a powerful explanation for this widespread problem. It breaks down exactly why so many flat roofs fail and presents the professional, step-by-step solution that can permanently end the rainy season nightmare.
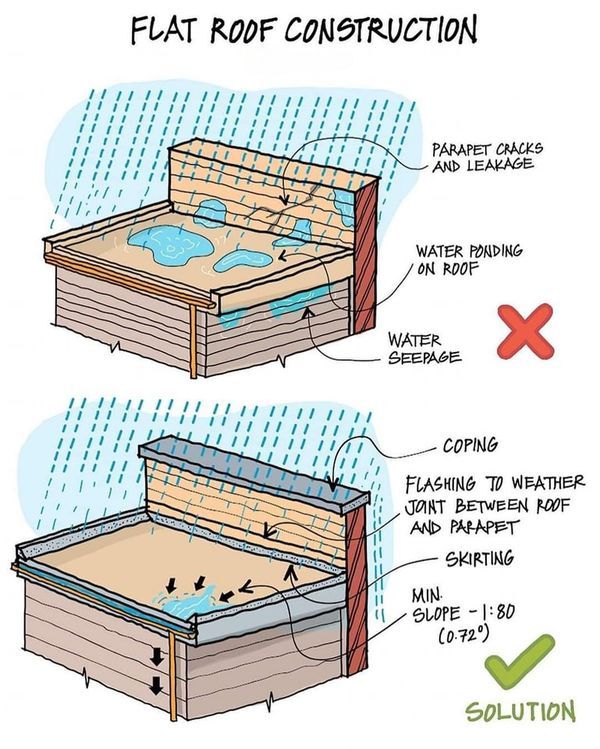
Part 1: Deconstructing the Failure – The Common Mistakes
The top half of the diagram, marked with a large red ‘X’, is an unfortunate but accurate depiction of a poorly constructed flat roof. It highlights a series of critical design flaws that are all too common in Phnom Penh.
Mistake #1: Water Ponding on the Roof
The most fundamental error is designing a roof that is perfectly flat. While it may seem logical, this creates a shallow basin. As the diagram shows, rainwater simply collects in large pools, a phenomenon known as “ponding.” This standing water has significant weight—a pool just 5cm deep covering a 4×5 meter area weighs a full metric ton (1000 kg). This immense, constant pressure puts enormous stress on the building’s structure and relentlessly seeks out any microscopic flaw in the waterproof membrane. It’s not a roof; it’s a poorly made, unintended swimming pool.
Mistake #2: Parapet Cracks and Unsealed Joints
The parapet is the low wall that extends above the roofline. The diagram shows two failure points here. First, cracks can form in the parapet wall itself, allowing rain to soak into the masonry like a sponge. Second, and far more critical, is the joint where the flat roof surface meets the vertical parapet wall. Without proper sealing, this 90-degree corner becomes a superhighway for water to seep into the building structure, often appearing as dampness or leaks on the inside wall just below the ceiling.
Mistake #3: Inevitable Water Seepage
This is the direct result of the first two mistakes. The constant pressure from ponding water, combined with easy entry points at the parapet joints, guarantees that water will eventually find its way through the roof’s layers. This “seepage” leads to the familiar damaged ceilings, peeling paint, mold growth, and in severe cases, can compromise electrical systems and cause concrete spalling due to rusting of the internal rebar.
Part 2: The Professional Solution – A Dry Roof by Design
The bottom half of the diagram, with its green checkmark, illustrates that a durable, leak-proof flat roof is not the result of magic or expensive, temporary paints, but of smart, fundamental design. It is a system engineered to actively manage and shed water.
Solution #1: The Mandatory Slope (Min. Slope 1:80)
The most important principle is that a “flat roof” should never be truly flat. The diagram specifies a minimum slope of 1:80. This means for every 80 centimeters of horizontal distance, the roof level drops by 1 centimeter. This subtle, often unnoticeable gradient (0.72 degrees) is enough to use the power of gravity to direct water efficiently towards designated drains or scuppers, ensuring it flows off the roof instead of ponding on it. This slope is typically created with a lightweight concrete mix, called a screed, applied on top of the main structural slab.
Solution #2: Fortifying the Weakest Link (The Roof-to-Wall Joint)
A leak-proof roof is only as strong as its weakest point, which is almost always the joint between the horizontal and vertical surfaces. The solution is a multi-layered defense system:
- Skirting (or Upturn): The primary waterproof membrane of the roof should not stop at the corner. As shown, it must curve upwards and continue for at least 15-20cm up the face of the parapet wall, creating a seamless, waterproof basin.
- Flashing: This is a secondary layer of protection installed over the skirting to “weather” the joint. It acts as a robust cover, ensuring that no water can get behind the upturned membrane. This two-part system is the professional standard for ensuring this critical joint remains permanently sealed.
Solution #3: Capping the Parapet
To prevent water from soaking into the parapet wall from above, a “coping” is installed. This is a cap, often made of sloped concrete or metal, that covers the top of the parapet. It functions like a miniature roof for the wall itself, directing water to fall onto the main roof surface to be carried away by the drainage system.
Local Expert: “Stop Patching, Start Designing”
Mr. Chea Vuthy, the fictional founder of a local renovation firm, ‘Phnom Penh Property Care,’ says these issues are his company’s most common call-out during the wet season.
“Every year, it’s the same story,” Vuthy says. “People spend money on expensive waterproofing paints, which are just a temporary patch. The paint might last one season, but the real problems—the ponding and the bad joints—are still there. The water will always win.”
“The mistake is thinking short-term,” he argues. “A builder saves a small amount of money and time by not creating a proper slope or not detailing the flashing correctly. But the building owner pays for it ten times over in damages and repairs. We see flat roofs used for everything here: water tanks, air-con units, laundry. Every time someone walks on the roof or installs a new unit, they can create tiny cracks in a poor-quality membrane. Without a slope, the water just sits on that crack and works its way in. With a proper slope, the water is gone in 20 minutes.”
What You Can Do
- For Current Building Owners: After the next rain, safely access your roof. If you see large pools of water still standing an hour later, your roof has a slope problem. Inspect the corners where the roof meets the wall. If the material looks cracked, peeling, or separated, your flashing has failed. Instead of another can of sealant, invest in a permanent solution by having a professional contractor assess the cost of adding a proper drainage screed and re-sealing the joints correctly.
- For Those Building New: Do not leave the roof design to chance. Ensure your architectural plans and your contract with the builder explicitly specify a minimum drainage slope of 1:80 and detail the use of proper skirting and flashing at all parapet walls.
Ultimately, this diagram teaches a simple but vital lesson: A dry, durable flat roof is an active system, not a passive one. It is a carefully considered design that works with gravity, not against it, protecting a building’s value and providing priceless peace of mind when the monsoon clouds gather.