A highly detailed architectural plan for a robust, heavy-duty outbuilding has become an object of admiration online, representing the gold standard for DIY construction. With its massive timbers, deep foundation, and strong engineering, it appears to be the blueprint for a structure that could last for centuries, capable of withstanding almost any challenge.
This plan is an outstanding guide to building for maximum strength. However, its very robustness presents a subtle but significant risk for the aspiring builder. The most common mistake in construction isn’t always building too weak; sometimes, it’s building too strong for the wrong reasons. Following this “heavyweight” plan for a simple backyard project can be a wasteful and unnecessarily complex error in judgment.
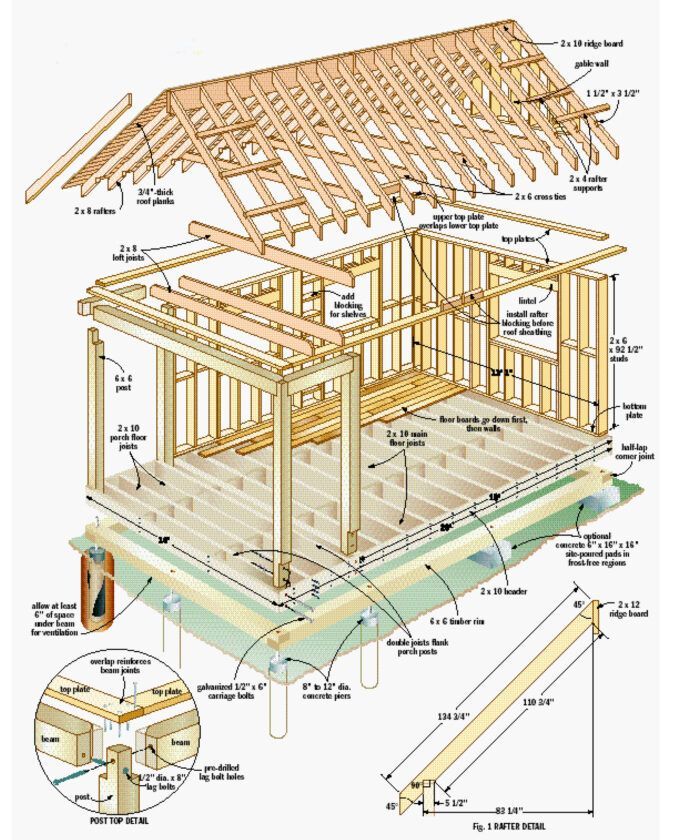
Step 1: Anatomy of a Heavy-Duty Design
To understand its purpose, it’s essential to examine the impressive, high-performance features specified in the diagram. This is clearly a design for a demanding application or a harsh, cold climate.
- A Deep and Adaptable Foundation: The structure is supported by a substantial pier foundation, with a note explicitly advising to sink the concrete piers deeper in “frost-free regions” (a likely typo, meaning regions with frost). This demonstrates a design intended to resist the powerful forces of frost heave in cold climates. The Post Top Detail shows a secure, load-bearing connection between the posts and the beams.
- A Floor Built for Heavy Loads: The floor system is immense. It’s framed with 2×10 main floor joists and a 2×10 header, supported by double 2×10 plank porch posts. This is a floor engineered not just for foot traffic, but for the weight of heavy equipment, a vehicle, or a fully loaded second-story storage loft.
- Thick Walls for Extreme Insulation: The walls are framed with 2×6 studs. A key reason for using 2x6s over standard 2x4s is to create a deeper wall cavity (5 ½ inches) that can hold thick, high-R-value insulation, essential for keeping a building warm through a freezing winter.
- A Roof Engineered for Snow: The roof structure is equally powerful. It uses heavy 2×8 rafters, a 2×10 ridge board, and 2×8 loft joists that double as rafter ties. This creates an incredibly strong system designed to support a massive vertical load, such as the heavy, wet snow common in mountainous or northern regions of the US and Europe.
Step 2: The Critical Mistake – Using a Sledgehammer to Crack a Nut
This blueprint is an excellent solution for a specific problem. The mistake is applying this solution to a project that doesn’t have that problem. For a standard garden shed in a mild or temperate climate, this design is a classic case of overbuilding.
- The Unnecessary Cost: The primary consequence of overbuilding is financial. A 2×6 stud can cost significantly more than a 2×4. A 2×10 joist costs much more than a 2×6. For a simple storage shed, upgrading every piece of lumber to this heavy-duty specification could easily double the cost of the framing materials without providing any meaningful benefit.
- The Unnecessary Complexity: This is not a simple weekend project. Handling heavy 2×10 and 2×12 timbers, stick-framing a complex rafter roof, and building a loft floor requires advanced skills, more labor, and often specialized equipment. For a basic shed, a simpler design with pre-made trusses and 2×4 walls is far more achievable for the average DIYer.
- The Mismatch of Purpose: The “why” behind the design is crucial. The 2×6 walls are for insulation. If you are building an unheated storage shed in a moderate climate, you are paying a premium for a deep wall cavity you will never use. The heavy roof is for snow load. If you live in a region that gets little to no snow, you are paying for strength that will never be tested.
The “correction” is to practice the principle of right-sizing. A well-built shed with 2×4 walls and a standard rafter or truss system is perfectly durable for storing lawnmowers and garden tools. You should match the strength, complexity, and cost of a plan to the actual, real-world needs of your project.
Step 3: From Blueprint to Building Site – Expert Advice
“There’s a temptation in the DIY community to believe that ‘stronger is always better,’ but that’s not what smart building is about,” says Sarah Jenkins, a (fictional) senior editor at Practical Homebuilding magazine. “Smart building is about efficiency and appropriateness. This plan is fantastic if you’re building a two-story workshop in a snowy region like Colorado or the Alps. It is complete overkill for a garden shed in North Carolina or the south of France.”
“The most important question a builder should ask is, ‘What problem am I trying to solve?'” Jenkins adds. “If the problem is storing your tools, you don’t need a structure designed to hold up five feet of snow. Define your needs first, then find a plan that meets them efficiently and safely.”
Conclusion: The Smartest Tool is the Right Plan
This heavy-duty building plan is an exceptional resource for understanding the principles of robust, cold-climate construction. It serves as an excellent guide for a demanding project where heavy loads and extreme weather are a primary concern.
However, for the majority of common backyard projects, it is a lesson in the importance of restraint and proper planning. The smartest builders understand that the goal isn’t just to build a strong structure, but to build the right structure. Choosing a plan that is appropriately scaled to your needs, budget, skills, and—most importantly—your local climate is the most critical first step to a successful and satisfying project.