A beautifully rendered architectural diagram is winning praise online for its meticulous focus on a frequently overlooked aspect of construction: exterior finishing and trim. The image, detailing the rear wall of a classic shed or cottage, goes beyond simple framing to illustrate the layers of craftsmanship that create a timeless, durable, and weatherproof building.
For DIY builders and homeowners, this diagram is a masterclass in traditional carpentry. It reveals that the “finishing touches” are not merely decorative; they are a complex system of interlocking parts designed to protect the building from the elements. However, the biggest mistake an amateur can make is to admire the beauty of these details without fully understanding their function, potentially leading to costly water damage down the line.
Step 1: Deconstructing the Layers of Craftsmanship
This diagram is best understood by examining its detailed sections, which reveal how a skilled carpenter creates a handsome and weather-resistant facade.
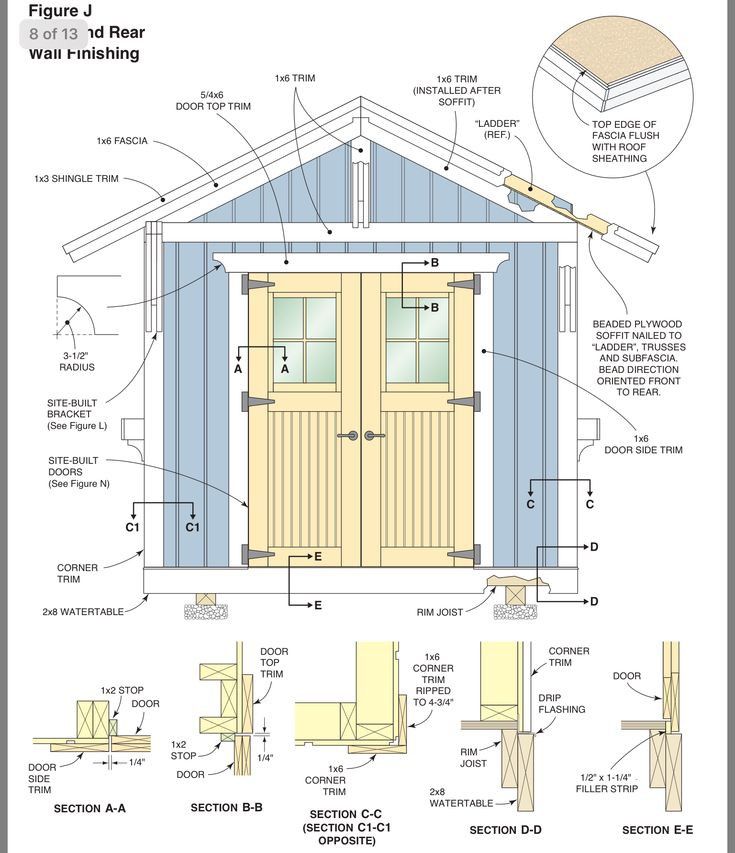
- The Roof Edges (Eave and Gable): The drawing shows a multi-layered approach. A 1×6 Fascia board covers the ends of the roof rafters. Above that, a 1×3 Shingle Trim provides a clean edge for the shingles to butt up against. The “Ladder” detail illustrates how outriggers are built to support the roof overhang on the gable end, creating a strong and visually appealing roofline.
- The Corners and Base: The corners aren’t simply butted together. Section C-C shows how wide 1×6 Corner Trim is used to create a strong visual corner and cleanly cover the edges of the siding. At the base, a 2×8 Watertable board is installed. This thick, durable piece is designed to shed water away from the foundation and protect the bottom of the wall, which is most vulnerable to moisture splash-back from the ground.
- The Door Assembly (Sections A-A and B-B): The diagram shows a handsome, site-built door set within a robust frame. The trim work is layered, with a 1×2 Stop molding inside the door jamb that the door closes against, creating a snug, weather-resistant seal. A thick 5/4×6 Door Top Trim acts as a classic lintel, adding visual weight and helping to direct water away from the top of the door.
- The Weatherproofing Details (Sections D-D and E-E): This is where the functional genius lies. Section D-D shows a piece of Drip Flashing—a critical piece of metal—tucked behind the corner trim. This flashing ensures that any water that gets behind the trim is directed back out, preventing it from reaching the wall sheathing. Section E-E shows a Filler Strip under the door, another important detail for sealing a common point of air and water infiltration.
Step 2: The Critical Mistake – Beauty Without Function
The most common mistake made by inexperienced builders is to replicate the look of this traditional trim work without understanding the physics of water management.
- The Problem: Missing or Improper Flashing. A builder might painstakingly cut and install all the beautiful wood trim but forget the hidden metal flashing (like the drip flashing in Section D-D). They might rely on caulk alone to seal the joints. Caulk eventually fails, cracks, or pulls away. Without the backup protection of properly installed flashing, water will inevitably find its way behind the trim boards.
- The Consequences. Once water gets behind the trim, it becomes trapped against the wooden wall sheathing. This creates a perfect environment for rot, decay, and insect infestation. The damage happens slowly and silently, and by the time it becomes visible as peeling paint or soft spots, the underlying structural damage can be extensive and expensive to repair. The beautiful trim, intended to protect the building, has instead created a sponge that holds water against it.
The Correction: Think Like a Raindrop
The fundamental rule of weatherproofing is that every component should be layered to shed water downwards and outwards.
- Start with a Weather-Resistive Barrier (WRB): Before any trim or siding is installed, the wall sheathing should be covered with a WRB (like house wrap or building paper).
- Flash ALL Openings: Every window and door needs to be properly flashed, with layers of flashing tape and metal head flashing integrated with the WRB.
- Layer from the Bottom Up: Just like roof shingles, siding and trim should be installed so that each piece overlaps the piece below it, ensuring water always flows down the outside of the surface.
- Don’t Rely on Caulk Alone: Caulk is a sealant, not a flashing. It is the last line of defense, not the first. Proper flashing is the primary and most important barrier.
Step 3: An Expert’s Perspective on Durable Design
“What separates professional work from amateur work is an obsession with water management,” says Michael Coates, a (fictional) master carpenter and building consultant. “Anyone can cut a board to length and nail it on a wall. A pro thinks about where the water will go when that joint eventually opens up a little bit. That’s what flashing is for. It’s the cheap insurance you install behind the expensive, pretty stuff.”
“This diagram is excellent because it actually shows some of that flashing detail,” Coates adds. “But the key takeaway for any DIYer is this: if you don’t understand why each of those little pieces is there, especially the hidden ones, you are better off using a simpler system. A simple but correctly flashed trim job is infinitely better than a complex, beautiful one that leaks.”
Conclusion: The Craft of Durability
This detailed plan is a valuable celebration of traditional building craft. It reminds us that a well-built structure is a thoughtful assembly of carefully considered layers. The beauty of the finished product is not just in its appearance, but in its intelligent design that works in harmony with nature to protect the building’s core.
For anyone inspired by this image, the lesson is clear: study the details, admire the craftsmanship, but most importantly, embrace the fundamental principles of water management. By ensuring that every cut, joint, and layer contributes to shedding water effectively, you can build a project that is not only beautiful on day one, but remains strong, dry, and durable for generations to come.