“A simple bin, some worms, and your kitchen leftovers can create powerful compost and liquid fertilizer for gardens.”
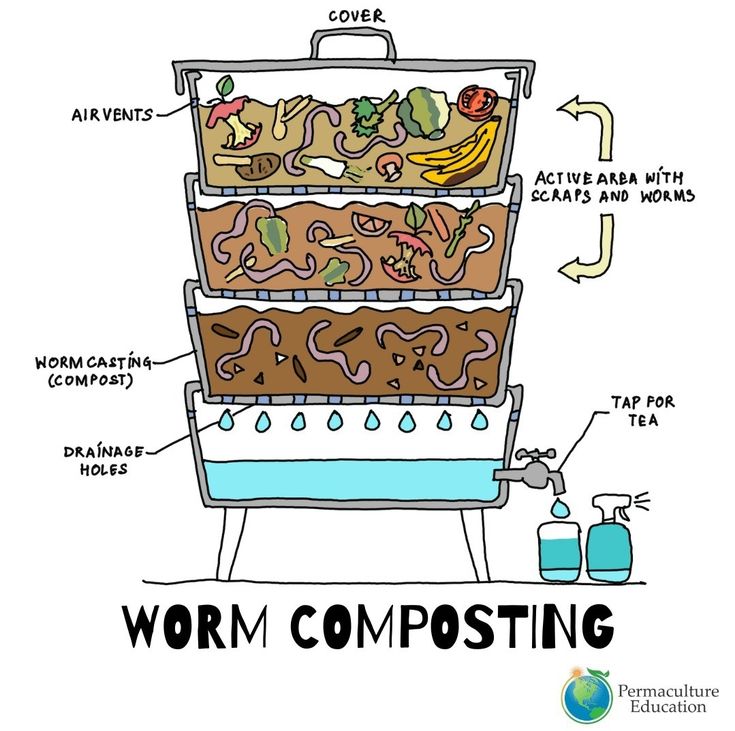
🌱 What the Diagram Shows
This diagram explains the process of worm composting step by step:
- Cover with Air Vents – Keeps the bin ventilated while preventing pests.
- Active Area with Scraps & Worms – Food waste like vegetable peels, fruit scraps, and coffee grounds are placed here for worms to feed on.
- Worm Casting Layer – As worms eat and digest the waste, they produce castings, which are nutrient-rich compost.
- Drainage Holes – Prevent excess water buildup, keeping the bin balanced and breathable.
- Liquid Collection Tray (“Worm Tea”) – Liquid drains to the bottom and can be tapped out. This “worm tea” is an excellent natural fertilizer when diluted with water.
🪱 Why Worm Composting Matters
- ♻️ Reduces Waste – Up to 40% of household food scraps can be diverted from landfills.
- 🌍 Eco-Friendly – Cuts methane emissions from decomposing waste.
- 🌱 Soil Health – Worm castings improve soil texture, water retention, and plant growth.
- 💧 Natural Fertilizer – Worm tea is like a “super juice” for plants.
🏡 How to Start Your Own Worm Bin
- Get a multi-layer worm bin (or DIY with stackable crates).
- Add bedding like shredded newspaper or cardboard.
- Introduce composting worms (red wigglers are most common).
- Feed them small amounts of scraps—vegetable peels, fruit cores, coffee grounds, and eggshells.
- Harvest worm castings every few weeks and use worm tea for your garden.
🌍 A Growing Trend
From city apartments to backyard farms, worm bins are becoming a must-have for eco-conscious households. Schools and community gardens also use them as teaching tools, helping kids see the magic of waste turning into life-giving soil.
👉 Bottom line: With just a little space and a handful of worms, anyone can turn kitchen scraps into “black gold” for plants and help the planet at the same time.