August 11, 2025 – A clear, six-step instructional diagram, originating from Eastern Europe, provides an excellent visual guide to one of the most essential parts of any construction project: building the roof eaves and preparing the surface for roofing. Its logical, step-by-step process makes a complex task seem manageable for DIY builders.
This diagram illustrates a perfectly sound, standard-duty method for finishing a roof edge on a masonry building. However, the critical mistake an amateur builder could make is assuming this “standard” method is sufficient for every climate. For regions that experience high winds, heavy rain, or significant snowfall, this design requires several “heavy-duty” upgrades to ensure it is durable and safe for the long term.
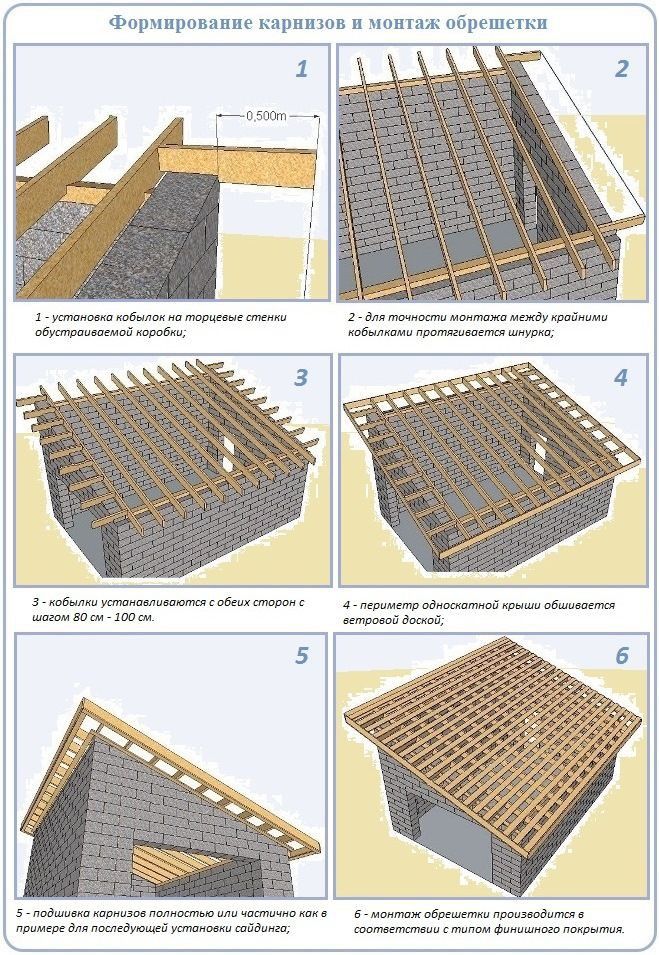
Step 1: The Basics of Building an Eave
The diagram, though in Russian, illustrates a universal construction process. Here’s a step-by-step breakdown of the standard method it shows.
- Framing the Overhang: The process begins by attaching wooden outriggers (called “кобылки“) to the top of the masonry gable wall. These extensions create the structure for the roof overhang, or eave.
- Ensuring Alignment: A string line is stretched between the first and last outriggers. This acts as a precise guide to ensure all the subsequent outriggers are installed in a perfectly straight line.
- Completing the Frame: Additional outriggers are installed along the wall, typically spaced 80-100 cm apart, to complete the eave’s underlying structure.
- Installing the Fascia: A “wind board,” known in English as a fascia board, is fastened to the ends of the outriggers. This creates a clean, vertical surface for attaching gutters and gives the roof edge a finished look.
- Enclosing the Soffit: The underside of the eave is enclosed with sheathing, creating the soffit. This protects the framing from the elements and pests.
- Installing Roofing Battens: Finally, roofing battens (обрешетка) are installed across the rafters. These are the strips of wood to which the final roofing material (tiles, metal panels, etc.) will be attached.
This is an excellent guide to the fundamental sequence of building a basic roof eave.
Step 2: The Critical Mistake – A Standard Design for an Extreme Climate
The primary mistake is not in the technique itself, but in applying this standard-duty design to a location with heavy-duty weather demands without crucial upgrades. A roof eave is constantly under attack from three forces: gravity (weight), wind uplift, and water intrusion. Here’s how to upgrade the standard design to fight back.
Correction 1: Upgrading for High-Wind Regions
- The Problem: The diagram implies standard nail connections. In a high-wind event (common in coastal US states or stormy parts of Europe), wind getting under the eave can create powerful uplift forces that can tear a simply nailed structure apart.
- The Upgrade: Instead of relying on nails alone, all connections should be made with structural screws or specialized metal connectors (hurricane ties). These create a continuous, engineered load path that securely anchors the eave and the entire roof structure to the walls, preventing it from being lifted or peeled off.
Correction 2: Upgrading for Heavy-Rain Regions
- The Problem: The simple overlapping wood shown in the diagram creates many seams where wind-driven rain can penetrate. Relying on paint and caulk to seal these joints is a short-term solution that will eventually fail.
- The Upgrade: A comprehensive waterproofing system is essential. This includes installing a self-adhering ice and water shield membrane on the roof deck, especially along the eaves. All joints, particularly where the wooden outriggers meet the masonry wall, should be meticulously sealed and protected with robust metal flashing that directs water safely away.
Correction 3: Upgrading for Heavy-Snow Regions
- The Problem: The weight of accumulated snow and ice can be immense. The lumber sizes and connections shown may not be sufficient to support this heavy vertical load without sagging, breaking, or pulling away from the wall.
- The Upgrade: The entire roof system, including the outriggers and their connections, must be engineered for the specific snow load required by local building codes. This may involve using larger dimension lumber (e.g., 2x8s instead of 2x6s), stronger fasteners, and a steeper roof pitch to help shed snow more effectively.
[Image showing a cutaway of a roof eave with hurricane ties and waterproof membrane installed]
Conclusion: Build for the Worst Day, Not the Average Day
“This diagram shows a perfectly acceptable way to build a roof for a basic shed in a very mild climate,” says Frank Davies, a (fictional) veteran contractor. “The mistake is thinking that ‘acceptable’ is the same as ‘resilient.’ Today, with more extreme weather events, building to the bare minimum standard is asking for trouble.”
“Investing in better fasteners, proper flashing, and a water shield membrane might add a small percentage to the upfront cost of a roof, but it multiplies its durability and resilience,” he adds. “It’s the cheapest and most effective insurance policy you can buy for your building.”
This clear instructional guide is a valuable tool for understanding the basic process of finishing a roof. However, its real lesson is that responsible building requires more than just following steps. It requires understanding the specific environmental forces your structure will face and engineering it to withstand them. A truly well-built roof is one that is designed not just for a calm, sunny day, but for the worst storm it is ever likely to encounter.