📰 Today’s Build Bulletin

1. Site Preparation & Footprint Layout
Headline: “Ground Zero—Precision Grading Begins!”
Step-by-Step:
-
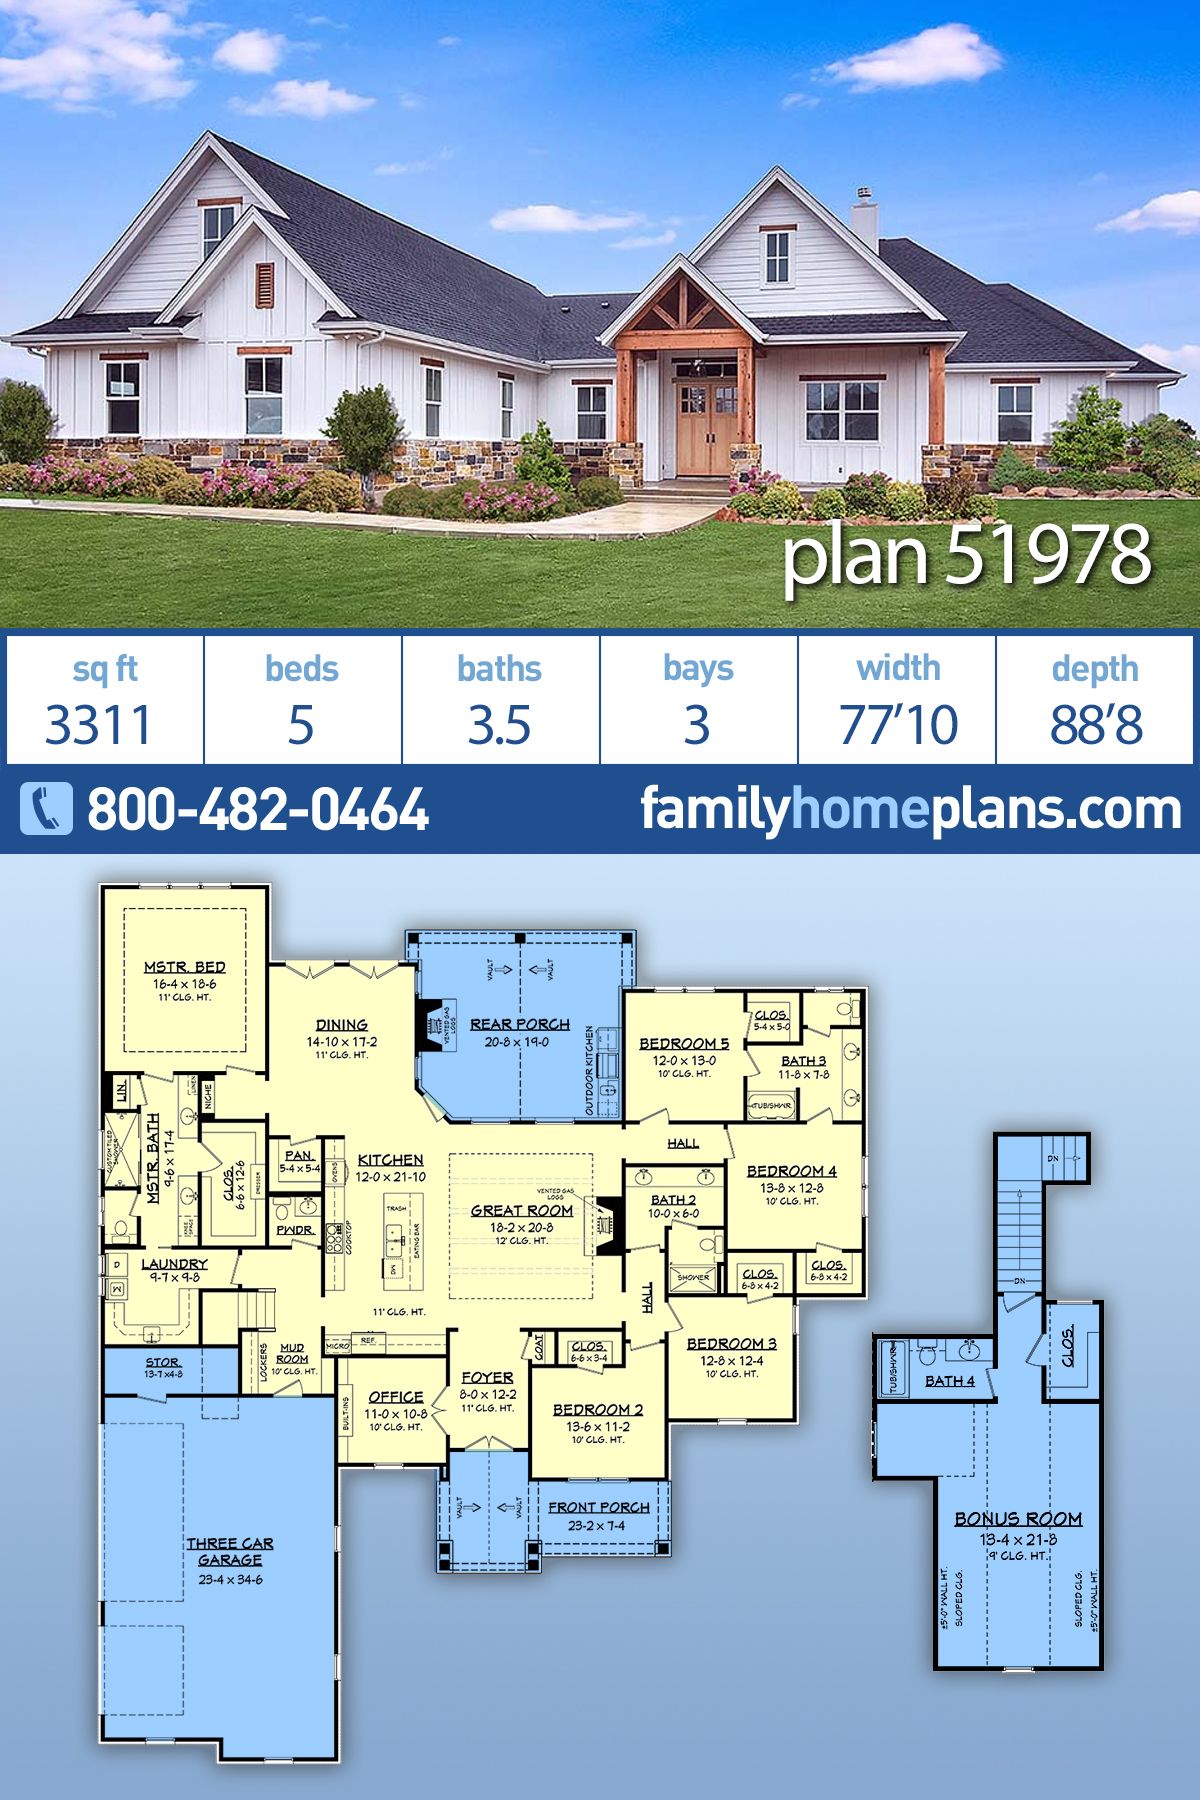
Survey & Stakeout: Use the plan’s 77′-10″ × 88′-8″ dimensions to mark property corners and building setbacks.
-
Clearing & Grading: Remove vegetation and topsoil; level to design elevation, installing erosion controls.
-
Utility Trenching: Excavate trenches for sewer, water, gas, and electrical feeds—tie into municipal mains.
2. Reinforced Concrete Foundation
Headline: “Rock-Solid Underpinning Poured!”
Step-by-Step:
-
Excavate Footings: Dig trench footings to frost-line depth around the entire perimeter and under major load points.
-
Formwork & Rebar: Assemble 2×6 timber forms and place #4 rebar grid per engineered spacing.
-
Concrete Placement: Pump high-strength mix; screed slab area for the 3-car garage, mudroom, kitchen, and great room zones.
-
Curing: Cover and mist for seven days to avoid cracking and achieve full design strength.
3. Structural Framing & Roof Deck
Headline: “Walls Go Up—Creating Five Bedrooms!”
Step-by-Step:
-
Sill Plates & Anchor Bolts: Bolt treated sill plates to the foundation at 6′-o.c. per code.
-
Wall Framing: Erect 2×6 exterior studs and 2×4 interior studs—lay out master suite, office, and four guest bedrooms.
-
Engineered Trusses: Crane in roof trusses; secure with hurricane ties and shear panels for lateral stability.
-
Sheathing & Shear Walls: Nail OSB panels; brace corners for the bonus room over the garage.
4. Exterior Envelope & Weatherproofing
Headline: “Rain or Shine—Home Stands Ready!”
Step-by-Step:
-
ZIP System Panels: Apply sheathing with built-in moisture barrier; tape seams to create an airtight shell.
-
Windows & Doors: Install energy-efficient units per bay—three-car garage door, front entry, rear porch sliders.
-
Roofing Underlayment & Shingles: Lay synthetic underlayment; nail architectural shingles with drip edges.
-
Siding & Trim: Fit board-and-batten vinyl siding and stone veneer accents around the porch and garage base.
5. Interior Systems & Rough-Ins
Headline: “Wiring Up for Comfort & Connectivity!”
Step-by-Step:
-
HVAC Duct & Equipment: Hang flex ducts; set furnace in utility room, mount A/C condenser outside.
-
Plumbing Rough-In: Run PEX for kitchens and baths—three full baths plus powder room.
-
Electrical Rough-In: Pull THHN wires for outlets, switches, lighting cans and dedicated circuits for kitchen island.
-
Low-Voltage Cabling: Prewire for security, internet and smart-home panels in the study.
6. Interior Finishes & Millwork
Headline: “From Drywall to Designer Details!”
Step-by-Step:
-
Insulation & Drywall: Blow-in attic insulation; spray-foam exterior walls; hang and finish gypsum board.
-
Trim & Doors: Install baseboards, crown moldings, interior doors, and built-in shelving in office and studies.
-
Flooring & Paint: Lay engineered hardwood in living areas—tile in baths and laundry; apply two-coat paint finish.
-
Cabinetry & Fixtures: Fit kitchen cabinets, master bath vanities, and plumbing fixtures; mount light fixtures and hardware.
7. Garage & Bonus Room Completion
Headline: “Bonus Space Above—Suite Success!”
Step-by-Step:
-
Garage Door Installation: Hang three-bay insulated door; connect opener and safety sensors.
-
Bonus Room Build-Out: Frame, insulate, drywall, and finish 13′-4″ × 21′-8″ loft area above.
-
Trim & Flooring: Carpet or LVP; paint walls; install closets and bath 4 fixtures for future flex-space use.
8. Final Sitework & Landscaping
Headline: “Curb Appeal—Driveway to Doorstep!”
Step-by-Step:
-
Driveway & Walkways: Pour or pave a 23′ × 33′ garage apron and front porch path.
-
Grading & Drainage: Fine-grade swales; install downspout extensions.
-
Planting & Turf: Lay sod; plant shrubs and flowering beds to frame the farmhouse façade.
-
Punch List & Inspections: Walk with builder, address any touch-ups, and secure final occupancy permit.