By: Modern Carpentry Digest | August 5, 2025
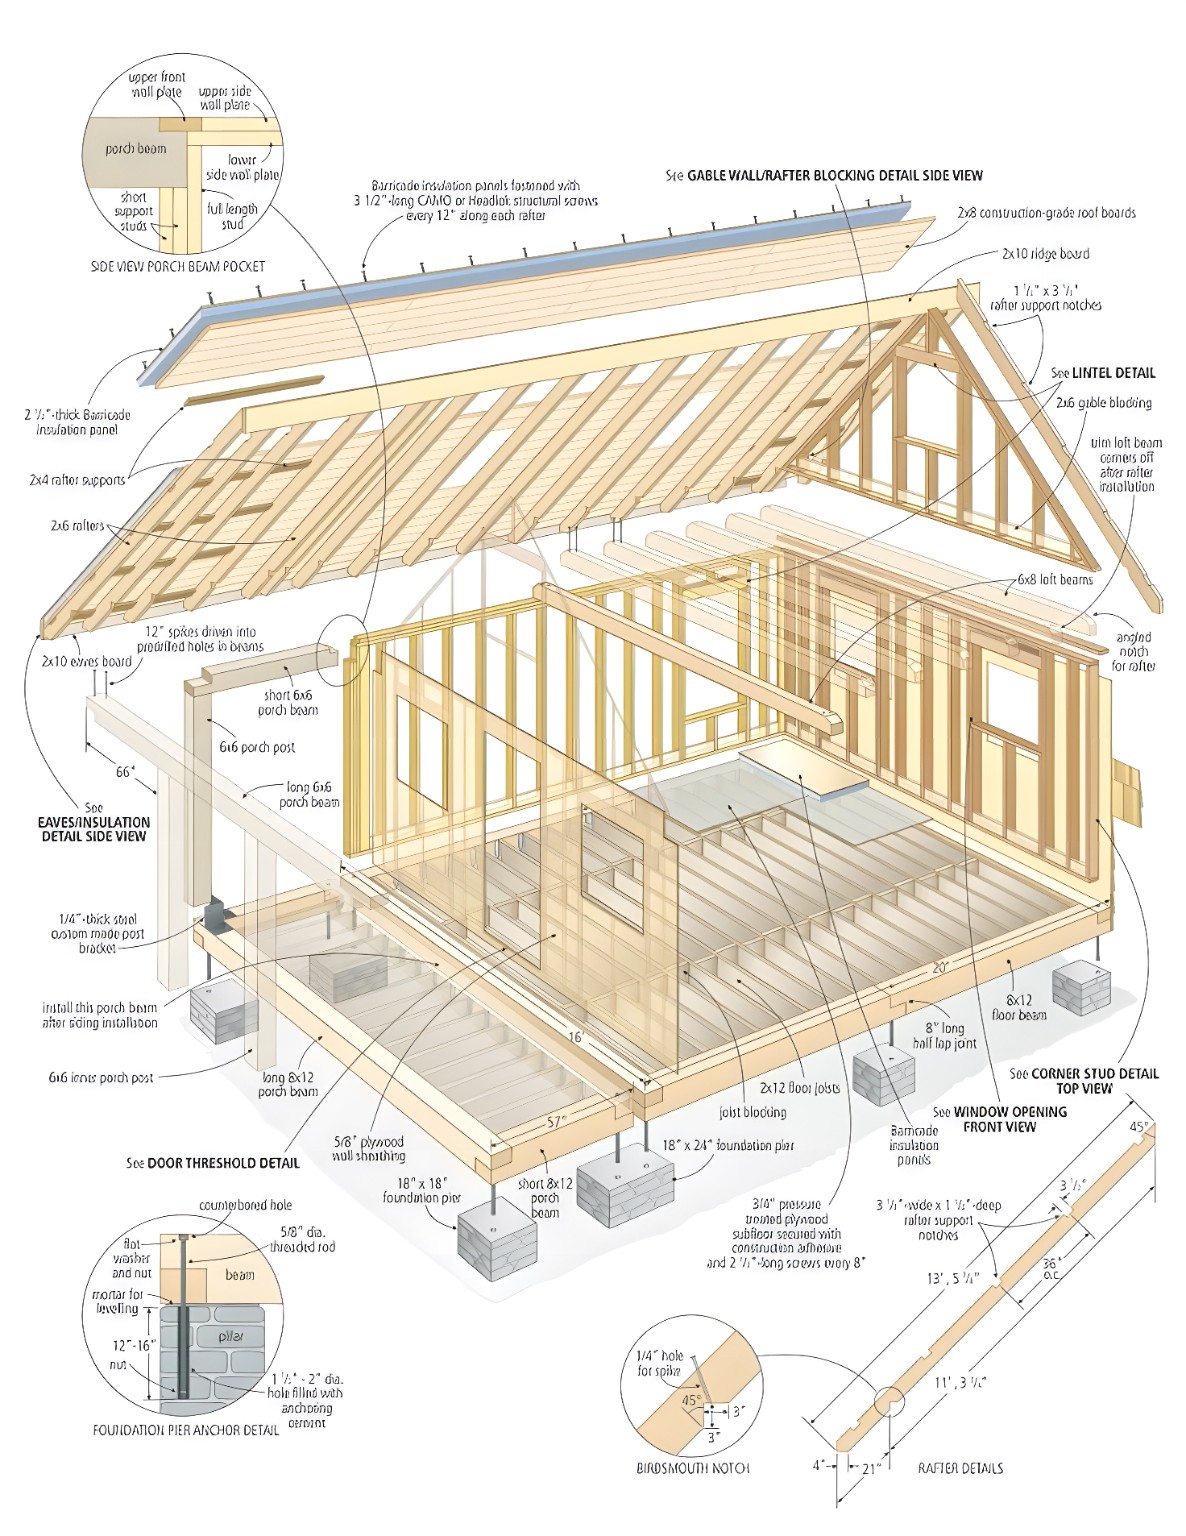
When it comes to home additions, few features offer as much warmth and curb appeal as a well-crafted porch, seamlessly integrated with your roof structure. The isometric detail above lays out every element—from foundation piers and floor beams to rafter notches and insulation panels—required to frame a porch that’s both structurally robust and energy-efficient. In this in-depth, news-style feature, we’ll walk you through each critical step, so you can replicate this design on your next build. Let’s raise the roof—literally.
1. Establishing a Solid Foundation
The journey begins underground, with carefully placed foundation pier blocks supporting both the main floor and the porch extension.
- Pier Placement and Footings
- Excavate and compact soil at each pier location per the plan’s “18″×18″ foundation pier” callout.
- Pour concrete footings bearing below frost line, then set precast pier blocks on top, ensuring each is level and aligned.
- Anchor Rods and Post Bases
- Embed ½″ threaded rod into the center of each pier before the concrete sets.
- Once cured, bolt on galvanized steel post brackets (¼″ thick) for the 6×6 porch posts, allowing slight adjustment for leveling.
2. Laying Out the Floor System
Above the piers, the 8×12 floor beams and 2×12 joists form a sturdy platform.
- Beam Installation
- Position long 8×12 porch beams atop the outer piers, securing them to the post brackets.
- Use carriage bolts through the beam into the bracket’s saddle plate, tightening nuts with washers.
- Joist Layout & Half-Lap Joinery
- Snap chalk lines for 2×12 floor joists at 16″ on-center across the main beams.
- Where joists cross beams, cut 8″ half-lap notches so each joist sits flush on the beam’s top flange.
- Nail or bolt joists to beams for a rattle-free deck frame.
- Subfloor Sheathing
- Cover joists with 5/8″ tongue-and-groove plywood, staggering seams and sealing them with construction adhesive for rigidity and quiet.
3. Erecting Porch Posts and Beams
With the floor in place, attention turns to the porch framework that carries the eaves.
- Setting 6×6 Porch Posts
- Lift each 6×6 post into its bracket, plumb with a level, and temporarily brace.
- Tighten post-base bolts, then check diagonals for square.
- Installing the Long 6×12 Porch Beam
- Nail or bolt a 6×12 beam horizontally between posts, forming the southern edge of the porch roof.
- Pocket this beam into the main house wall’s double top plate (as shown in the detail “Side View Porch Beam Pocket”), fitting it snugly before tightening.
- Short 6×6 Porch Beam
- Add a shorter 6×6 beam at the house-side post for additional eave framing, cutting a half-lap notch into the wall stud and bearing it on the lower side wall plate.
4. Wall Framing and Pocket Details
The porch beams tie directly into the main wall’s double top plates.
- Double Plate Coordination
- Fasten an upper and lower 2×4 wall plate across the stud tops.
- Cut a pocket at the plate intersection—1½″ deep by the beam’s thickness—to host the porch beam end grain.
- Stud Alignment
- Offset the lower side wall plate studs so the beam pocket clears insulation panels (2¾″–3″ thick) without compressing them.
5. Roof Rafter Installation
The rafters extend from the main ridge downward, carrying both the house and porch eaves.
- Bird’s-Mouth Notch Layout
- Using the rafter details (bottom-right inset), mark and cut a 45° cheek and a 3″ seat at each rafter heel so it sits flush on the top plate and overhangs the porch beam by exactly 6′6″ (per the plan).
- Rafter Spacing and Support
- Snap chalk lines on the double top plates at 24″ OC.
- Lift each 2×10 rafter into place, seat the bird’s-mouth, and secure with 12d nails or 12″ spiraled spikes driven through pre-drilled holes in the rafters into the plate and pockets.
- Loft Beam Integration
- At the gable end, notch the 6×8 loft beam into the side wall framing above the top plate (as shown by the “Gim Loft Beam Corner Off After Rafter Insulation” callout), ensuring that the insulation pack behind it remains continuous.
6. Adding Insulation Panels
Energy efficiency demands a continuous thermal barrier beneath the roof sheathing.
- Barricade™ Insulation Boards
- Cut 2¾″-thick polyiso panels to fit snugly between the rafters.
- Fasten panels to the underside of 2×4 rafter supports using 3″ CAMO® or Headlok™ structural screws every 12″, as labeled in the exploded view.
- Rafter Support and Blocking
- Install 2×4 support nailing strips along each rafter bottom edge; this gives fastening for the insulation and later for the interior ceiling finish.
- Air-Sealing
- Tape all panel seams with foil-backed tape.
- Seal gaps at eaves and ridge with spray foam to prevent convective heat loss.
7. Roof Sheathing and Ridge Board
Once the insulation is in place, the exterior roof deck goes on.
- 2×8 Construction-Grade Boards
- Lay 2×8 roof boards perpendicular to rafters, securing with ring-shank nails at each rafter support.
- 2×10 Ridge Board
- Center a 2×10 at the roof peak, slipped between the last courses of roof boards on either side, and toe-nail into the upper rafter ends for a stable ridge.
8. Eaves and Flashing Detail
The porch roof’s edge must shed water cleanly into the gutter.
- Eaves Flashing
- At the rafter look-outs, install a continuous drip edge: a 2×10 emes board under the roof boards, bent with metal flashing over its nose.
- Gutter Support
- Fasten the gutter hangers directly to the flashing’s back flange, so downspouts land neatly beside porch posts.
9. Door Threshold and Transition
Where the living area floor meets the porch deck, a durable transition is vital.
- Foundation Pier Anchor
- Drill a 5/8″ hole through the porch beam and foundation anchor rod.
- Secure with a washer and nut, tightening until the beam is perfectly level.
- Threshold Detail
- Install a treated threshold beam at the door opening (see “Door Threshold Detail”), packing beneath it with leveling shims as needed for a weather-tight seal.
10. Final Assembly: Spars, Battens, and Finishes
With the structural shell in place, add your roof covering supports and finish materials.
- Spars (Roof Battens)
- Drive 5×10 spars (battens) across the 2×8 boards at 60 cm centers, nailing through each into the roof boards below.
- Batten Insulation Panel Seal
- Seal the 3/16″ plywood sub-roof to the insulation with construction adhesive and 2¼″ screws at every 8″.
- Interior Finish
- From below, fasten drywall or tongue-and-groove ceiling planks to the 2×4 support strips for a clean soffit and ceiling.
Conclusion
From the hidden threaded rod anchoring your porch beam to the careful pocket cut into the double plate, every detail in this assembly contributes to a porch and roof that will stand the test of time—structurally sound, weather-tight, and energy-efficient. By following these ten meticulous steps—foundation, framing, insulation, and finishing—you’ll create a porch-integrated roof system that looks seamless from the street and performs like a champion on heating bills. Here’s to craftsmanship you can trust—one beam, one rafter, one screw at a time.
Happy building!