By Architectural Digest: Build Edition | August 5, 2025
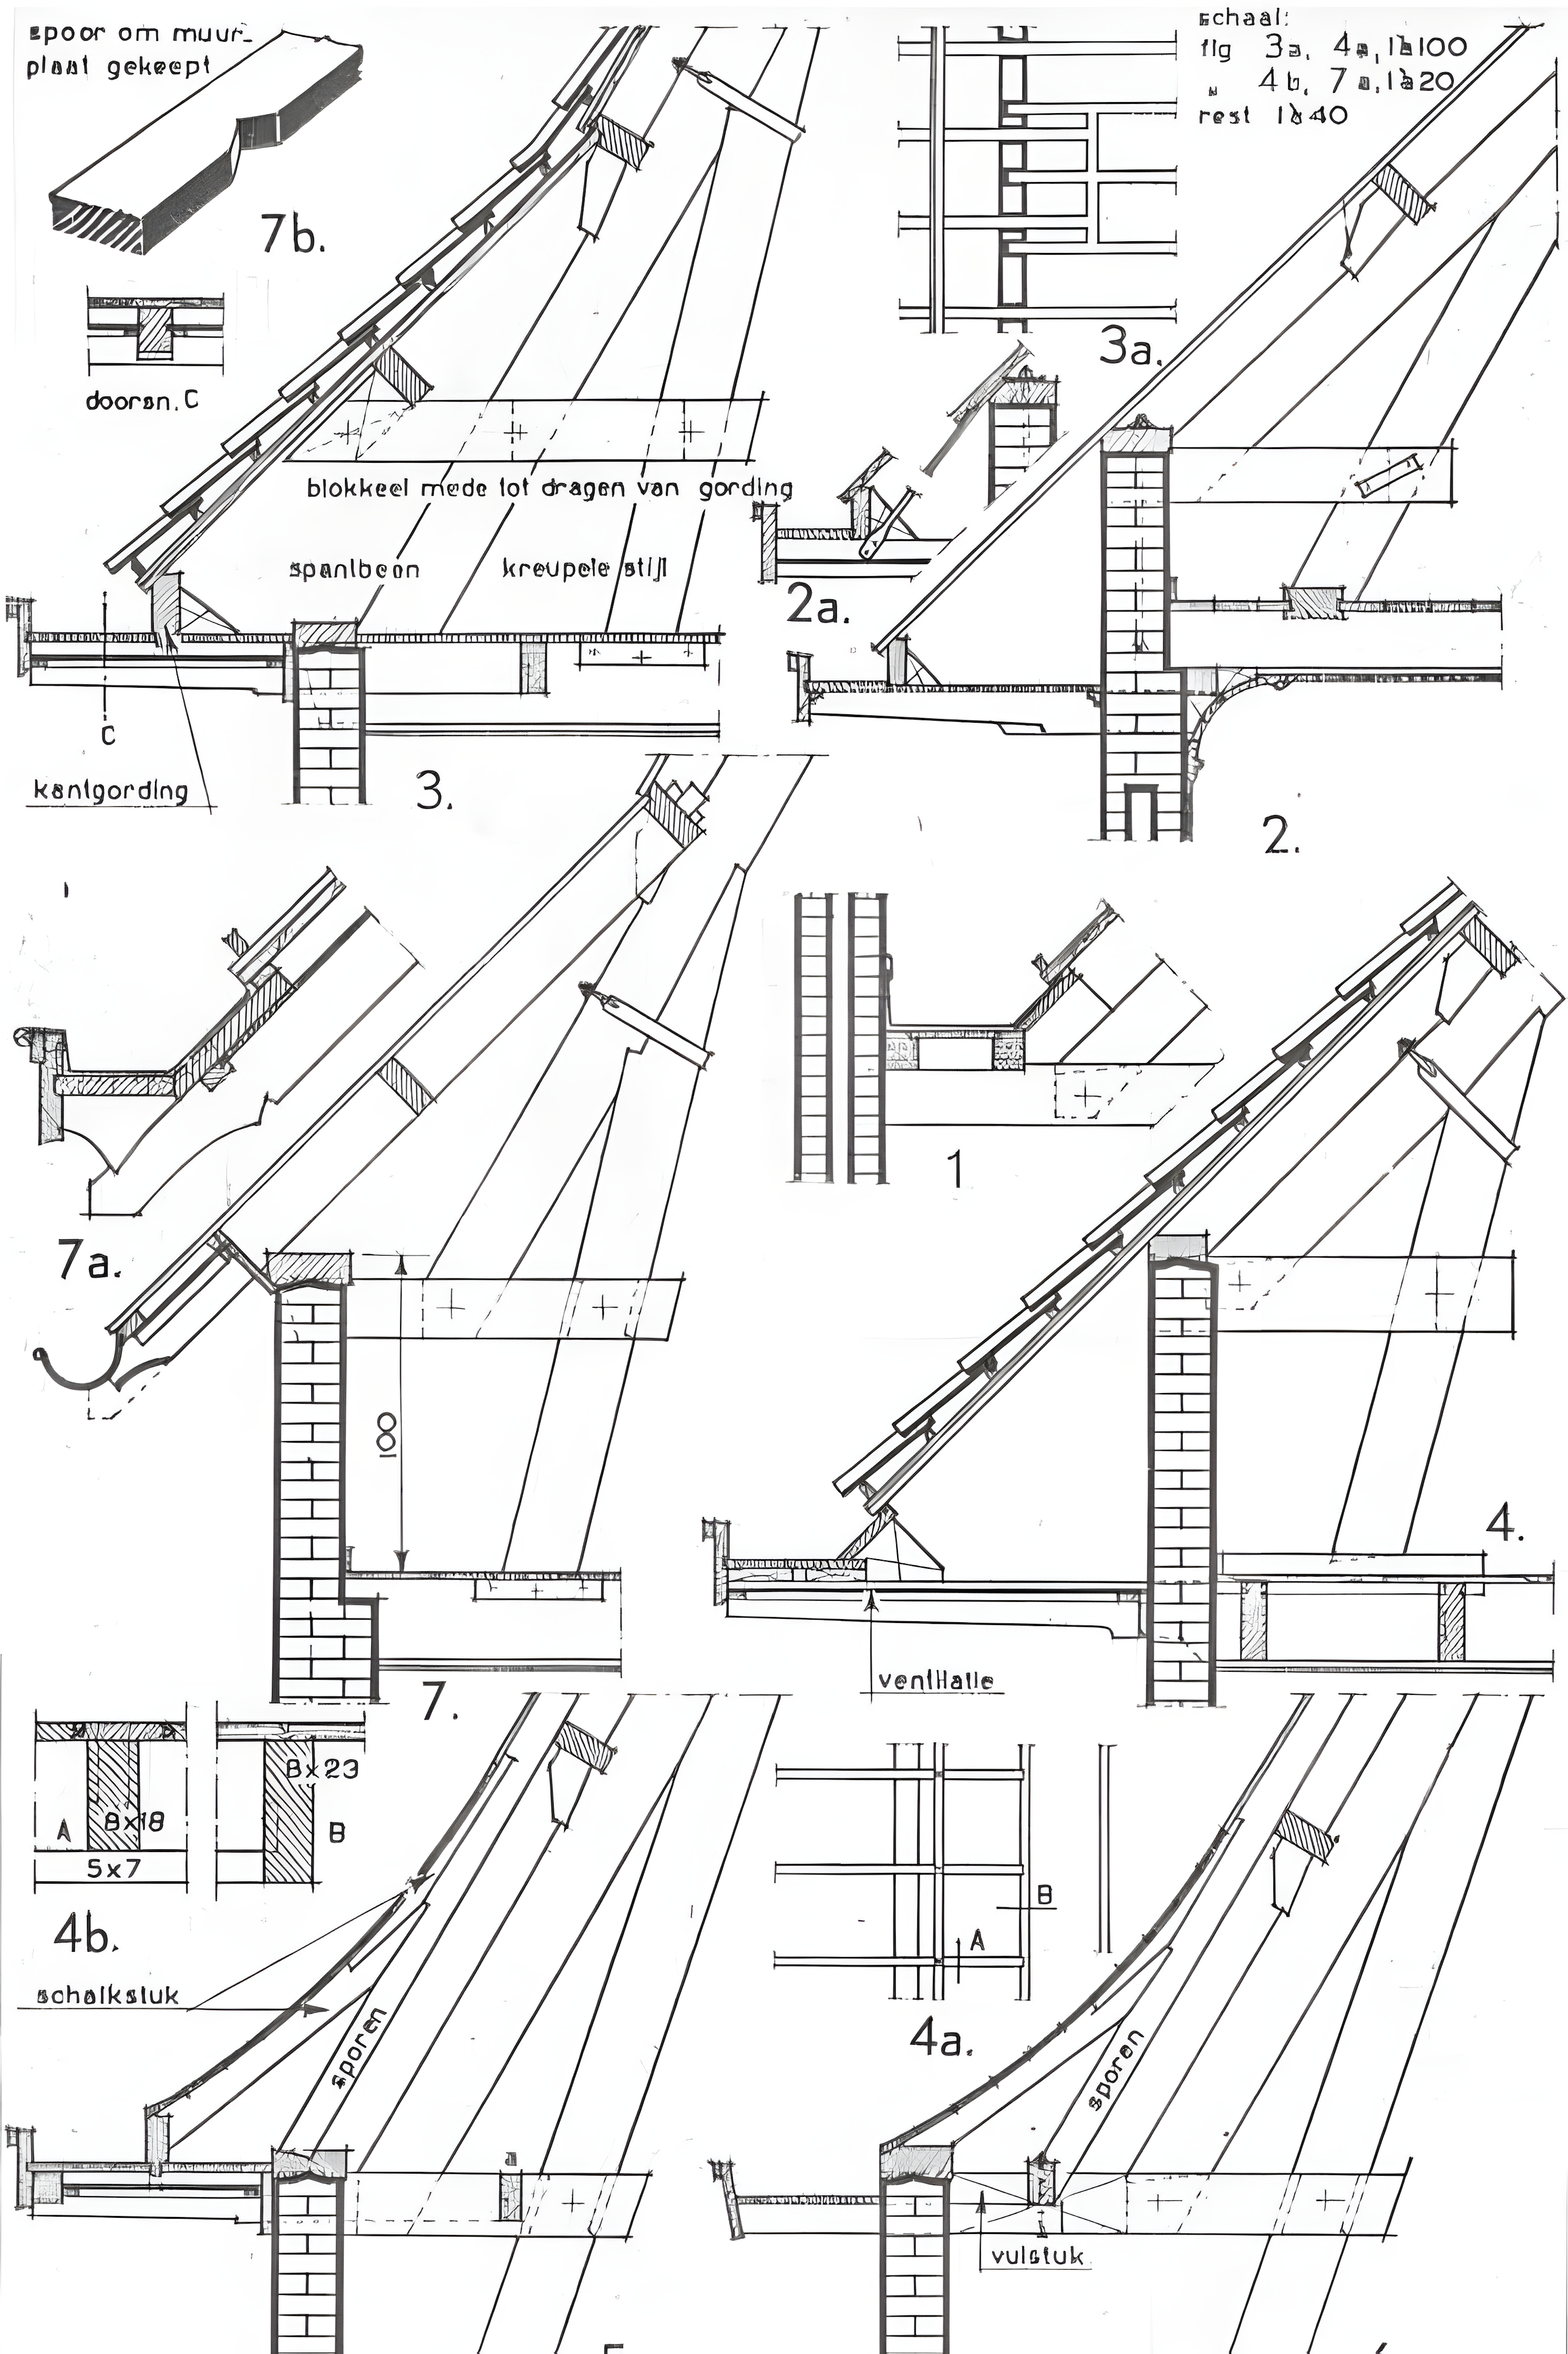
When it comes to timber-framed buildings, the cornice—the transition between wall and roof—can make or break both performance and style. A well-executed cornice manages rainwater, ventilates attic space, and delivers a crisp architectural finish. The vintage diagram above, titled “A Dozen Simple Cornices for Frame Buildings”, showcases nine time-tested profiles, each numbered for easy reference. In this detailed, news-style walkthrough, we’ll transform these inked drawings into on-site realities. Whether you’re renovating a craftsman bungalow or erecting a new garden studio, you’ll learn exactly how to select and build the cornice that fits your frame.
Why Cornices Matter
- Weather Protection
A properly angled drip edge prevents water from tracking back under roofing materials or dripping onto siding, which avoids rot and leaks. - Ventilation
Many cornices incorporate soffit vents or open gaps to feed attic airflow, guarding against moisture buildup and heat-soak in summer. - Load Transfer
Rafter tails and fascia boards must be securely fastened to carry wind uplift loads and snow weight down into the wall studs. - Aesthetic Finish
From simple drip edges to decorative brackets and moldings, cornice details define a building’s character.
Cornice 1: The “Molded Eave” (Detail 1)
Features:
- 2×4 rafter tails
- Fascia trimmed with a 2″×4″ crown molding
- Painted metal drip gutter tucked behind shingles
How to Build:
- Rafter Preparation
- Cut the rafter tails flush at the correct overhang length (typically 12″–18″).
- Plane a 10° slope on the underside so water sheds cleanly.
- Install the Crown Molding
- Choose a rot-resistant wood (cedar or cypress).
- Pre-paint both faces for longevity.
- Fasten the molding to the fascia board with stainless steel finish nails, aligning its profile to match the roof pitch.
- Fit the Drip Gutter
- Slip the gutter flange between the roofing felt and the bottom course of shingles.
- Secure with roofing cement and small copper nails.
- Seal the top lip under the felt apron.
Cornice 2: The “Boxed Eave with Soffit” (Detail 2)
Features:
- Enclosed soffit beneath 2″×4″ rafters
- 1″×5″ fascia board
- Continuous G.I. or aluminum gutter
How to Build:
- Ledger and Soffit Framing
- Attach a 2″×4″ ledger board to the wall stud tops, secured with ½″ lag screws at 16″ on center.
- Run 2″×4″ joist hangers from the ledger, fastening matching soffit joists perpendicular to the rafters.
- Install Soffit Panels
- Use pre-vented vinyl soffit panels or tongue-and-groove cedar.
- Leave a ¾″ gap at the wall plate for intake ventilation.
- Fascia and Gutter
- Fix a 1″×5″ fascia to the rafter tails, covering the soffit edges.
- Mount the gutter flange directly to the fascia, ensuring a fall of ¼″ per 10′ run.
Cornice 3: The “Open Rafters with Drip Edge” (Detail 3)
Features:
- Exposed rafter tails
- 2″×6″ thick fascia matched flush with rafter bottom
- Slim metal drip flashing
How to Build:
- Rafter Tail Finishing
- Round-over or chamfer rafter tail ends for a refined look.
- Smooth with 120-grit sandpaper, then prime and paint.
- Attach Drip Flashing
- Bend 26-gauge galvanized steel into an L-shape with a rolled nose.
- Slip the upper leg under the felt, nail through the roofing, and fold the lower leg over the rafter tail.
- Fascia Installation
- Scribe the 2″×6″ fascia against the wall sheathing.
- Secure with exterior-grade wood screws, countersunk and filled.
Cornice 4: The “Bracketed Eave” (Detail 4)
Features:
- 2″×8″ joists Cantilevered 8″ beyond wall face
- Decorative 1″×6″ wood brackets
- Gutter strapped to the bracket bottom
How to Build:
- Cantilever Joist Layout
- After placing joist hangers at the wall line, slip each 2″×8″ joist into position and toe-nail it through the ledger.
- Cut and Fit Brackets
- Trace a bracket pattern (6″ projection with a 2″ rise) on 1″×6″ stock.
- Bandsaw the curves, sand edges, and fish-mouth to seat the joist bottoms.
- Gutter Attachment
- Bolt 2″ gutter straps through the bracket bottoms.
- Use sealant at every bolt penetration.
Cornice 5: The “Splayed Soffit” (Detail 5)
Features:
- Soffit board sloping down at 10° from horizontal
- 2″×4″ rafter tails set back 2″ from the fascia face
- Small crown molding at the lower soffit edge
How to Build:
- Rafter Tail Setback
- Mark each tail 2″ in from its clipped end.
- Cut a short vertical face there so the fascia can mount flush.
- Soffit Boarding
- Rip 1″×8″ boards at a 10° bevel on one edge.
- Screw them to rafter tails and ledger. Maintain 1/16″ gap at seams for expansion.
- Finish with Molding
- Nail a ½″×3″ ogee molding to the soffit’s lowest edge for a shadow line.
Cornice 6: The “Deep Recessed Soffit” (Detail 6)
Features:
- 2″×10″ joists with 2″×4″ rafter tails
- Soffit dropped 6″ below joist bottom
- 2″×2″ open slot vents every 24″
How to Build:
- Rafter & Joist Coordination
- Stub the rafter tails into a 2″×10″ beam using 8″ timber screws.
- Double-check alignment so the soffit plane sits level.
- Soffit Framing
- Erect soffit furring strips perpendicular to joists, set 6″ down.
- Leave 2″×2″ openings between every two strips for venting.
- Install Soffit Panels
- Nail ¼″ plywood or fiber cement board to the furring.
- Lace the vents with insect mesh.
Cornice 7: The “Tin-Roof Eave” (Detail 7)
Features:
- 2″×6″ rafters under tin roof panels
- Extended 2″×4″ drip edge folded in tin
- Exposed rafter ends painted to match
How to Build:
- Rafter Prep & Paint
- Shape the tail profile with a ½″ round-over bit.
- Prime and finish with two coats of exterior enamel.
- Drip Edge Integration
- After laying the tin panels, fold the last 2″ of sheeting over a 2″×4″ drip board.
- Secure with factory recommended clips.
- Seal Terminations
- Apply a non-hardening butyl sealant along the folded edge.
- Rivet every 12″ with neoprene-gasketed rivets.
Cornice 8: The “Reverse Falcorso” (Detail 8)
Features:
- Roof boards carried past rafters, underside finished with a 2″×6″ fascia
- Vertical 2″×4″ strut tying boards back to wall plate
- Simple drip into a half-round gutter
How to Build:
- Extend Roof Sheathing
- Nail the roof boards (¾″ plywood) to extend 2″ beyond rafter tails.
- Counterbore and fill nail holes.
- Strut Installation
- Cut 2″×4″ struts at the correct bevel to connect the board lip back to the wall plate.
- Bolt through with carriage bolts and washers.
- Fascia and Gutter
- Pin a half-round gutter flange to the board undersides.
- Cap the fascia with drip flashing for a clean reveal.
Cornice 9: The “Minimalist Braced Eave” (Detail 9)
Features:
- 2″×4″ braces at 45° between rafter and fascia
- 1″×10″ fascia board
- Gutter recessed behind the board face
How to Build:
- Brace Fabrication
- Rip 2″×4″ braces on a table saw to achieve the correct cross-section for both faces.
- Fasten with structural screws at top and bottom.
- Fascia Hanging
- Screw the 1″×10″ fascia to the rafter ends, hiding screw heads in the bottom third.
- Pre-drill every fixing to avoid splitting.
- Recessed Gutter Fit
- Sink the gutter trough behind the fascia board, mounted on concealed brackets.
- Ensure the fascia face covers the gutter lip by 1″ to shield it from view.
Final Tips for All Cornices
- Use Corrosion-Resistant Fasteners: Stainless steel or hot-dip galvanised for all exterior timber and flashing attachments.
- Test Slope and Drainage: Before cladding, mist-spray the eaves with a hose to ensure water sheds properly.
- Prime and Paint: Seal all end grains, cut edges, and fastener holes before installation to prevent moisture ingress.
- Maintain Clearances: Leave 1/8″ expansion gaps at wood-to-wood joints; fill with matching exterior sealant after assembly.
By following these nine step-by-step instructions, you’ll not only secure your roof against wind and rain but also craft a distinctive cornice profile that complements your building’s style. From simple drip edges to ornate bracketed eaves, these classic frame-building details continue to stand the test of time—combining durability, ventilation, and the timeless grace of a well-resolved roofline.