How to convert a simple stuff sack into a two-sided, quick-stuffing bishop bag for faster hammock setup and pack-up.
When you’re out camping, every second counts—whether you’re racing to set up before dark or quickly packing up before the rain hits. One of the cleverest hacks for hammock campers is the DIY Bishop Bag. This simple modification transforms an ordinary hammock stuff sack into a two-sided, quick-stuffing bag that makes setup and take-down faster, smoother, and much more convenient.
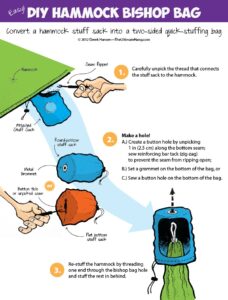
Here’s a step-by-step guide, as shown in the illustrated instructions:
🔧 Step 1: Carefully Unpick the Seam
- Use a seam ripper to gently unpick the thread that connects the stuff sack to the hammock.
- Be patient—pulling too hard could damage the fabric. The goal is to detach the stuff sack without tearing.
👉 At this stage, you’ve got a free sack and a hammock ready to be upgraded.
🧵 Step 2: Make a Hole at the Bottom
Now comes the modification that turns a normal sack into a bishop bag. You have three options here:
- Sew a Reinforced Buttonhole
- Unpick about 1 inch (2.5 cm) along the bottom seam.
- Sew reinforcing stitches (zig-zag or bar tack) to prevent fraying.
- This creates a neat buttonhole for your hammock suspension to pass through.
- Install a Metal Grommet
- Punch a small hole in the bottom of the sack.
- Attach a metal grommet for durability.
- This works great for round-bottom stuff sacks.
- Use a Buttonhole on Flat-Bottom Bags
- If your stuff sack has a flat bottom, you can stitch in a buttonhole for a clean and functional finish.
👉 The purpose of the hole is to allow one end of the hammock suspension rope to stick out, while the rest of the hammock stays stuffed inside the bag.
🪢 Step 3: Re-Stuff the Hammock
- Thread one end of your hammock (with the suspension cord) through the new bishop bag hole.
- Let that end always remain outside the bag.
- Stuff the rest of the hammock into the sack.
When setting up, you simply pull out the free end, secure it to a tree, and walk the hammock across while it unpacks smoothly. Packing up is just as simple—start at the loose end and stuff everything back inside.
🌟 Why the Bishop Bag is Brilliant
- Quick Setup & Pack-Up
No more fumbling with tangled fabric. One end always stays accessible. - Keeps Suspension Accessible
Your suspension ropes are always ready to tie—no need to dig inside the bag. - Compact & Tidy
The hammock packs neatly, and the bag doubles as storage while you hang. - Customizable
You can choose between grommets, buttonholes, or reinforced seams depending on your sewing skills and the type of bag you’re using.
⛺ A Small Hack with Big Benefits
The bishop bag gets its name from its resemblance to a bishop’s miter hat, but in the camping world, it’s all about function over fashion. With just a few stitches and a little DIY effort, you can turn your hammock experience into a hassle-free setup.
Whether you’re a weekend camper or a long-distance backpacker, this DIY bishop bag mod is a must-try. It saves time, reduces frustration, and keeps your hammock gear in top condition.