Acoustic specialists reveal the science of diffraction and line-of-sight interruption—and provide a detailed, step-by-step, plan to site, size, and build sound control walls that reclaim your serene outdoor space.
Urban and suburban homeowners know the frustration: a steady stream of traffic rockets past your property, turning your backyard into an unwelcome soundstage. You’ve tried planting dense hedges and installing picket fences, only to discover noise still finds its way through. The secret to real peace? A properly engineered sound barrier that exploits the physics of diffraction and line-of-sight obstruction.
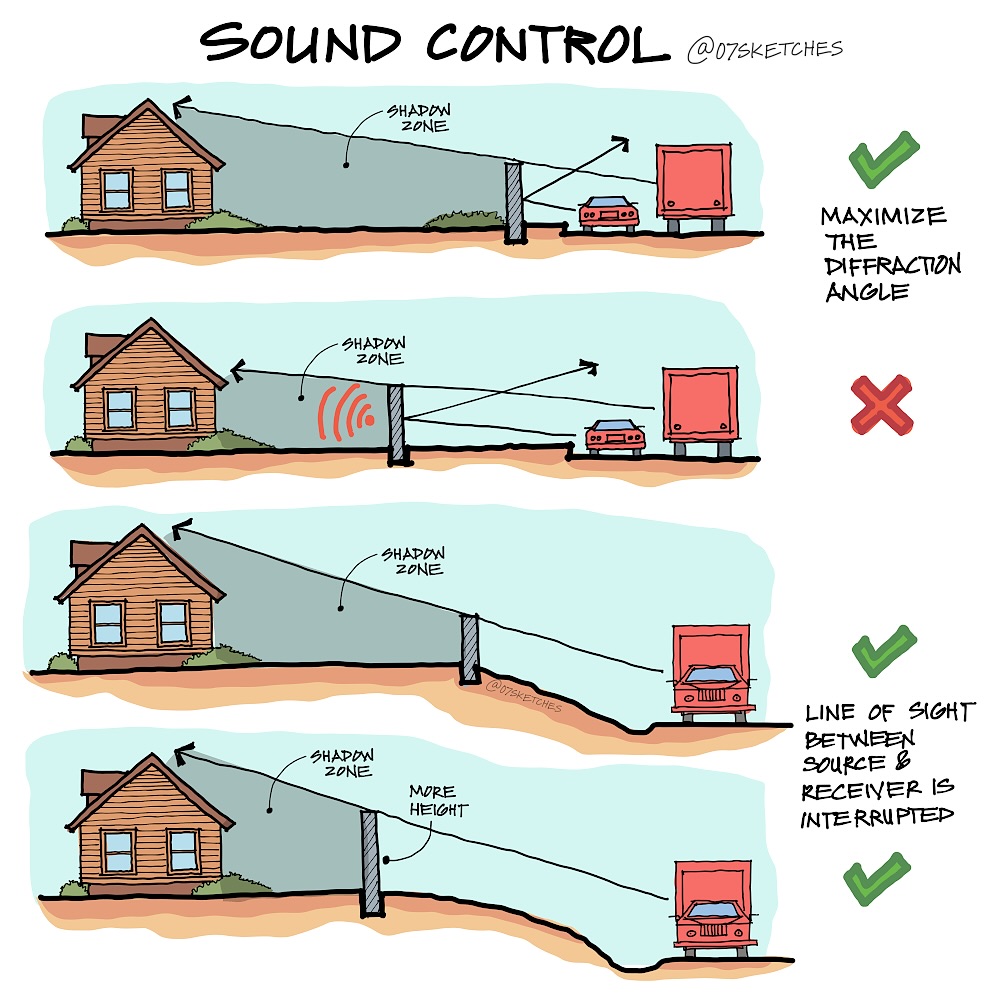
In this in-depth guide, we’ll unpack why some barriers fail, how maximizing diffraction angles and breaking direct sightlines produce deep “shadow zones,” and walk you through a comprehensive, step-by-step process—from site survey to material selection—to build a wall that truly silences the road.
1. Understand the Sound Shadow Zone
Before breaking ground, it’s crucial to grasp how sound travels around obstacles. When a noise source (like a passing truck) meets a barrier, two phenomena occur:
- Diffraction: Low-frequency waves bend around the top and edges of the wall. The sharper the angle between the wavefront and the barrier’s edge, the deeper the “shadow” behind it.
- Line-of-Sight Interruption: High-frequency sounds travel in straighter rays; blocking the line of sight between source and receiver eliminates these direct paths, forcing sound to diffract and lose energy.
Why Some Barriers Fail: Placing a short wall too close to the receiver only creates a shallow shadow zone (Image 1). A gap between barrier and ground or insufficient height allows sound to “bleed” underneath or over the top (Image 2)—making your expensive structure nearly useless.
2. Phase 1: Conduct a Detailed Site Survey
Step 1: Map Noise Sources and Receiver Points
- Walk the property boundary with a sound level meter, noting the loudest spots (dB peaks) and primary noise origins (e.g., highway lanes, intersections).
- Mark the location(s) where quiet is most desired—patio, play area, windows.
Step 2: Measure Existing Topography
- Record the ground elevation at the noise source, at potential barrier footing locations, and at the receiver point.
- Identify any dips or rises that could enhance natural diffraction.
Step 3: Assess Available Footprint
- Measure property lines and utility easements to determine the maximum possible barrier length.
- Note any access requirements (gates, maintenance openings) and local setback regulations.
3. Phase 2: Sizing Your Sound Barrier
Step 4: Calculate Required Height
- Using the surveyed elevations, draw a straight line of sight from the noise source (e.g., the centerline of the roadbed) to the receiver’s ear height (approximately 1.5 m).
- The barrier’s top must sit above this line. Add at least 0.5 m extra to account for undulating vehicle heights and measurement tolerances.
Step 5: Determine Barrier Length
- Extend the barrier at least 5 m beyond the lateral edges of the noise source in both directions—to prevent “end-flank” diffraction around the wall ends.
- If the source is linear (a road), cover the full length of road parallel to your property plus these extensions.
Step 6: Optimize Barrier Position
- Placing the wall closer to the noise source increases attenuation (thicker shadow zone). If property constraints force it nearer the receiver, build higher to maintain performance.
- Vet any drainage or grading issues—ensure the barrier base remains sealed to the ground.
4. Phase 3: Select Materials and Construction Methods
Step 7: Choose Dense, Rigid Materials
- Concrete or Masonry: Excellent mass for blocking low-frequency noise; heavy and long-lasting.
- Composite Panels: Sandwich panels with a dense core (min. 10 kg/m²) and weather-resistant skins.
- Timber with Mass Loaded Vinyl (MLV) Backing: For budget projects—use at least 19 mm tongue-and-groove boards plus MLV layer.
Step 8: Incorporate Absorptive Surfaces (optional but recommended)
- On the noise-source side, apply acoustic absorptive cladding (e.g., mineral wool panels behind perforated metal). This reduces reflective noise bouncing back toward the road and mitigates reverberation in the shadow zone.
Step 9: Ensure Ground Contact and Sealing
- Excavate a shallow trench (100–150 mm deep), pour a concrete footing, and embed the bottom of the barrier.
- Seal joints and panel seams with acoustic sealant to eliminate leakage.
5. Phase 4: Installation Best Practices
Step 10: Prepare the Footings
- Excavate footings along the planned alignment, matching the barrier length and position.
- Pour reinforced concrete strips sized per engineer’s spec (commonly 300 mm wide × 150 mm deep).
Step 11: Erect the Barrier
- Pre-assemble panels or erect formwork on-site for poured concrete walls.
- Use alignment strings every 2 m to maintain a straight, plumb surface.
- For modular panels, set posts into the wet concrete or bolt into anchors after curing.
Step 12: Add Absorptive Treatments
- Install mineral wool or recycled cellulose batts behind perforated metal or weatherproof acoustic panels at 100 mm thickness.
- Protect the absorptive layer with a durable exterior finish (e.g., perforated aluminum with drainage holes).
6. Phase 5: Landscaping and Aesthetic Integration
Step 13: Green Buffers
- Plant fast-growing evergreens (e.g., Leyland cypress, Thuja) 1–2 m from the barrier—dual function: visual softening and additional absorption of higher frequencies.
- Use deciduous shrubs along the base to hide the wall footing in summer and allow sun penetration in winter.
Step 14: Finish Treatments
- Apply textured stucco or decorative cladding on the receiver side to enhance homeowner appeal.
- Consider mural art or climbing vines on long stretches to break up monotony and reduce reflective glare.
7. Phase 6: Performance Verification
Step 15: Post-Construction Sound Testing
- Wait at least one week for the ground to settle and vegetation to establish.
- Re-measure SPL (sound pressure level) at the same receiver points and times of day as the initial survey.
- Expect 5–10 dB reduction in perceived noise for every meter of barrier height—meaning a 3 m wall can yield 15–30 dB attenuation, effectively halving the loudness.
Step 16: Identify Leak Paths
- Walk the length of the barrier with the meter set to mid-frequency weighting.
- If you find hotspots where levels spike, inspect for gaps at the base, poorly sealed joints, or panel defects—then reseal or repair accordingly.
8. Phase 7: Maintenance and Long-Term Monitoring
Step 17: Regular Inspections
- Twice yearly, check for cracks, sealant failures, or vegetation encroachment that could open paths for sound.
- Clear debris from drainage trenches to keep the barrier’s base sealed.
Step 18: Adaptive Upgrades
- If traffic volumes or vehicle types change (e.g., introduction of heavy trucks), consider adding a secondary absorptive fence on your side or raising the wall by installing modular extensions.
- Technology advances—such as recycled-rubber acoustic panels—may offer retrofit options to boost performance without full replacement.
Conclusion
By rigorously applying the principles of diffraction angle maximization and line-of-sight interruption, and following this structured, seven-phase plan, you can design and build a sound barrier that turns your noisy thoroughfare into a distant hum. From the initial site survey to material selection, construction, landscaping, and testing, each step ensures you harness physics—not hope—to reclaim your outdoor tranquility. With proper maintenance and future-proofing, your engineered wall will stand guard against traffic noise for decades, giving you back the peaceful sanctuary you deserve.