By: Scandinavian Carpentry Journal | August 5, 2025
In traditional Nordic architecture, the trempelvæg—a shallow knee wall—paired with generous udhængstag (overhanging rays) creates a beautifully proportioned attic space that’s both airy and weather-resistant. The hand-drawn plan above outlines a classic trempel wall detail, complete with precise dimensions, rafter layouts, and timber profiles. In this in-depth, 1,000-word guide, we’ll walk you through each step to transform this drawing into a robust, well-ventilated attic wall and eave assembly. Ready your tools and let’s get started.
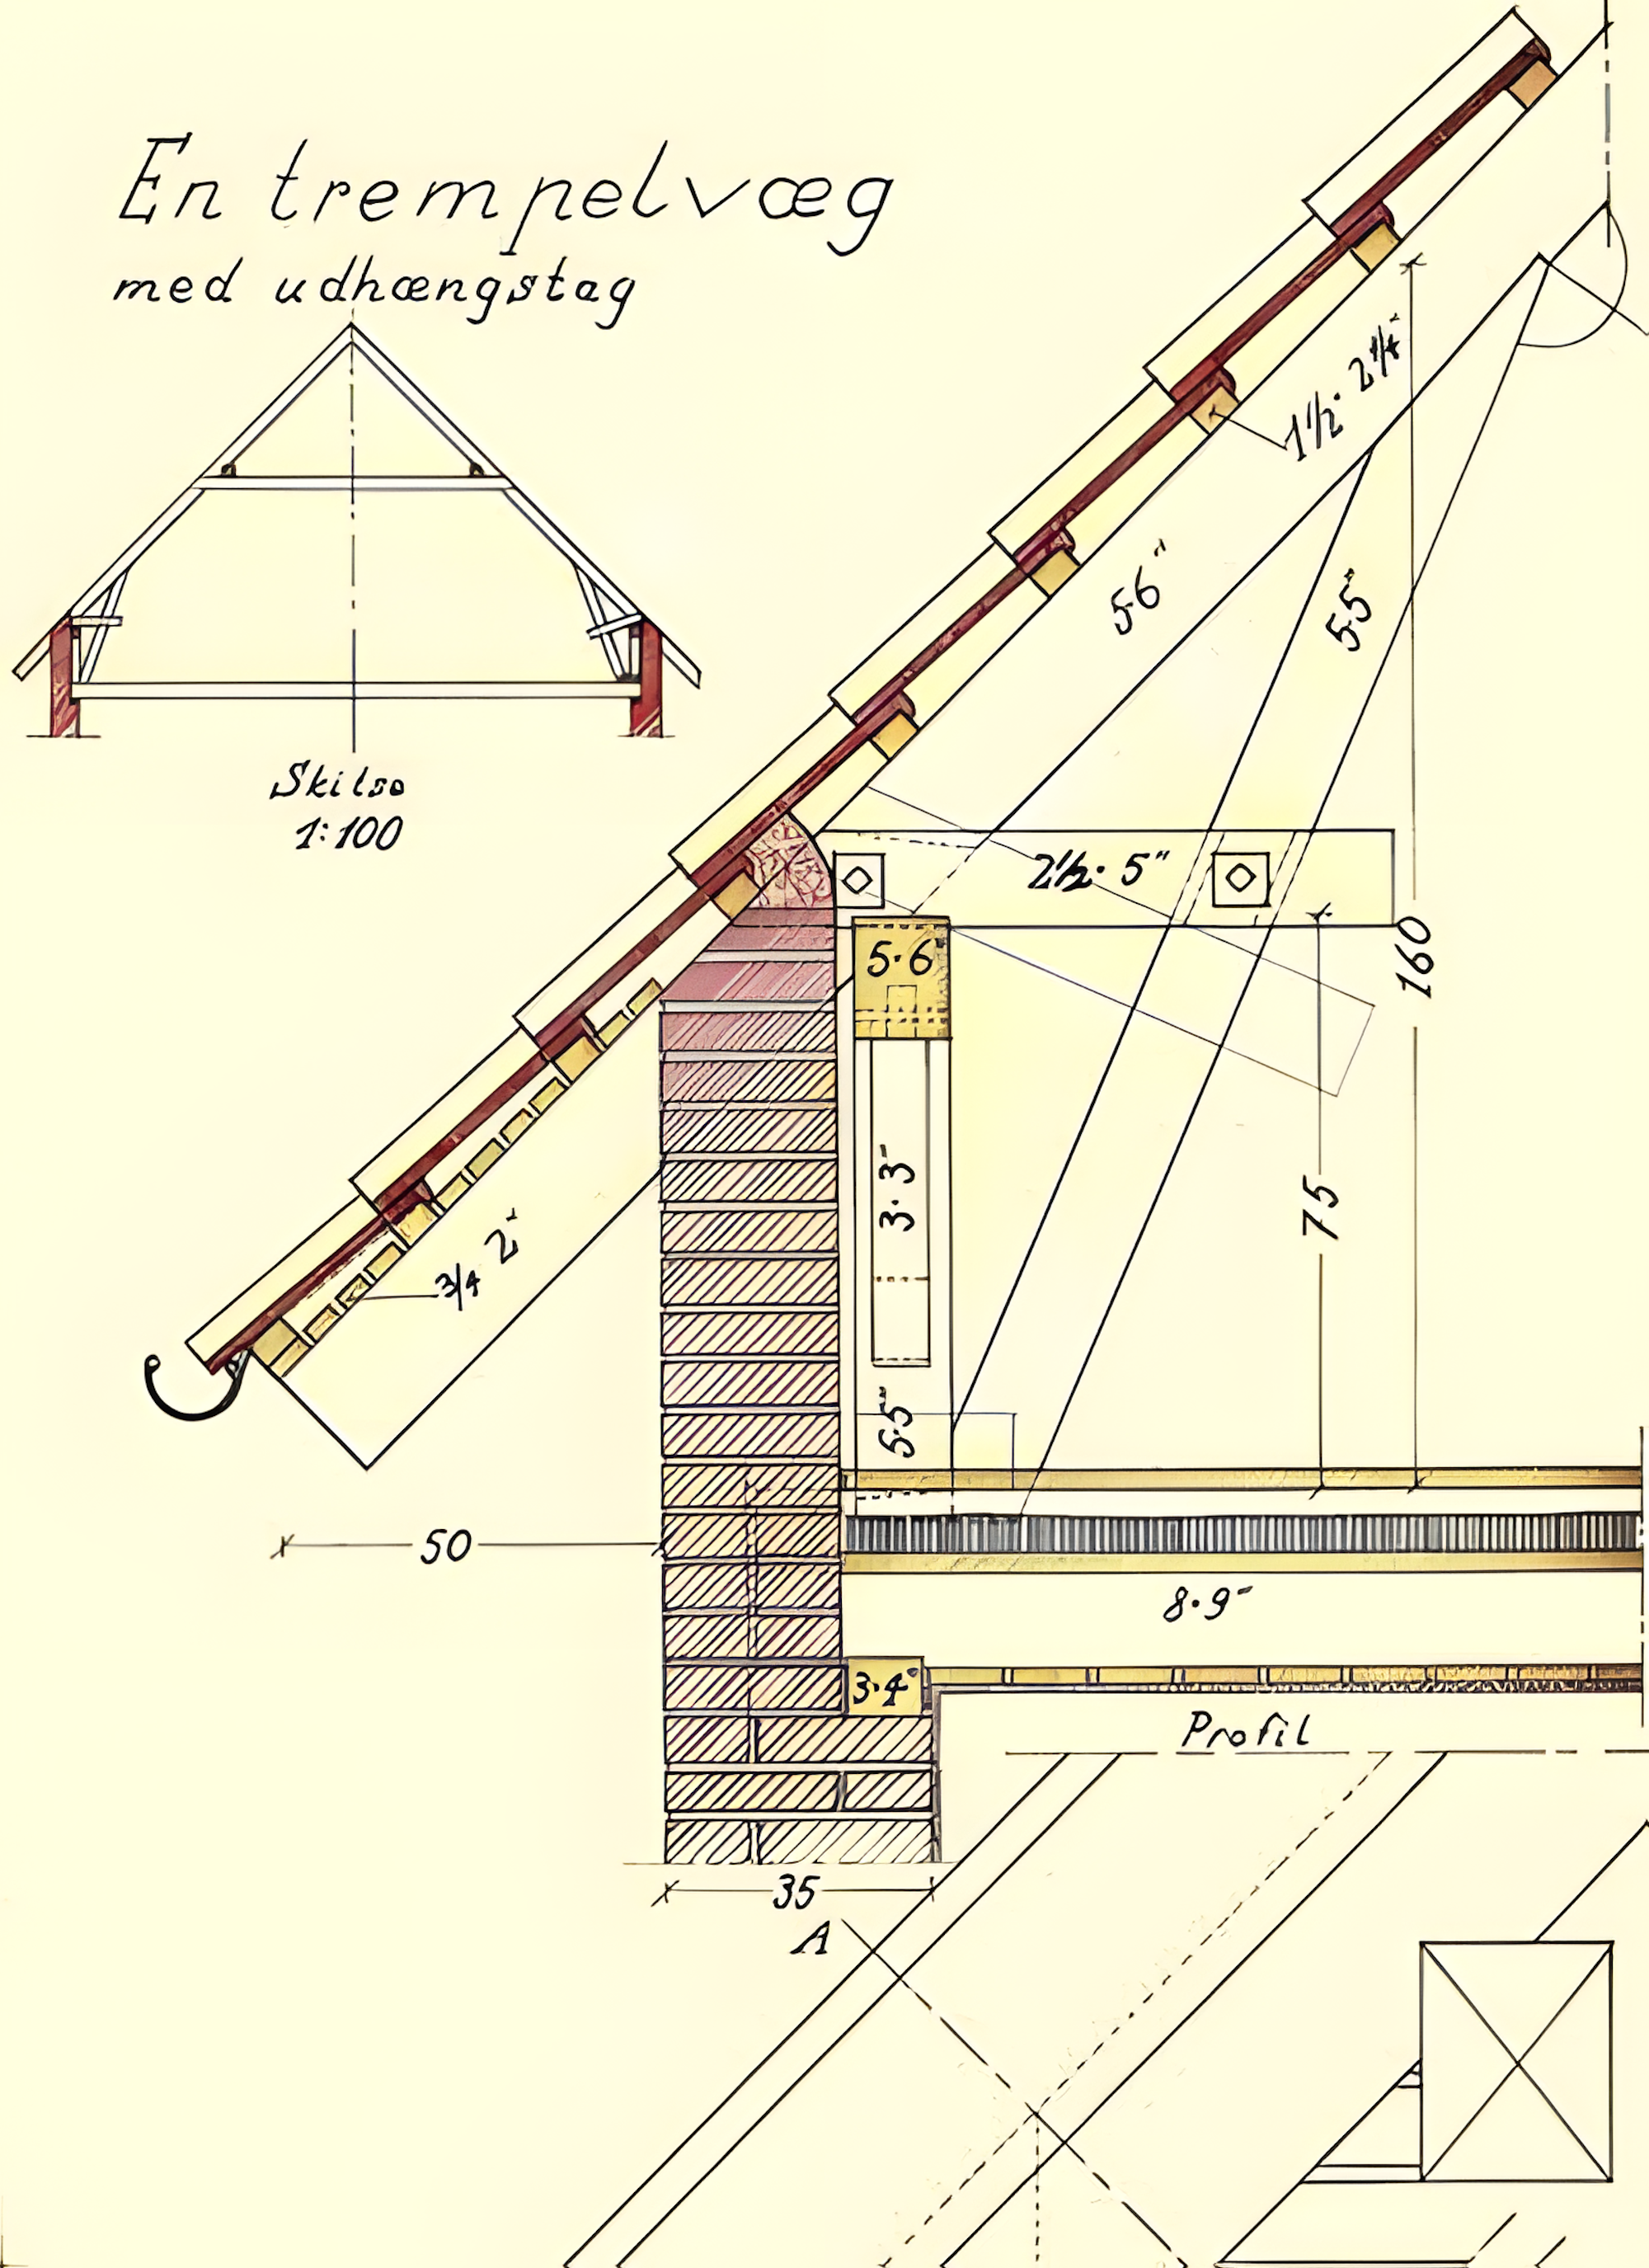
Key Components & Dimensions
- Trempelvæg (knee wall): Built atop the floor structure, 35 cm wide, rising 75 cm to 160 cm height.
- Udhængstag (overhang rafters): Extend 50 cm beyond the wall face, clad with ¾″ × 2″ soffit boards.
- Hovedtagelement (main rafters): Laid out at a 55° pitch, spaced per drawing, resting on the trempelvæg.
- Vindskeder & Taglægter: Fascia and battens to support the roof covering.
- Ventilation gap: Between underside of roof boards and insulation, feeding air from eave vents.
Step 1: Prepare the Trempelvæg Foundation
- Set Out the Wall Plate
- On your attic floor joists, snap a chalk line 35 cm in from the outer wall face.
- Position a 2″×6″ treated timber plate (dormient) along this line, securing it with structural screws into each joist.
- Build the Knee Wall
- Erect vertical studs atop the wall plate at your chosen height—75 cm for a low “knee,” or up to 160 cm for a more generous loft.
- Space studs at 40 cm centers. Confirm plumb with a level.
- Plate the Top
- Cap the studs with a second 2″×6″ top plate, aligning all studs and securing with 3″ nails.
Step 2: Lay Out and Cut the Rafters
- Determine Roof Pitch
- The plan calls for a 55° main rafter angle. Use a sliding bevel set to 55°.
- Mark Rafter Lengths
- From the top‐plate-to‐ridge height (measured on plan as 160 cm above the top plate), extend your bevel line to establish each rafter length.
- Mark both the plumb-cut heel seat (to bear on the top plate) and the ridge‐cut at the opposite end.
- Cut the Overhang Rafters
- Each rafter extends 50 cm past the knee wall. On your stock, mark the 50 cm look-out and cut the bird’s-mouth at the heel—level face to sit on the plate, plumb cheek against the stud face.
Step 3: Fasten the Rafters to the Trempelvæg
- Seat the Bird’s-Mouth
- Lift each rafter into place, fitting its bird’s-mouth over the trempel top plate. Use a temporary block to hold the look-out at the correct overhang.
- Secure with Metal Straps
- On the underside of each rafter heel, fix a galvanized metal strap (staffa) over the top plate, twisting up the rafter cheek.
- Nail through strap into both plate and rafter, ensuring a tight connection.
- Check Alignment
- Stretch a string line from the first rafter tip to the ridge point to verify consistent overhang and flush rafter tails.
Step 4: Install the Collar Tie (Udhængstag Support)
- Position Collar Beam
- The drawing shows a collar tie set slightly below the ridge. Measure down from the ridge intersection (using 55° lines) and snap a chalk line.
- Cut Notches in Rafters
- At each mark, cut a shallow seat into the rafter faces to receive the collar beam. Ensure the seat is plumb to the rafter.
- Fasten the Collar Tie
- Insert a 2″×6″ timber into the rafter seats, spanning the width of the truss.
- Secure with through-bolts or timber dowels at each rafter seat.
Step 5: Provide Ventilation at the Eaves
- Soffit Board Installation
- Nail ¾″ × 2″ soffit boards to the underside of the overhang rafters, leaving a 10–15 mm gap at the wall face for air intake.
- Air Gap Under Roof Deck
- Between the backs of the roof boards and the insulation layer, maintain a continuous air channel. Install plastic or timber baffles at each rafter space to keep insulation clear of the deck.
- Vent Grille
- At the wall-plate interface, cover the intake gap with a breathable vent grille to keep pests out while allowing airflow.
Step 6: Fit the Fascia and Battens
- Fascia Board (Vindskede)
- At the rafter look-outs, fix a 1″×6″ fascia board. Pre-cut the under edge at the 55° pitch to align with the rafter tail.
- Roof Battens (Taglægter)
- On top of each rafter, install horizontal battens at spacing appropriate to your roof covering (e.g., tile or slate).
- Use galvanized nails or screws to fix the battens through the rafters.
Step 7: Lay the Underlayment and Covering
- Roof Underlayment
- Roll out a breathable membrane over the battens, starting at the eaves and overlapping upwards. Staple to battens, tensioning smoothly between rafters.
- Covering Material
- Depending on your chosen finish (metal sheet, slate, or tile), fix the covering in straight courses.
- At the eaves, overhang the covering 3–5 cm beyond the fascia to encourage clean water drip into the gutter.
Step 8: Install the Gutter
- Gutter Brackets
- At 50–60 cm intervals along the fascia, fix gutter hangers pointing slightly downward toward the downpipe location.
- Hang the Gutter
- Snap in a half-round or box gutter, sealing joints with exterior sealant.
- Ensure the 50 cm overhang lets water fall directly into the gutter, not down the soffit.
Step 9: Insulate and Finish Interior
- Insulation
- Behind the soffit baffles, install insulation within the trempel cavity—rigid boards or mineral wool batts—to thermal standards.
- Interior Lining
- Cover the wall-plate and knee wall studs with plasterboard or tongue-and-groove boards.
- Finish with joint tape and paint or tongue-and-groove trim.
Step 10: Final Checks and Maintenance
- Alignment Test
- Use a laser level along the soffit and fascia to ensure a straight, uniform eave line.
- Ventilation Audit
- On a breezy day, hold a tissue at the intake grille. It should pull gently inward, confirming airflow.
- Annual Inspection
- Each spring, clear vents of debris, check strap fixings at rafter heels, and re-seal any aged joints in the gutter.
Conclusion
By following these ten steps—careful layout of the trempelvæg, precise rafter cuts at 55°, robust strap fixings, and diligent attention to ventilation—you’ll create a classic Danish‐style knee wall with extended eaves that marries form and function. Your attic gains headroom, your roof enjoys proper airflow, and your building stands ready to weather everything from crisp autumn rains to heavy winter snows. Skål to craftsmanship that endures!