By: Backyard Innovation Weekly | August 5, 2025
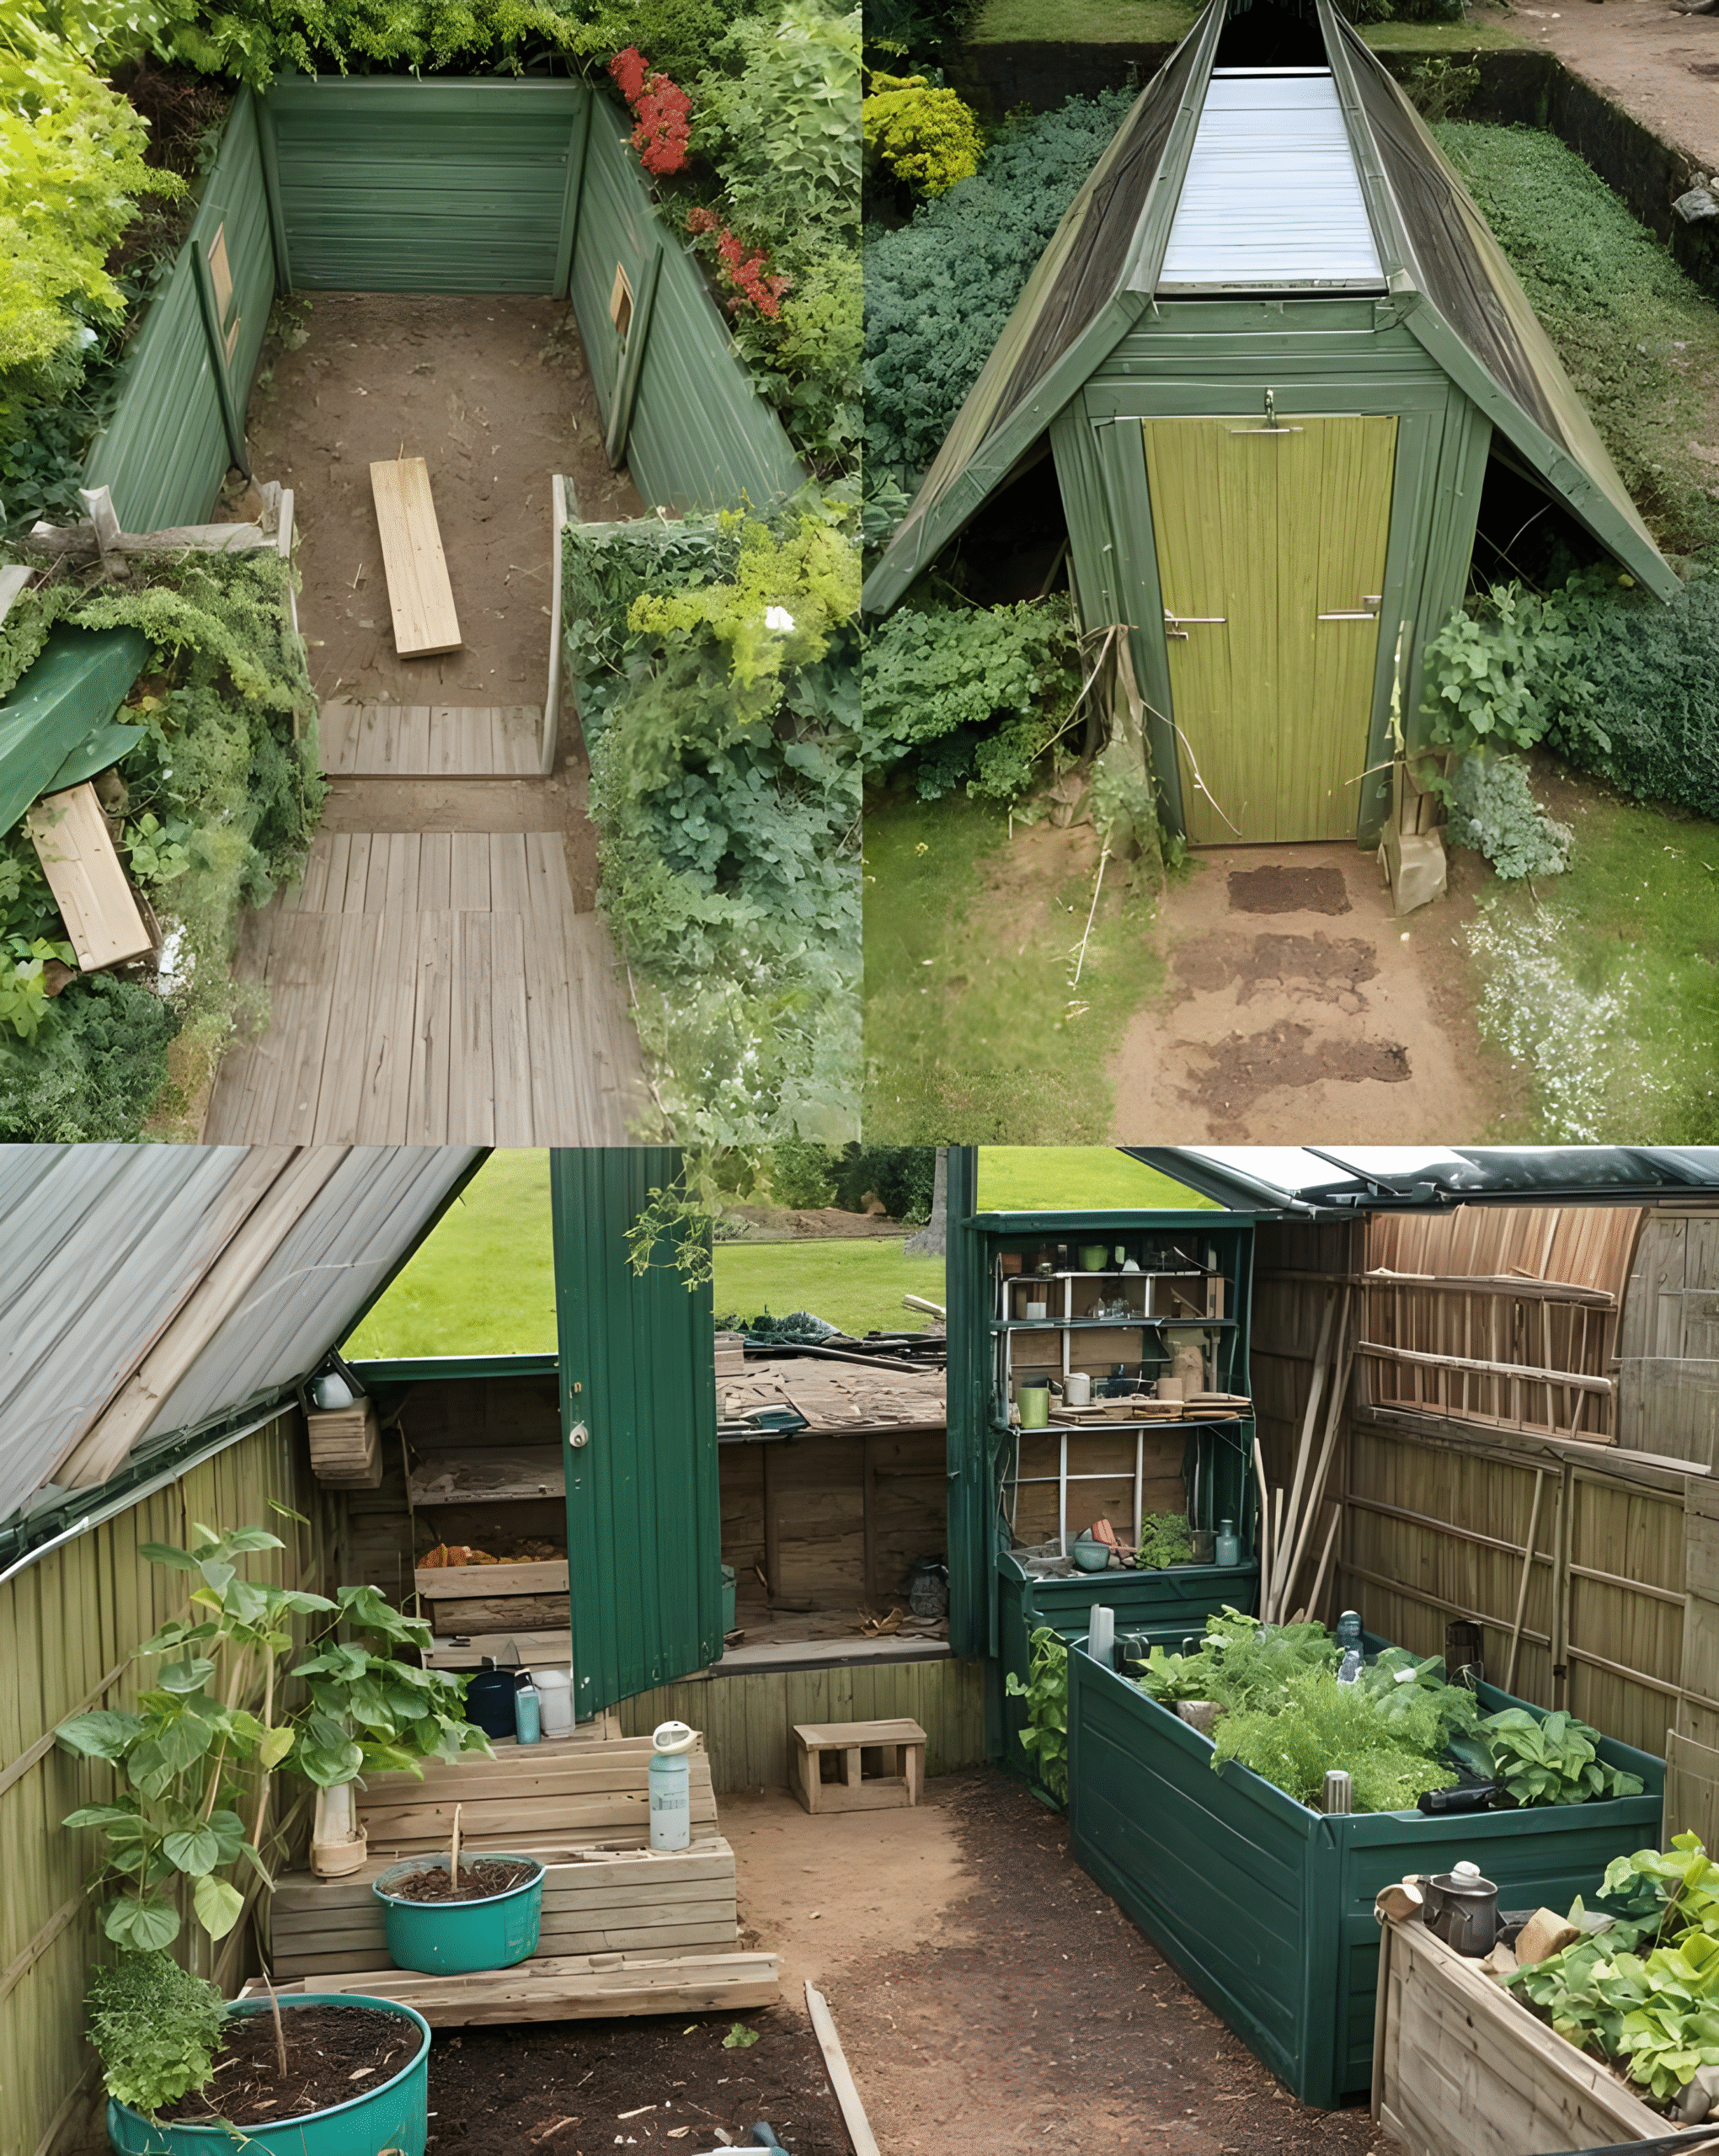
In the quiet corners of backyards around the world, a quiet revolution is sprouting. It’s not powered by high-tech gadgets or massive structures — but by smart, sustainable, do-it-yourself garden buildings. One such marvel is shown in the images above — a modest-looking green structure that conceals a powerhouse of functionality beneath its rustic charm.
Half-shed, half-greenhouse, and fully eco-conscious, this multi-use garden cabin offers the ideal solution for modern gardeners seeking a year-round space for plant propagation, tool storage, potting, and raised bed cultivation — all in one footprint.
Let’s explore how you can recreate this eco-garden house step by step, using reclaimed materials, clever space-saving design, and a blend of modern and traditional gardening techniques.
🏡 What Is an Eco-Garden House?
An eco-garden house is a compact structure that merges the best of a:
- Garden shed
- Mini greenhouse
- Potting station
- Tool storage
- Vertical and raised garden space
Its goal: maximize productivity in minimal space, while reducing water usage, energy dependence, and waste.
The featured structure showcases:
- Raised beds built into the walls
- Fold-out bench seating
- Shelves and storage for pots/tools
- A roof with both opaque and transparent panels for light control
- A sealed, weather-resistant design for year-round use
🧰 Tools & Materials You’ll Need
Depending on your customization and size, here are the basics:
Framework & Exterior
- Pressure-treated timber, plywood, or upcycled pallets
- Corrugated polycarbonate/metal roofing sheets
- Hinges, bolts, and galvanized nails/screws
- Green exterior paint (eco-safe)
- Plastic or wooden siding for walls
Interior
- Wooden boards for shelves and benches
- Raised bed kits or wood for building custom boxes
- Garden-friendly plastic liners
- Hooks, organizers, and storage bins
Other
- Level, saw, drill, hammer, screwdriver
- Weed barrier fabric
- Compost, topsoil, mulch, seeds, and seedlings
🛠️ Step-by-Step Construction Guide
Step 1: Choose the Right Location
Place your garden house:
- In full or partial sun
- Near a water source
- With good drainage and access
It should face south in cooler climates (or east in hot climates) to optimize morning light and reduce overheating.
Step 2: Clear and Level the Ground
As shown in the top-left photo:
- Mark your structure’s footprint using stakes and string.
- Excavate and level the base to ensure stability.
- Lay down a wooden or stone floor platform, or use gravel and weed barrier fabric to control moisture and weeds.
Step 3: Construct the Outer Walls
Using panels or vertical slats:
- Build 4 sturdy walls, with the back slightly taller to allow water runoff.
- Use pressure-treated or weatherproof wood.
- Add window cutouts or vents for airflow (as seen in the side panels).
Paint all wooden surfaces with green, non-toxic weatherproof sealant — like in the example above — to blend with your garden and resist rot.
Step 4: Install the Roof
In the top-right photo, the roof is partially opaque, likely using:
- Polycarbonate panels for light transmission
- Metal roofing sheets for shade and storm protection
Split the roof into hinged segments if you’d like easy access to sunlight or ventilation, or to grow vines or climbers on the sides.
Step 5: Build the Interior Layout
This is where functionality comes alive — as seen in the bottom photo.
Add these key components:
- Raised Garden Beds
- Construct with wood or metal panels along one side.
- Line with plastic or landscape fabric.
- Fill with organic soil and compost.
- Shelving Units
- Recycle old shelves or build from scratch.
- Store pots, fertilizers, tools, seeds, and gloves.
- Bench Seating & Potting Area
- Use flat boards or recycled timber for seating.
- Integrate a table or workspace for potting and prep.
- Hanging Organizers & Tool Racks
- Install hooks or pegboards for trowels, clippers, and gloves.
- Add bins for compost, twine, and plant labels.
Step 6: Add Plants, Compost & Watering System
Grow Inside:
- Herbs like basil, parsley, mint
- Lettuce, kale, or spinach
- Tomatoes, carrots, radishes in raised beds
- Companion plants like marigolds or nasturtiums for pest control
Add:
- A self-watering system or use sub-irrigated planters
- Mulch layer to retain moisture
- Compost bin in one corner for sustainability
Step 7: Go Vertical
Maximize space by using vertical wall planters or trellises, especially for:
- Climbing veggies (beans, peas, cucumbers)
- Hanging baskets (strawberries, herbs)
- Garden tools (rakes, hoses, nets)
In the bottom right section of the image, you can see tools neatly stored along the wall — a smart space-saving strategy.
🌡️ All-Season Tips
Summer:
- Keep roof vents open for airflow
- Shade tender plants with mesh
- Use a moisture sensor to avoid overwatering
Winter:
- Add compost insulation to soil beds
- Use solar lights or thermal mass (like water barrels) to retain heat
- Close up roof and vents to retain warmth
🌱 Why Garden Houses Are the Future
Benefits:
- Grow food year-round
- Organize tools and seeds efficiently
- Control pests and climate
- Avoid watering stress
- Reduce dependency on store-bought produce
These garden houses empower self-sufficiency, reduce grocery costs, and promote eco-conscious lifestyles — all from your backyard.
💡 Extra Features You Can Add
- Rainwater harvesting barrel
- Solar panels for powering lights or fans
- Mini compost toilet or sink
- Folding potting benches
- Bluetooth thermometer or humidity monitor
🧠 Real-World Impact
From suburban families to school projects, these mini eco-houses are empowering people to:
- Teach kids about sustainability
- Grow fresh, chemical-free produce
- Reclaim small or unused backyard corners
- Become part of the “Grow Your Own Food” movement
Some communities have even adopted shared versions in urban lots or parks as part of collective gardening programs.
🏁 Conclusion: More Than Just a Shed
The green garden house shown above is not just a shelter for tools — it’s a living, breathing part of the garden ecosystem. It offers a sanctuary for seedlings, a workshop for gardeners, and a haven for homegrown abundance.
With a few basic tools, some recycled materials, and a weekend of work, you can turn a bare patch of earth into a year-round productivity powerhouse — your own slice of sustainable paradise.