SEO Caption:
“Luxury Poolside Cabana & Family Retreat Build Guide 🔨🌴 | Step-by-Step Construction of Your Ultimate Backyard Oasis – From Pool Excavation to Finished Cabana! 👇 Tap the comments for the full, photo-packed breakdown and pro tips.”
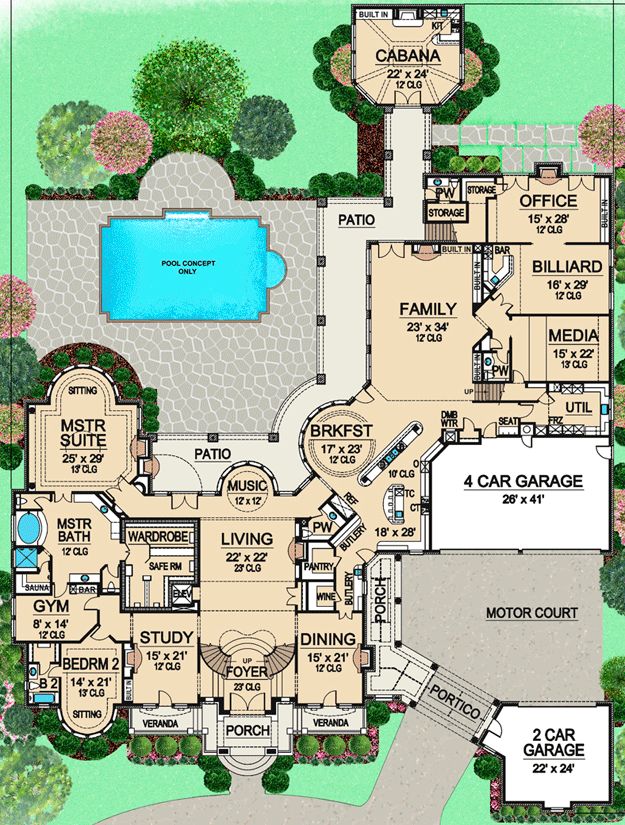
📰 Today’s Build Bulletin: Pool Cabana & Family Wing
1. Site Prep & Pool Excavation
Headline: “Digging In for Paradise!”
Step-by-Step:
- Survey & Layout: Mark the 23′×34′ pool footprint and cabana approach path.
- Excavation: Excavate to design depths, stockpile spoil, and install temporary erosion fencing.
- Base Prep: Compact subgrade, add gravel bedding, and rough-grade for proper drainage.
2. Concrete Shell & Plumbing
Headline: “Shell of Steel & Water Lines!”
Step-by-Step:
- Rebar Grid: Place #4 rebar throughout the pool floor and walls per engineered specs.
- PVC Plumbing: Rough-in skimmers, main drains, return lines, and cabana prep-tub stub-outs.
- Shotcrete/Gunite: Spray concrete walls and floor; trowel to smooth, then cure under wet burlap.
3. Patio & Pool Deck Finishes
Headline: “Pavers Set the Stage!”
Step-by-Step:
- Edge Forms: Set perimeter forms for the 30′×30′ paved area.
- Base & Bedding: Lay compacted base, screed sand bedding, and snap chalk lines.
- Install Pavers: Stagger patterns, cut to fit, then sweep polymeric sand into joints.
4. Cabana Foundation & Framing
Headline: “Cabana Rises on Solid Footings!”
Step-by-Step:
- Footing Trenches: Excavate for 24″×24″ pad footings at each column.
- Concrete Pour: Pour pads and level; insert anchor bolts before set.
- Post & Beam: Erect treated wood posts, install beams, and nail subfloor sheathing.
5. Family & Game Room Addition
Headline: “Adding Family Living Space!”
Step-by-Step:
- Wall Plates & Studs: Bolt sill plates to slab; frame 12′ walls for family, billiard, and media rooms.
- Roof Trusses: Lift and secure prefabricated trusses; sheathe with plywood.
- Sheathing & Wrap: Tape ZIP panels or house wrap; flash window and door openings.
6. MEP Rough-Ins & Utilities
Headline: “Systems Integrated Early!”
Step-by-Step:
- Electrical Runs: Pull circuits for lighting, outlets, pool equipment, and cabana mini-split.
- Plumbing Lines: Run water to cabana bar sink and outdoor shower stub.
- HVAC Ductwork: Install duct chase for family wing and condenser pad for cabana climate control.
7. Exterior Cladding & Roofing
Headline: “Weatherproof & Stylish Finish!”
Step-by-Step:
- Roof Underlayment: Lay synthetic felt; install metal or shingle roofing.
- Siding & Trim: Fit board-and-batten siding on cabana and painted stucco on the addition.
- Gutters & Downspouts: Mount seamless gutters and direct downspouts to drainage swales.
8. Interior Finishes & Cabinetry
Headline: “From Drywall to Decor!”
Step-by-Step:
- Insulation & Drywall: Fill walls with spray-foam; hang, tape, and finish drywall.
- Millwork Install: Fit cabana bar, media built-ins, and family room shelving.
- Paint & Flooring: Apply two-tone paint; lay tile in cabana, LVT or hardwood in family/game rooms.
- Fixture Mounting: Install lighting, plumbing fixtures, and AV equipment.
9. Final Touches & Landscaping
Headline: “Oasis Complete!”
Step-by-Step:
- Pool Equipment Startup: Connect pump, filter, heater, and LED lights; balance chemistry.
- Outdoor Furniture: Place loungers, bar stools, and game-room seating.
- Plantings & Turf: Plant palms, shrubs, and sod around the patio and cabana.
- Punch-List Walkthrough: Address any touch-ups, test all systems, and hand over keys.
🔗 Dive deeper in the comments for full photo galleries, material lists, and expert tips on every phase—your definitive guide to building the ultimate poolside retreat!