A comprehensive, step-by-step, guide to properly framing dormers—covering ridge headers, valley and jack rafters, sheathing, flashing, and trim—to ensure weather-tight, load-bearing performance in your next roof addition.
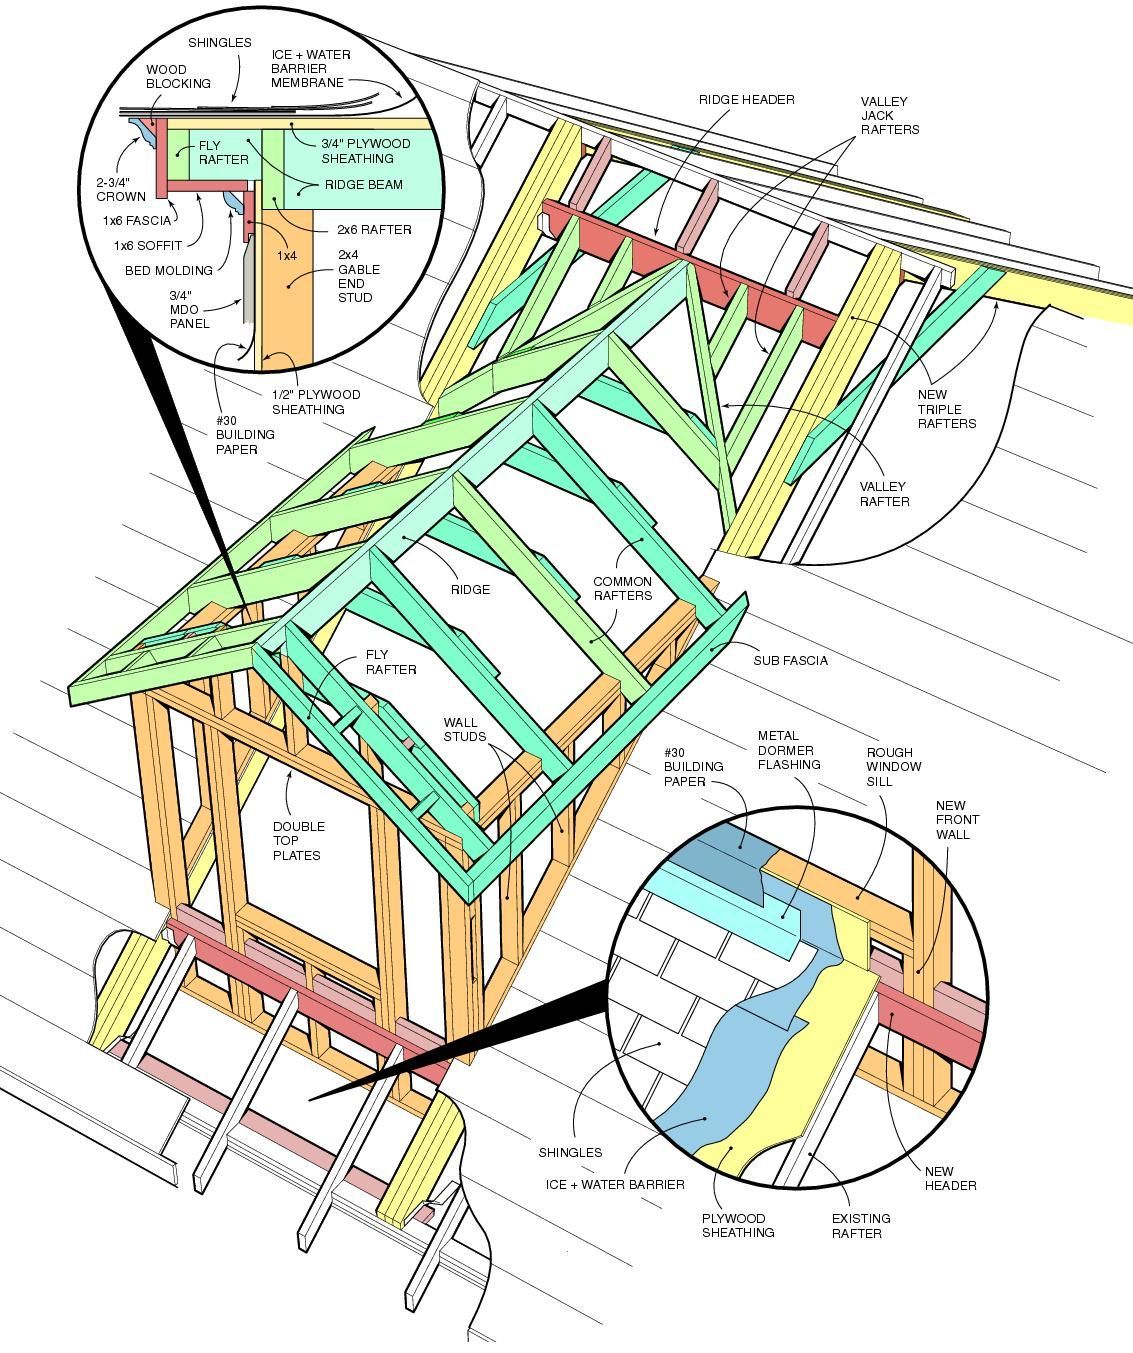
Adding a dormer can transform an attic into livable space, flood a room with natural light, and dramatically boost curb appeal. Yet even experienced carpenters can stumble when tying a dormer into an existing roof plane—resulting in water leaks, twisted rafters, and undue structural stress. In this detailed guide, we’ll diagnose the most frequent framing and flashing mistakes illustrated in the diagram above, then walk you through a precise, seven-phase correction plan. By the end, you’ll understand how to seamlessly integrate new dormers with existing rafters, apply proper ice-and-water protection, and finish with leak-proof flashing and trim.
Phase 1: Diagnosing the Problem Areas
Before swinging the hammer, inspect your existing dormer framing for these telltale issues:
- Undersized or Misaligned Ridge Header:
- Mistake: Using a single 2×8 ridge beam or failing to seat it fully on the supporting wall plate.
- Consequence: Deflection under load and uneven valleys.
- Weak Valley & Jack Rafter Connections:
- Mistake: Cutting jack rafters too short—or mating them to the ridge beam rather than the valley rafter.
- Consequence: Poor load transfer and sagging valleys.
- Insufficient Sheathing & Ice-and-Water Barrier:
- Mistake: Missing MDO panel at the gable end or underlayment laps pointing in the wrong direction.
- Consequence: Water intrusion at the dormer-to-roof junction, rot in the rafters.
- Improper Flashing & Fascia Details:
- Mistake: No metal flashing under the dormer sill or over the step-flashing at the sidewall.
- Consequence: Slow leaks that rot framing and sheathing over time.
Once you’ve pinpointed which of these issues plagues your dormer, move on to the correction phases below.
Phase 2: Remove Faulty Framing & Prep the Opening
- Strip Back to Sound Structure:
- Carefully remove shingles, underlayment, and sheathing around the dormer footprint to expose the full extent of the existing rafters and wall plate.
- Support the Roof Load:
- Erect temporary propping beneath the ridge and common rafters on either side of the dormer. Use adjustable shore jacks and cross-braces to carry the load safely.
- Cut Out Damaged Rafters & Headers:
- Using a reciprocating saw, remove any compromised rafters, ridge headers, or sheathing.
- Label each removed member so you know its original position for reference.
- Inspect Underlying Wall Plate & Header:
- Check the top plate of the new front wall for squareness and level.
- If decay or twisting is present, replace or sister in a new double top plate.
Phase 3: Install a Proper Ridge Header & Valley Rafters
- Set the Ridge Header:
- Cut a true ridge beam sized per span and load (commonly a double 2×10 or engineered LVL).
- Seat it squarely on the double top plate of the dormer front wall—and on jack studs or posts nailed into the existing ridge framing.
- Secure with hurricane ties or metal beam hangers every 24″ O.C.
- Lay Out Valley Rafters:
- Calculate the valley rafter length using the jack-rafter formula (run = wall thickness + soffit overhang; rise based on roof pitch).
- Cut two full-length valley rafters from 2×8 or 2×10 lumber, ensuring their plumb cuts match the ridge beam angle and bird’s-mouth seating on the wall plate.
- Fasten Valley to Ridge:
- Use through-bolts or lag screws where the valley meets the ridge header, with rafter ties on the reverse side.
- Check for twist and adjust so the valley rafter sits plumb and true.
Phase 4: Install Jack, Fly, and Common Rafters
- Position Fly Rafters:
- These run from the existing eave up to the new dormer ridge. Mark their locations on the ridge beam and wall plate, spacing them equal to the common rafters.
- Cut & Fit Jack Rafters:
- Jack rafters fit from the dormer wall plate up to the valley rafter.
- Transfer the angle from test cuts on scrap lumber, then cut each bird’s-mouth seat to match the dormer front wall plate depth and angle.
- Install Common Rafters:
- These tie into the existing roof beyond the dormer. Secure them to the ridge beam and to the valley rafters at each end, using gusset plates or metal connectors.
- Check All Alignment:
- Use a straightedge along the underside of each rafter run to confirm a smooth plane—no dips or bumps at the dormer transition.
Phase 5: Sheathing & Underlayment Detailing
- Apply ½″ Plywood Sheathing:
- Start with the existing roof, then sheath the dormer framing in one continuous layer back to the existing field.
- Stagger panel joints and leave a 1⁄8″–3⁄16″ gap for expansion.
- Install #30 Building Paper & Ice-and-Water Barrier:
- Wrap the dormer end studs with MDO panel or peel-and-stick underlayment.
- Lay ice-and-water shield from the existing roof up and over the dormer sill, extending six inches beyond the interior face of the dormer wall.
- Run building paper over the field sheathing, then under the drip edge and over the dormer sill barrier.
- Seal All Penetrations & Seams:
- Use self-adhered flashing tape at all panel seams and around penetrations (vents, windows).
- Embed a continuous metal drip edge at the eave and a small hemmed sub-fascia to support the future fascia board.
Phase 6: Flashing & Trim Installation
- Dormer Sill Flashing:
- Fit custom bent pan flashing directly under the dormer window sill, extending up behind the sheathing by four inches and out over the drip edge.
- Sidewall Step Flashing:
- At each row of shingles, slip in piece of metal step flashing against the dormer wall under the shingles, then cap with the next piece of housewrap or building paper.
- Back-Wall Counter Flashing:
- Once siding is installed, cut a reglet three inches above the head of each step-flashing location.
- Insert a metal counter-flashing strip into the reglet and seal with exterior sealant.
- Install Fascia, Soffit, and Bed Molding:
- Attach the 1×6 fascia and soffit boards, cutting them plumb to the valley angles.
- Cap the dormer gable with bed molding and crown to shed water away from the joint.
Phase 7: Final Inspection & Finish Roofing
- Leak-Test the Dormer:
- After sheathing and flashing, but before shingles, spray water up onto the dormer roof with a garden hose. Check inside for any drips or moisture penetration.
- Lay Shingles Continuously:
- Begin at the dormer eave, working up and out until you tie into existing field shingles.
- Shingle the dormer roof in the same pattern and exposure as the main roof, ensuring no shingle ends are left unsupported at the valleys.
- Finish Ridge Cap & Valley Cover:
- Install the ridge cap along the new dormer ridge, overlapping the ridge vent and sealing properly.
- At the dormer-roof valleys, center a continuous metal valley flashing and cover with a closed-cut shingle or woven valley technique per manufacturer guidelines.
- Clean Up & Monitor:
- Remove all stray nails and debris.
- Re-inspect after the first heavy rain. Confirm the interior remains bone-dry and all fascia joints are sealed.
Conclusion
By following this structured, seven-phase process—removing faulty framing, installing correctly sized ridge headers and valley rafters, positioning jacks and fly rafters, applying continuous sheathing and underlayment, executing meticulous flashing, and finishing with careful shingling—you’ll eliminate the common mistakes that lead to leaks and structural compromise. Proper dormer integration not only enhances your home’s functionality and aesthetics but also ensures years of durable, weather-tight performance. Take the time to measure twice, cut once, and you’ll enjoy a beautifully executed dormer addition that stands the test of time.