By Construction Today | August 5, 2025
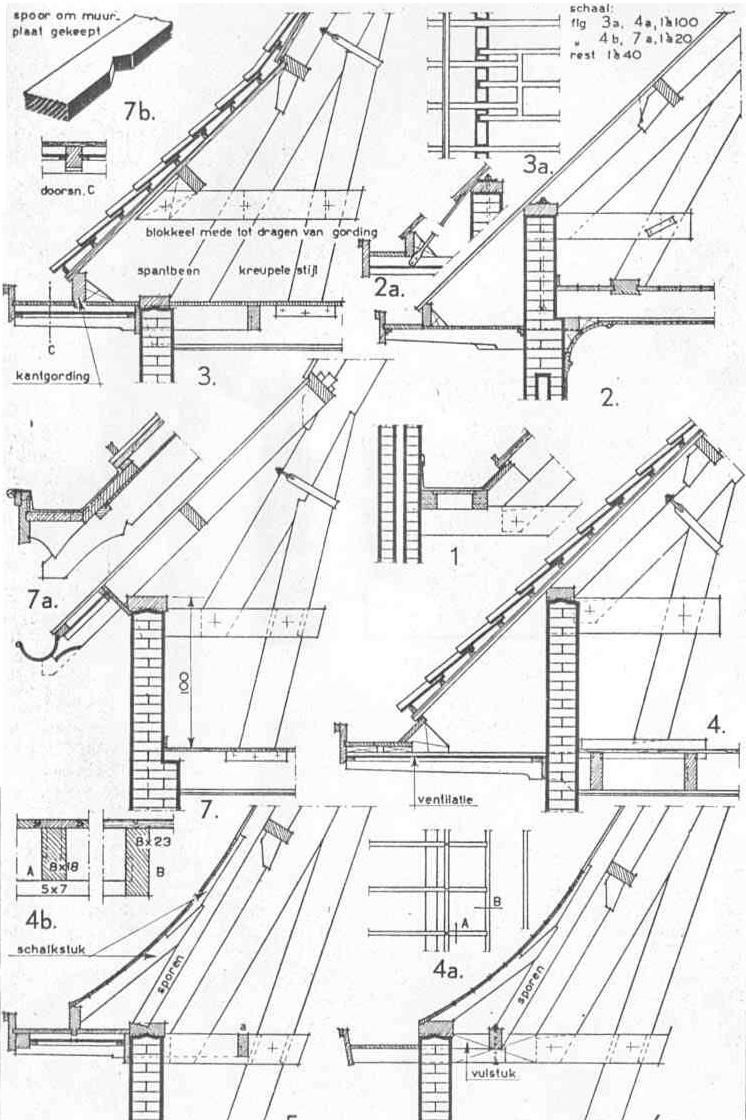
When it comes to roofing, the devil is in the details. The junction where roof meets wall—commonly known as the eaves, verge, or gutter line—is critical for weatherproofing, structural integrity, and even the aesthetic finish of your home. The technical drawing above presents eight time-proven connection types, numbered 1 through 7b (with sub-details), each suited to different wall constructions, roof slopes, and material choices. In this in-depth, news-style guide, we’ll walk you through how to execute each detail on site—step by step—so you can choose the right method for your next roofing project.
Why Eaves Matter
- Weatherproofing: Proper eaves prevent water ingress at the wall head.
- Ventilation: Ventilated soffits avoid condensation in the attic.
- Load Transfer: Correct framing ties ensure rafter loads reach the wall plate safely.
- Aesthetics: Clean, level eaves finish the look of your roofline.
Selecting the correct connection detail depends on your wall type (brick, block, timber frame), the roof pitch, and whether you need integrated gutters or soffit ventilation.
Detail 1: Simple Rafter Bearing on Wall Plate (Detail 1)
Ideal for solid masonry walls with no cavity.
Key Components:
- Rafter tail cut square
- Wall plate bedded on mortar
- Felt underlay tucked behind the brickwork
Installation Steps:
- Set the Wall Plate: Lay a treated timber plate atop the finished masonry wall, embedding it in mortar for a snug fit.
- Position Rafters: Cut each rafter tail to seat flush on the plate, with a slight slope cut on the underside to shed water.
- Fix Underlay: Tuck underlay (roofing felt) between the plate and brickwork to create a capillary break.
- Nail Off: Secure rafters to the plate with galvanised joist hangers or toenail nails at 45°.
Detail 2: Rafter on Top of Beam with Soffit (Detail 2 & 2a)
Ideal for cavity walls where you want an external soffit box.
Key Components:
- External ledger beam bolted to wall ties
- Soffit boarding beneath the rafters
- Vent strip at the eaves
Installation Steps:
- Fix the Ledger: Bolt a treated timber ledger to the masonry using expansion anchors at regular centers.
- Attach Wall Ties: Insert wall ties into the cavity to secure the ledger against inward movement.
- Set Rafters: Lay rafters on the ledger, nailing through into the beam.
- Install Soffit: Fit soffit boards (e.g., vented PVC or timber) between fascia and wall, leaving a strip for airflow.
- Ventilation: Install a continuous vent strip or individual vents per rafter bay.
Detail 3: Block Keel with Cavity Support (Detail 3 & 3a)
Ideal for blockwork cavity walls requiring a hidden support block.
Key Components:
- Block keel laid in mortar alongside the inner leaf
- Rafter bearing on the keel and inner block
- Cavity tray at the outer leaf
Installation Steps:
- Build the Keel: During wall construction, lay an additional block course—“the keel”—to carry the rafters.
- Position Cavity Tray: Insert a pre-formed or lead tray above the keel to divert any moisture toward the outer cavity.
- Seat Rafters: Cut rafter tails to bear on the keel. Nail through into the inner block.
- Seal the Cavity: Ensure the outer leaf’s flashings tie into the tray and that mortar doesn’t bridge the cavity.
- Finish Soffit: Fix soffit boards beneath the keel, ensuring a 10 mm gap for ventilation.
Detail 4: Curved or Swept Eaves with Filler Piece (Detail 4 & 4a, 4b)
Ideal for decorative or traditional swept eaves on masonry walls.
Key Components:
- Curved rafter shape or swept joist
- Vulstuk (filler piece) to support the under-cloak
- Schalkstuk (clay fillet) beneath tiles
Installation Steps:
- Shape Rafters: Use a template to scribe the curved profile on each rafter tail.
- Install Filler: Fix vertical filler timber (vulstuk) onto the wall plate to create a flat nailing surface for the swept boards.
- Lay Fillet: Pack a clay fillet beneath the tile overhang to eliminate gaps and insect entry.
- Boarding and Tiles: Fix horizontal boarding over the curved rafters, then bed the tiles onto the sweep, ensuring correct overhang.
- Guttering: Fit a half-round gutter or run tile drips directly into the fascia gutter box.
Detail 7: Eaves with Integrated Gutter (Detail 7 & 7a, 7b)
Ideal for roofs without separate gutter brackets, using a built-in gutter trough.
Key Components:
- Kennel boards sloped to form the gutter base
- Fascia board doubling as a gutter back
- Gutter lining (lead or PVC) set into a rebate
Installation Steps:
- Fit Gutter Joists: Install a row of short joists (spanbeens) at the eaves, sloping inward by 1:200 to encourage flow.
- Board the Kennel: Nail kennel boards onto the joists, shaping them down to the fascia.
- Rebate for Lining: Cut a rebate into the fascia board to take the gutter lining metal or PVC membrane.
- Insert Lining: Dress lead lining or slot a PVC gutter lining into the rebate, upturning it at each end for a watertight seal.
- Cap Flashing: Over-tile or cap-tile the fascia to protect the gutter lip from wind-driven rain.
Detail 5 & 6: Timber Frame Eaves (Not Numbered, Typical Timber-Frame)
Ideal for light-frame construction with timber studs.
Key Components:
- Eaves beam (kantgording) supported on studs
- Breathable sarking underlay
- Ventilated soffit strips
Installation Steps:
- Set Eaves Beam: Bolt or strap the edge purlin (kantgording) to the top of the studs.
- Lay Sarking: Staple breathable underlay across rafters, extending over the eaves beam but leaving a small gap at the soffit for airflow.
- Rafter Fixing: Nail rafters onto the edge purlin, using joist hangers or metal straps.
- Ventilation Gap: Ensure a 25 mm clear cavity between insulation and soffit boarding; fit vented boards or individual vent strips.
- Fascia and Soffit: Fix soffit underneath and a fascia board to hide the rafter tails and underlay edge.
Finishing Touches & Best Practices
- Flashing Integration: Wherever masonry meets timber, always tuck the roofing underlay behind a purpose-made flashing to prevent water tracking.
- Ventilation: Continuous eaves vents achieve better airflow than spot vents—aim for at least 5,000 mm² of free vent area per linear metre of eaves.
- Corrosion Resistance: Use stainless-steel or galvanised fixings, especially where lead or zinc flashings meet timber.
- Insulation Detail: Keep insulation clear of natural ventilation channels; insert fire-retardant foam fillers around penetrations.
- Quality Control: After roof covering is complete, spray test the eaves with a hose to verify no leaks or drips occur.
Conclusion
These eight connection details embody decades of Dutch and broader European roofing practice, blending functionality with craftsmanship. Whether you’re working on a solid brick Victorian terrace, a modern block cavity house, or a lightweight timber-frame extension, there’s a tried-and-tested eaves solution here for you. By following these step-by-step instructions—selecting the correct detail number, installing the key components in sequence, and observing the finishing best practices—you’ll ensure your roof-wall junction is robust, weathertight, and built to last.