In neighborhoods across the country, the familiar silhouette of a newly framed home is nothing short of engineering poetry. What looks like a simple grid of boards is, in fact, a carefully choreographed stack of structural layers—each playing a precise role in strength, insulation and durability. We stepped onto a clean lot to document, step by step, how that standard platform-framed wall, floor and roof assembly comes together.
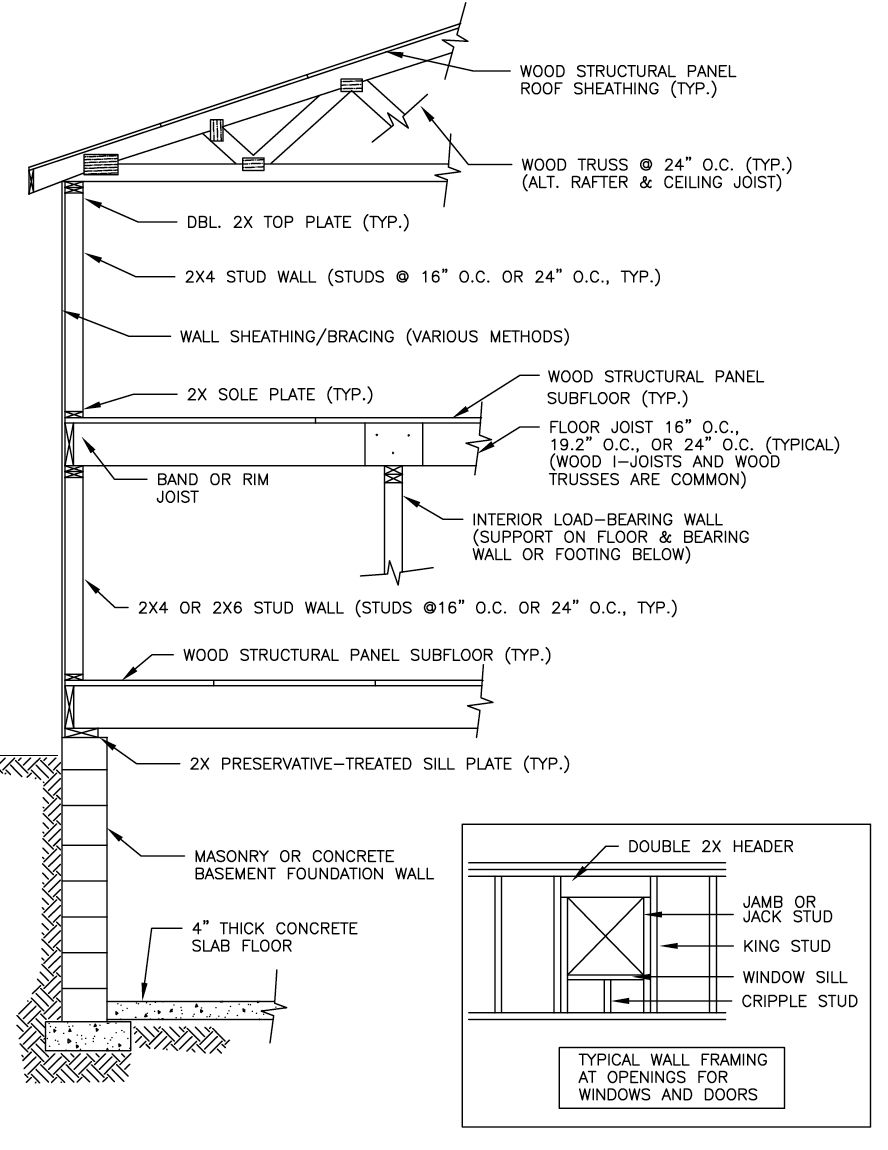
1. Laying the Foundation and Sill Plate
Before any lumber arrives, excavators pour a concrete basement or stem wall to designer depth. A 4-inch slab is finished, and atop the cured concrete wall, crews anchor a preservative-treated 2× sill plate with embedded anchor bolts spaced per code. This treated wood barrier—isolating wood from masonry—becomes the first “floor” of the platform system.
2. Building the First-Floor Platform
Next, 2× band (or rim) joists are bolted down, wrapping the perimeter. Between them, 16- or 24-inch-on-center floor joists span to interior footings or beams. In multistory homes, these joists double as ceiling joists below and floor support above. Engineered I-joists are common, but traditional solid-sawn lumber works just as well when properly sized. Once in place, ¾-inch subfloor panels are fastened atop the joists, creating a flat, strong working floor.
3. Erecting the First-Floor Walls
Now the magic begins: carpenters lay out 2×4 (or 2×6) sole and top plates on the subfloor, snapping chalk lines for stud placement at 16- or 24-inch centers. Studs are toe-nailed between plates, king and jack studs frame any openings, and a double top plate ties perpendicular walls together. At each window and door, a “double 2× header” spans the opening, transferring roof and floor loads around the void.
4. Sheathing and Bracing the Walls
With the skeleton up, crews sheath the exterior with OSB or plywood, nailing at prescribed schedules. This continuous sheathing resists racking, locks stud alignment, and provides a nailing base for future siding or cladding. Diaphragm bracing—whether structural sheathing or metal straps—is added to meet seismic or wind-load requirements.
5. Framing Interior Load-Bearing Walls
Before raising the second story, interior bearing walls are framed atop the first-floor subfloor. These 2×4 or 2×6 assemblies sit directly over foundation footings or beams below, carrying the weight of the above floors and roof. Their placement is critical—mis-aligned bearing walls can spell trouble in later stages.
6. Assembling the Second-Floor Platform
Repeat the platform process one level higher: install rim joists around the bearing walls, set floor joists perpendicular where possible, and fasten subfloor panels. This “platform” becomes the working deck for raising the next tier of walls—and adds fire-blocking continuity between levels.
7. Raising the Second-Floor Walls and Roof Plate
Once the second-floor walls are up, a second double top plate is installed, overlapping corners for strength. This plate forms the bearing surface for the roof or attic trusses. Headers, cripples and jack studs are installed around any upper-level openings, mirroring the first story.
8. Installing Trusses or Rafters
Atop the wall plates, pre-manufactured wood trusses—spaced at 24 inches on center—are lifted into place. Trusses combine the role of rafters and ceiling joists, speeding installation and ensuring uniform roof geometry. If stick-framing, 2× rafters and ceiling joists are laid out and nailed in a similar pattern. In both cases, metal hurricane ties reinforce each connection against uplift.
9. Sheathing the Roof and Sealing the Shell
With the roof skeleton set, crews sheath with 7⁄16- to ¾-inch structural panels, then wrap the walls in a weather-resistive barrier. All openings are flashed, and soffit vents or ridge vents are cut to establish attic airflow. At this point, the home is fully “dried-in”—ready for windows, doors and exterior finishes.
10. Insulating, Drywalling and Finishing
Inside the sealed shell, insulation batts or spray foam fill the stud cavities. Once mechanical, electrical and plumbing rough-ins are inspected, drywall crews hang gypsum panels on walls and ceilings. Subsequent coats of mud and paint hide the bones beneath sleek finishes—ushering the frame from structural marvel to livable home.
Bottom Line:
The platform framing method—studs on sole plate, subfloor platform, stacked walls, then roof—has stood the test of time because it’s economical, flexible and easy to inspect at each stage. By adhering to stud spacing rules, proper sheathing and load-bearing alignments, builders ensure that each board contributes to a strong, code-compliant structure that lasts for generations. Next time you drive by a framed house, you’ll see more than wood—you’ll see a symphony of layers working in concert to shelter life’s moments.