By: Timber Craft Weekly | August 5, 2025
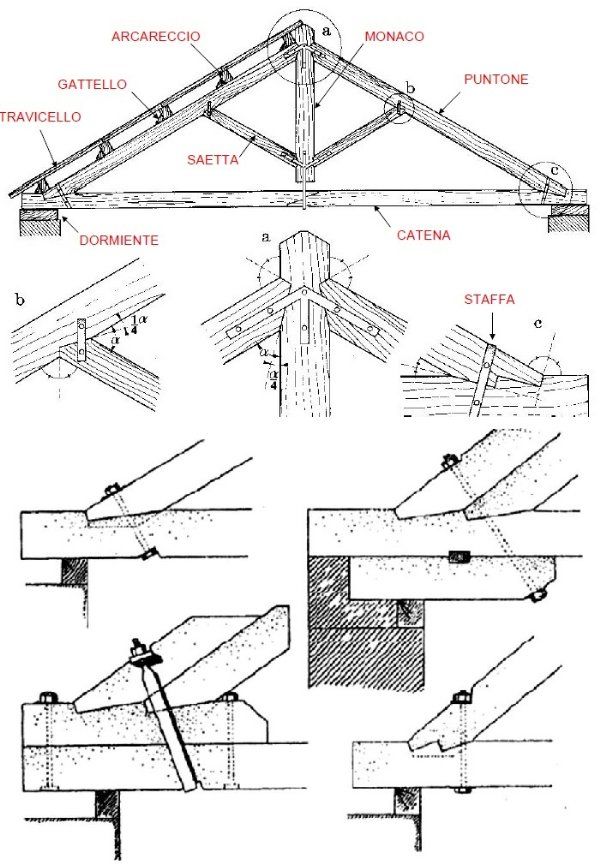
Good carpentry starts with solid joinery, and nowhere is that more evident than in a king post truss—one of the simplest yet strongest roof truss designs. The beautifully hand-drawn diagram above names each member in Italian: the monaio (king post), puntone (principal rafter), travicello (straining beam), arcareccio (collar tie), saetta (strut), catenaria (tie beam), and dormiente (wall plate). In this 1,000-word deep dive, we’ll show you, step by step, how to lay out, cut, assemble, and raise your very own king post truss—whether you’re framing a small pavilion, barn, or cottage.
Why the King Post Truss?
- Simplicity: Only seven members, all straight timbers.
- Strength: Central post (monaio) transfers roof loads down to the tie beam (catenaria).
- Versatility: Spans anywhere from 12 to 20 feet without intermediate support.
- Historic Charm: A time-tested form seen in medieval halls and rural buildings worldwide.
Materials & Tools Checklist
- Lumber
- 2 × 8″ or 2 × 10″ for the puntone (principal rafters)
- 2 × 6″ for the catenaria (tie beam) and travicello (collar tie)
- 4 × 4″ timbers for the monaio (king post) and saetta (struts)
- Iron Straps & Bolts (staffe) for gusset connections
- Framing Square, Sliding Bevel, Tape Measure, Chalk Line
- Circular Saw or Hand Saw with Carpenter’s Pencil
- Auger Bit or Drill & Spade Bit for bolt holes
- Gusset Plates (plywood or metal) if preferred over straps
- Lifting Gear (block & tackle or gin pole) for raising the truss
Step 1: Set Out the Geometry
- Determine Span & Pitch
- Decide on your clear span—for example, 16 feet between wall plates (dormienti).
- Choose a roof pitch (commonly 30°–45°).
- Draw Full-Scale Layout
- On the shop floor or layout table, snap a chalk line for the tie-beam length (catenaria).
- At the center, mark the king-post location.
- Using a bevel set at half the pitch angle (α/2), strike lines from each tie-beam end inward. This intersection marks the rafter heel cuts.
- From the heel intersection, extend the same bevel line upward to locate the rafter-ridge points, establishing the full rafter length.
Step 2: Prepare the Tie Beam (Catenaria)
- Cut to Length
- Crosscut your 2 × 6″ tie beam to the span length, plus allowances for bearing tenons if using mortise-and-tenon seats on your wall plates.
- Mark the King-Post Seat
- At the tie’s midpoint, mark a vertical mortise or simply a bearing notch for the monaio (king post). Typical depth: 2″.
- Notch the Strut Seats
- Measure out from center along the tie beam—distance equal to where your saetta (strut) meets the travicello (collar tie).
- Mark and cut angled seats at α/4 (a quarter of the roof pitch angle) to receive the bottom end of each strut.
Step 3: Craft the King Post (Monaio)
- Cut to Height
- From your layout, you know the ridge height above the tie beam. Cut the 4×4 post to that length plus your chosen joint depth.
- Add Gusset Bearing
- At the top, mark a half-lap seat (depth ≈ timber thickness) for the collar tie (arcareccio).
- Drill bolt holes through the post to align with gusset plates, or lay out mortise and tenon for a wooden pin.
Step 4: Fashion the Principal Rafters (Puntone)
- Rafter Heel Cuts
- Using the heel lines from your layout, mark the plumb cut at the foot of each rafter.
- Angle the bird’s-mouth seat: level cut sits on the wall plate (dormiente), and plumb cheek fits flush against the stud face.
- Ridge Cuts
- At the opposite end, mark the ridge cuts so both rafters meet neatly over the king post. Include a ½″–1″ overhang (look-out) if desired.
- Gusset Plate Preparation
- Where rafters meet the monaio and arcareccio, drill matching bolt-hole patterns in each member. Ensure all holes register precisely.
Step 5: Cut the Collar Tie (Arcareccio) & Collar Beam (Travicello)
- Determine Collar Placement
- Typical height: ⅓ down from the ridge. From your full-scale layout, transfer this distance onto each rafter.
- Cut Notches
- At each end of the collar beam (2 × 6″), cut shoulders matching the rafter face angle so it seats tightly.
- Drill or Mortise
- Prepare bolt holes for iron straps (gattelli) or mortise-and-tenon joinery if you prefer an all-timber connection.
Step 6: Struts (Saetta) and Bracing
- Length & Angles
- Struts run from near the collar beam to the tie-beam, meeting your α/4 seats marked in Step 2.
- Cut both ends at the correct bevels so they bear fully in their notches.
- Check Fit
- Dry-fit each strut between its seat on the tie beam and its bearing under the collar, ensuring a snug, gap-free contact.
Step 7: Ironwork & Gusset Installation
- Position Iron Straps (Staffe)
- At each juncture—rafter to monaio (detail “a”), rafter to strut/travicello (detail “b”), and rafter to tie beam (detail “c”)—place flat steel straps on both faces.
- Bolt Up
- Use carriage bolts with washers and nuts, tightening to draw members together but not crushing timber. Typical bolt diameter: ½″ or ⅝″.
- Optional Plywood Gussets
- If you prefer, glue and screw plywood gussets over each face—just ensure moisture-resistant adhesive and stainless or zinc-coated screws.
Step 8: Dry Assembly & Inspection
- Lay Out on Saddles
- On two stable sawhorses or temporary saddles, assemble the entire truss, tapping into final alignment.
- Check All Angles & Plumb
- Use a level and square to confirm that the king post is perfectly vertical, rafters symmetrical, and collar tie horizontal.
- Mark Member IDs
- Before disassembly, chalk-mark each joint for re-erection order and orientation.
Step 9: Erecting the Truss
- Rigging Up
- Under the ridge intersection, install a gin pole or block-and-tackle anchored to a stable point.
- Lift Carefully
- Slowly hoist the truss upright, guiding rafter ends onto the wall plates (dormienti).
- Seat and Secure
- Once rafter heels seat fully in the wall-plate notches, nail or bolt through the wall plate into the rafter bird’s-mouth.
Step 10: Final Checks & Tying In
- Tie Beam Anchors
- Through-bolt the tie beam down into the masonry or timber sleeper below, preventing outward thrust.
- Rafter Plumb Lines
- Drop a plumb line from each rafter tip to ensure your ridge runs perfectly straight.
- Gusset Retorque
- After a day of settlement, re-check all bolt torque and add additional shims or packing if any joint has loosened.
Maintenance Tips
- Periodic Bolt Check: Every season, inspect and re-tighten iron fittings.
- Wood Treatment: Coat all end grains and cut surfaces with a quality exterior wood preservative.
- Moisture Management: Ensure good attic ventilation above the collar tie to prevent condensation in the heart of the truss.
Conclusion
Building a king post truss marries geometry, joinery, and muscle—yet yields a remarkably elegant structure that has stood for centuries. By following these ten steps—meticulous layout, precise cutting, robust ironwork, and careful erection—you’ll create a roof crowning your building with time-honored grace and enduring strength. Whether for a rustic barn or a modern timber frame pavilion, this truss will carry not just your roof load, but a legacy of craftsmanship into the next generation.