Interior design experts unveil a step-by-step, blueprint for assigning storage, cleaning, prep, and cooking zones—whether you have a U-shaped, island, or single-counter layout—to transform cluttered kitchens into seamless, efficient workspaces.
In today’s fast-paced world, the heart of the home should be a place of fluid creativity—not a battleground of mismatched storage and counter chaos. Yet too many kitchens suffer from a “one-size-fits-all” cabinetry approach, where dishes, dry goods, utensils, and appliances all jostle for space without regard to how we actually cook. The remedy? Deliberate kitchen zoning—dividing cabinets and counters into dedicated consumables, non-consumables, cleaning, preparation, and cooking areas, and arranging them to match your workflow.
In this comprehensive guide, we’ll unpack the science behind zone-based design, diagnose the pitfalls of unstructured layouts, and walk you—over a detailed, step-by-step, 1,000-word plan—through organizing your cabinets and counters to maximize efficiency, no matter your footprint.
1. Why Kitchen Zoning Matters
When everyday items are stashed randomly, you waste precious minutes—and mental energy—searching for what you need. A recent study by the National Kitchen & Bath Association found that kitchens with clear zone delineation cut meal-prep times by up to 30%. Here’s why:
- Logical Sequencing: Zoning aligns storage with the order of tasks—grab ingredients, wash produce, chop, then cook—minimizing back-and-forth.
- Reduced Clutter: Each zone has just the tools and supplies it needs, eliminating the “junk drawer” syndrome and freeing up valuable counter space.
- Ergonomic Flow: Positioning heavy or bulky items near the zones where they’re used reduces strain and risk of spills or accidents.
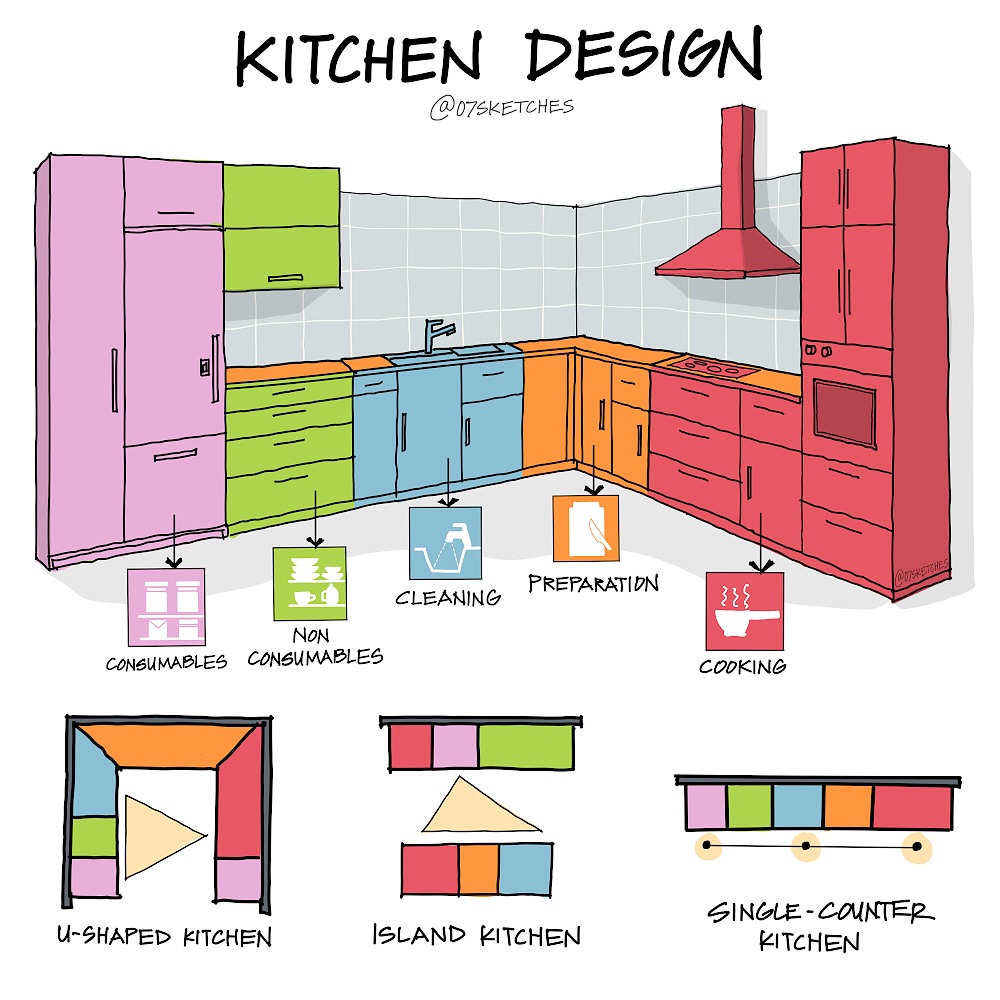
2. Identifying the Five Essential Zones
A. Consumables (Purple):
- Dry goods, canned foods, oils, spices—everything you eat that comes in packaging.
- Should be near the cleaning or prep zone so you can easily unload groceries and stage ingredients.
B. Non-Consumables (Green):
- Dishes, glassware, cookware, bakeware—items you’ll reuse.
- Ideally positioned adjacent to the cleaning zone (so clean dishes return to storage) and near the cooking zone for pots and pans.
C. Cleaning (Blue):
- Sink, dishwasher, trash/recycling pull-outs, cleaning supplies.
- Central hub: between consumables (for unloading) and prep (for washing produce).
D. Preparation (Orange):
- Cutting boards, mixing bowls, knives, peelers—tools for staging and chopping.
- Countertops in this zone should be spacious and well-lit, with storage directly underneath.
E. Cooking (Red):
- Cooktop, oven, hood, adjacent countertop for hot-dish landing, utensils.
- Flanked by prep on one side (for mise en place) and non-consumables on the other (for pots, pans).
3. Mapping Your Existing Layout
Before renovating, sketch your floor plan—U-shaped, island, or single-counter—and overlay approximate cabinet uses as they stand now. Note where you:
- Unload groceries
- Wash/rinse
- Chop and assemble
- Cook and bake
Mark inefficient “hops” between zones (e.g., from pantry at one end to sink at the other). Count the steps for a simple salad: fridge → sink → counter → stove → plate. If that leg exceeds four strides, you’ve identified a pain point to fix.
4. Phase 1: Establish the Cleaning Core
Step 1: Centralize your sink and dishwasher in the middle of a run. This becomes the fulcrum between consumables and prep.
- Tip: If right-handed, install the dishwasher to the right of the sink to catch drips directly.
Step 2: Under-sink pull-outs for trash, recycling, and cleaning supplies. Seal the backs of cabinets against moisture.
Step 3: Above the sink, mount a dish-rack-style sliding shelf or drying rack to free counter space.
5. Phase 2: Position Consumables & Non-Consumables
Step 4: To the left of the cleaning zone, designate consumables cabinets (purple):
- Tall pantry or pull-out larders for packaged goods.
- Near the fridge for quick unloading.
Step 5: Immediately to the right of cleaning, create a non-consumables zone (green):
- Deep drawers for plates and bowls—pull-out organizers to prevent breakage.
- Upper cabinets for glassware.
This placement means clean dishes go directly back into storage, and ingredients move straight from pantry/fridge to sink.
6. Phase 3: Carve Out the Prep Zone
Step 6: Adjacent to the non-consumables or cleaning zone, reserve at least 24″–30″ of counter as your preparation area (orange).
- Stock the drawer beneath with knives, measuring cups, peelers, and mixing bowls.
- Install under-cabinet lighting for shadow-free work.
- If you have an island, its frontage can double as prep real estate—just ensure it sits 42″–48″ from perimeter counters.
Step 7: Add vertical dividers in base cabinets for cutting boards and baking trays—keeps them upright and accessible.
7. Phase 4: Anchor the Cooking Zone
Step 8: Next to the prep zone, position your cooking cabinets (red):
- Cooktop or range with 12″–15″ of landing counter on either side.
- Wall-mounted or island hood directly above, sized at least as wide as the cooktop.
Step 9: Below the cooktop, use deep drawers for pots and pans, lined with non-slip mats. Side cabinets can hold lids vertically.
Step 10: If you have a wall oven or microwave combo, stack it at eye height in this red zone—reduces bending and accelerates transition from prep to bake.
8. Phase 5: Adapting for Different Footprints
- U-Shaped Kitchens: The three legs naturally accommodate distinct zones. Assign one leg to storage (consumables/non-consumables), the second to cleaning/prep, and the third to cooking. Place the prep triangle in the center for quick pivots.
- Island Kitchens: Use the perimeter for storage, cleaning, and cooking zones; dedicate the island entirely to prep. Install drawers on both sides of the island for tools and ingredients.
- Single-Counter Kitchens: When space is linear, create mini-zones in sequence: pantry/fridge → sink → prep counter → cooktop. Use vertical pegboards above zone transitions to hang tools, freeing up cabinet space.
9. Phase 6: Fine-Tuning & Personalization
Step 11: Ergonomic tweaks:
- Pull-out step stools inside lower cabinets for quick reach to uppers.
- Magnetic knife strips near prep zone for safety and visibility.
- Spice pull-outs beside the cooktop, lined in order of frequency of use.
Step 12: Aesthetic cohesion:
- Use color-coded cabinet interiors or drawer liners to reinforce zone identity.
- Add subtle tile accents above each zone—green mosaic behind cookware, blue stripe above the sink—to guide the eye.
10. Phase 7: First-Use Test & Iteration
Step 13: Cook your signature dish from start to finish. Time each segment—does the path from fridge to sink to prep to stove feel seamless? Count steps; aim for no more than three strides between adjacent zones.
Step 14: Solicit feedback from family or housemates. They may reveal unseen friction points—perhaps the spice cabinet feels too far from the cooktop, or the prep zone needs a second knife block.
Step 15: Make micro-adjustments: swap a utensil drawer, add a rolling cart for extra staging, or install a narrow pull-out for oil and vinegar between prep and cook zones.