A comprehensive, step-by-step renovation guide that shows you how to properly install ledger boards, rafters, cross members, posts, and screen stops—eliminating wobbles, gaps, and premature rot in your next screened-in patio project.
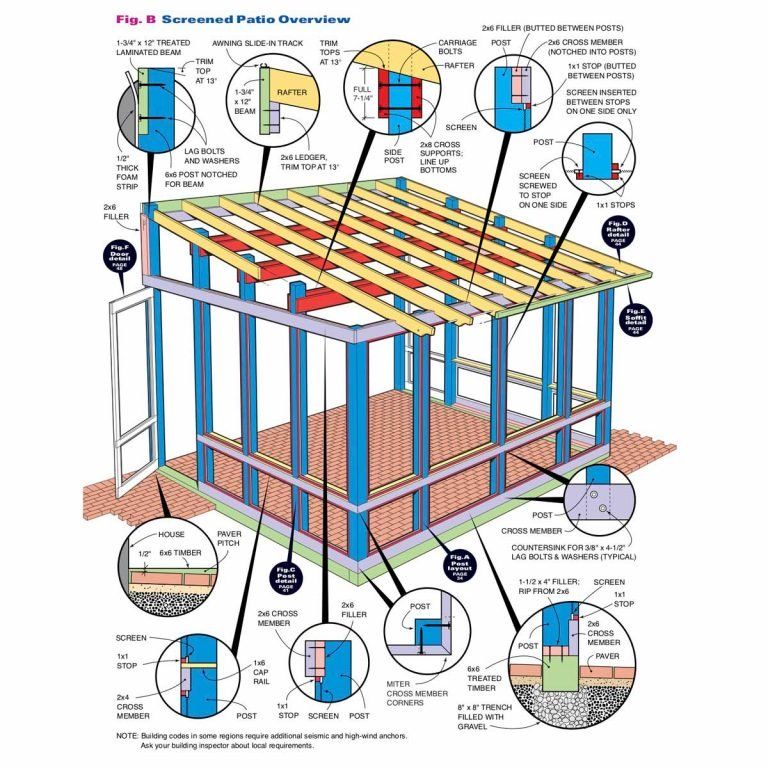
Building a screened-in patio is a rewarding way to expand your living space and enjoy the outdoors insect-free—but even minor framing mistakes can lead to sagging rafters, loose screens, and moisture damage. In the detailed blueprint above, several missteps stand out: undersized ledger connections, misaligned rafters, improperly notched posts, and haphazard screen stops. Follow this step-by-step, seven-phase guide to correct these errors and create a rock-solid, weather-resistant screened patio that will stand the test of time.
Phase 1: Preparing a Solid Ledger Connection
1. Verify Existing Structure & Flashing
- Inspect the house siding and sheathing where the ledger will attach. Remove any soft or rotted material.
- Install self-adhered flashing (ice-and-water barrier) behind the siding to shed water above the ledger.
2. Install a Treated Ledger Beam
- Use a 1¾″×12″ pressure-treated laminated beam (or two 2×8s sandwiched) fastened directly to the rim joist or band joist.
- Drill 3/8″ pilot holes and secure with ½″-diameter structural lag bolts, spaced no more than 16″ on center. Washers under the bolt heads prevent crushing the beam.
3. Shim and Level
- Shim behind the ledger to eliminate any gaps between the beam and house sheathing.
- Check the beam’s pitch with a long level—add a slight slope (¼″ per foot) away from the house to prevent water pooling.
Phase 2: Setting Up the Posts and Cross Members
4. Establish Post Footings
- Excavate 8″×8″ trenches below frost line, backfill with 4″ of gravel for drainage.
- Place 6×6-inch treated timber posts directly on the gravel, or use galvanized post anchors bolted to concrete piers.
5. Plumb and Brace Posts
- Align posts along the patio perimeter with a chalk line. Use a framing square to confirm each is perfectly vertical.
- Temporarily brace with diagonal 2×4s to maintain plumb while you attach cross members.
6. Install 2×6 Cross Members
- Notch each post to receive the 2×6 cross member halves—this “half-lap” ensures the member sits flush and shares load equally.
- Space cross members at 12″ on center (OC) if you plan to inset screen panels directly, or 16″ OC for narrower screen stops.
Phase 3: Attaching the Roof Ledger and Rafters
7. Mount the Roof Ledger
- Attach a second 2×6 ledger board at the top of the posts using carriage bolts through the posts and ledger, with washers under the bolt heads.
- Ensure the ledger aligns with the house ledger slope to provide a continuous drainage plane.
8. Lay Out Rafter Positions
- Snap rafter-layout chalk lines on both the house ledger and the roof ledger. Standard spacing is 24″ OC for 2×6 rafters.
9. Cut and Install Rafters
- For each rafter, transfer roof pitch angles to rafters using a speed square. Cut bird’s-mouth seats so the rafter rests squarely on both the house and roof ledgers.
- Fasten rafters with joist hangers or 2½″ exterior-grade nails through the seat. Secure the top of each rafter with a 1×2 filler strip beneath the screen track (see Phase 5).
Phase 4: Installing the Soffit Trim and Screen Slide-In Track
10. Attach 1×6 Soffit and Fascia
- Under the roof ledger, install 1×6 soffit boards to close the underside of the rafters. Leave a ⁄8″ gap between boards for ventilation if you’re enclosing a ceiling.
- Cap the outer edge with 1×6 fascia boards, fastening through the soffit into rafter ends.
11. Set the Screen Slide-In Track
- Center the manufacturer’s aluminum or PVC screen track on the rafters. Butt each track section end-to-end and secure with screws into the 1×2 filler strips.
- Trim track joints with the provided connectors to maintain a continuous groove for the screen spline.
Phase 5: Adding Screen Cross Supports and Stops
12. Install Vertical Screen Posts
- Between each pair of cross members, place 2×6 vertical “screen posts” to act as framing for the screen panels. These should align flush with the outer face of the cross members.
- Fasten each post with 3″ exterior-rated screws into the cross members above and below.
13. Insert 1×1 Screen Stops
- On one side of each screen bay, rip a 1×2 filler down to 1×1 width. Butt this stop against the screen edge.
- On the opposite side, use full-width 1×1 stops. The screen inserts between stops and is held in place by the spline.
14. Line Up Bottom Stops
- Ensure all bottom stops align exactly—use a chalk line along the patio’s concrete or paver surface. This prevents binding when sliding screens in.
Phase 6: Securing the Screens and Doors
15. Trim and Install Screen Panels
- Measure each bay’s width and height. Cut screen mesh approximately ½″ oversized.
- Lay mesh in the track groove, press in the vinyl spline with a spline roller, then trim excess mesh flush with a utility knife.
16. Mount Hinged Screen Doors
- Frame out the door opening with double 2×4 jambs to support hinges and latch hardware.
- Pre-install carriage bolt backing plates in the header and sill. Mount hinges and check for square swing.
Phase 7: Final Inspection and Weatherproofing
17. Check for Structural Movement
- Gently push on the framing at several points—there should be no perceptible sway. If you find movement, add diagonal blocking between posts and cross members.
18. Seal All Exposed End Grain
- Apply two coats of exterior-grade wood sealer or paint to all cut ends of treated lumber—this prevents rapid moisture uptake and decay.
19. Flash the Ledger-to-House Connection
- Slide a continuous Z-flashing behind the house ledger, lapping the top flange behind the siding flashing. Seal the top edge with polyurethane exterior caulk.
20. Clean Up and Routine Maintenance
- Remove stray nails and screws from the work area.
- Twice a year, inspect fasteners, re-apply sealant where necessary, and clear debris from the screen track to ensure smooth operation.
Conclusion
By rigorously following these seven phases—preparing solid ledgers, accurately notching and plumb-bracing posts, laying out and fastening rafters, installing correct soffit and screen tracks, adding aligned screen supports and stops, hanging doors, and final weatherproofing—you’ll correct the typical errors seen in DIY screened patio builds. The result is a durable, square, and leak-resistant enclosure that invites fresh air and panoramic views without pests or premature deterioration. Invest the extra care now, and your screened patio will reward you with years of low-maintenance enjoyment.