By: Green Living Reporter | August 5, 2025
In gardens where space is limited but ambitions are high, a new form of green innovation is taking root — literally. With the rise of sustainable gardening and small-space design, the spiral vertical herb tower is becoming one of the most admired and imitated styles among eco-conscious gardeners.
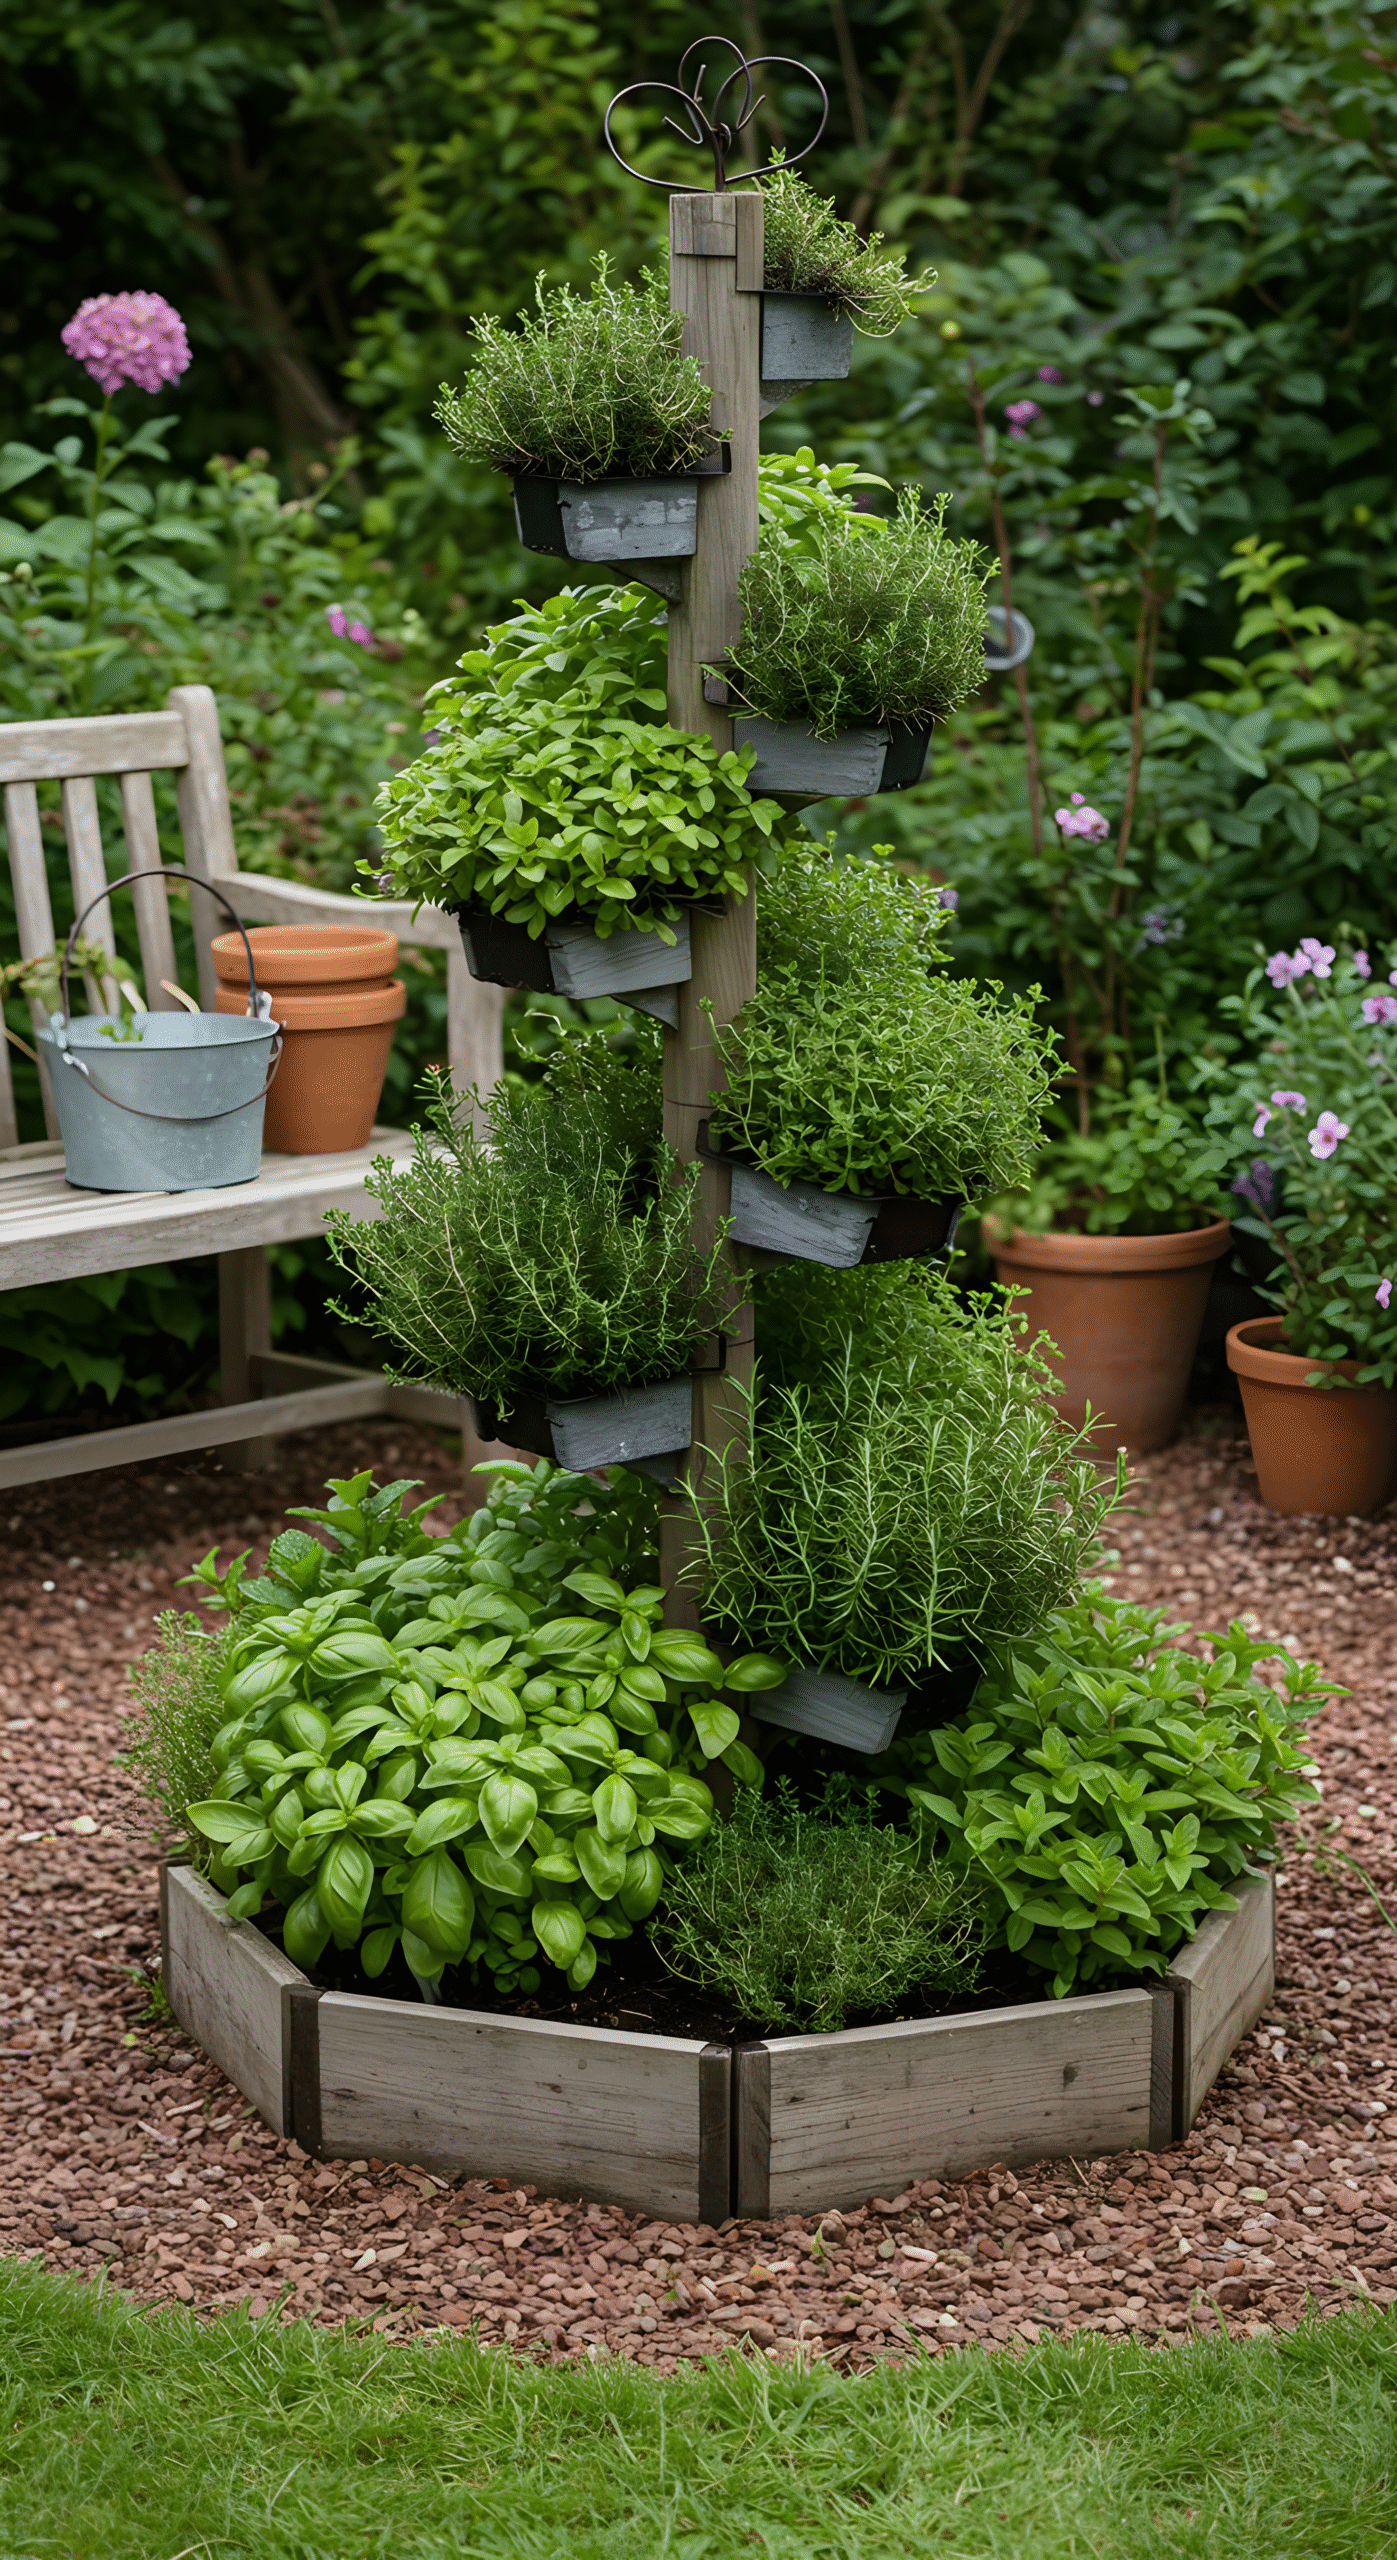
Set against a lush, natural backdrop, this stunning vertical herb structure stands tall — a centerpiece of beauty and utility. Potted herbs spiral up a central wooden post in neatly secured planters, surrounded at the base by lush, soil-planted varieties like basil and thyme. Each level hosts healthy, fragrant herbs basking in the sunlight — all within a footprint no larger than a patio chair.
This isn’t just a decorative piece. It’s a fully functional growing system, combining vertical gardening with rotational sun exposure, improved drainage, and an aesthetic flair.
Whether you’re new to gardening or ready for your next DIY adventure, here’s a step-by-step guide to building your own spiral herb tower, inspired by the image you’ve shared.
Step 1: Choose the Right Location
Before you build anything, choose a sunny and accessible location in your garden or patio. Most culinary herbs thrive in 6–8 hours of sunlight a day.
Ideal Site Requirements:
- Good drainage
- Minimum 3-foot diameter space
- Close access to water
- Protection from extreme wind
The spiral design also makes this project ideal for corner plots, central garden beds, or entryway focal points.
Step 2: Gather Your Materials
To recreate this vertical spiral herb tower, you’ll need:
Materials:
- 1 wooden post or pole (approx. 5-6 feet tall)
- 6–8 metal or wooden brackets
- 6–8 small herb planters or buckets (with drainage holes)
- 1 wooden raised garden bed frame (optional but recommended for the base)
- Screws and drill
- Gardening soil and compost
- A metal or decorative topper (optional but adds flair)
Tools:
- Drill with screwdriver bit
- Measuring tape
- Shovel or spade
- Level
Step 3: Build the Base Bed
The tower is set in a raised bed, which not only looks great but also serves multiple purposes:
- Retains soil and moisture
- Defines space and prevents weeds
- Adds elevation for ground-planted herbs
To Build:
- Create an octagon or circle using pre-cut wood panels or garden bed kits.
- Make it 8–12 inches tall and about 3 feet in diameter.
- Dig into the soil slightly and set the panels to ensure stability.
- Fill with nutrient-rich potting soil mixed with compost.
Step 4: Secure the Central Pole
This vertical post is the anchor for your spiral structure.
Instructions:
- Dig a 10–12 inch hole in the center of the raised bed.
- Insert the wooden post securely and fill the hole with gravel or quick-set concrete for added stability.
- Ensure the post stands completely vertical using a level.
- Let it set and stabilize before attaching anything to it.
Step 5: Attach the Spiral Planters
Once the post is stable, it’s time to build the spiral by mounting the planters.
Here’s how:
- Mark even vertical intervals up the post (every 6–8 inches).
- Attach a bracket at a slight angle, rotating around the post to create a spiral or corkscrew pattern.
- Mount each small planter or pot securely on its bracket.
- Ensure each pot has adequate drainage and isn’t directly shading the one below it.
Tip: Use galvanized metal brackets and weather-resistant containers to withstand outdoor conditions.
Step 6: Fill Planters and Base with Herbs
Now it’s time to bring your spiral herb garden to life.
Fill each planter with:
- Herb-friendly potting soil
- A single type of herb per container
Plant directly in the base bed:
- Large-leaf or bushy herbs like basil, parsley, rosemary, or thyme
- Spreading herbs such as oregano or creeping thyme to fill gaps
Step 7: Water and Mulch
After planting, thoroughly water the soil in each container and the base garden bed. Ensure water doesn’t pool — good drainage is crucial for herb health.
Add a light layer of organic mulch around the base herbs to:
- Retain moisture
- Suppress weeds
- Add nutrients over time
Step 8: Decorate and Personalize
This tower garden isn’t just functional — it’s a showpiece. Feel free to add flair:
Suggestions:
- Add a decorative topper to the post (like a wrought-iron ornament or wind spinner).
- Hang plant labels or tags to identify herbs.
- Place small garden accessories like watering cans or potted flowers nearby for charm.
Step 9: Maintain Your Spiral Garden
A vertical herb tower is easy to maintain, but it needs care to thrive.
Maintenance Tips:
- Water daily in summer (especially upper containers which dry faster)
- Trim and harvest herbs regularly to encourage bushy growth
- Remove dead leaves or flowers to keep plants healthy
- Rotate the structure every few weeks (if not fixed) for balanced sun exposure
Why the Spiral Design Works So Well
This spiral tower isn’t just eye-catching — it’s smart gardening:
Benefits:
- Space-efficient: Fits a dozen herbs in a 3-foot footprint
- Improves drainage: Gravity helps water flow downward naturally
- Increases sun access: Herbs on all sides catch sunlight at different times
- Reduces bending: Harvesting is easy on the back and knees
- Prevents crowding: Each herb has its own space to thrive
Perfect Herbs for a Spiral Tower
Not all herbs grow equally well in compact vertical settings. Here’s a proven combination:
- Top Tier: Basil, lavender, rosemary (sun-loving, upright)
- Middle Tiers: Oregano, thyme, sage, marjoram (low bushy herbs)
- Bottom Tier/Base: Parsley, mint, chives, lemon balm (larger, ground-level spreaders)
Avoid overly aggressive plants like mint in the spiral pots — contain them in their own section to prevent them from overtaking others.
Conclusion: Spiral Gardens, Rooted in Simplicity
In a world of complex solutions and expensive gardening gadgets, the vertical herb spiral offers something refreshingly simple: a structure that mimics nature’s own efficiency and elegance.
Whether you’re cultivating for flavor, fragrance, or just the sheer joy of growing your own food, this vertical garden design is a game-changer. With minimal effort, affordable materials, and a bit of creativity, you can transform even the smallest garden corner into a lush, aromatic haven.
So grab your drill, pick your herbs, and let your garden spiral upward — beautifully.