August 8, 2025 – As Phnom Penh’s skyline grows, so does the popularity of outdoor living spaces. New villas, apartments, and trendy cafes are increasingly featuring wooden decks and balconies, offering a welcome escape from the bustling city. But as the rainy season unleashes its daily deluge, a hidden and dangerous construction flaw in many of these structures poses a silent threat. A common shortcut, born from a simple misunderstanding of how wood behaves in our tropical climate, could be setting the stage for catastrophic rot and structural failure.
A detailed construction diagram, illustrating the professional standard for attaching a deck to a house, provides the crucial step-by-step knowledge needed to understand this danger and, more importantly, how to prevent it. This isn’t just about building codes; it’s about basic safety.
The Common and Dangerous Mistake: The Direct-Attach Time Bomb
The critical point of failure for any deck or balcony is where it attaches to the main building. This connection is typically made with a “ledger board”—a horizontal piece of wood that is bolted to the house and supports the entire weight of the deck joists.
The common—and deeply flawed—mistake is to bolt this wooden ledger board directly against the wall of the house. On the surface, it seems logical. A tight, direct connection feels strong. However, this practice creates a structural time bomb.
In a climate like Cambodia’s, with its intense humidity and torrential rains, this direct wood-on-wall contact is disastrous. Water, driven by wind and rain, inevitably seeps into the tiny seam between the ledger and the house wall. With no space to drain or for air to circulate, the moisture gets trapped. This trapped water, combined with the tropical heat, creates the perfect incubator for fungal rot and attracts termites.
Over a surprisingly short period—sometimes just a few years—the ledger board and the wooden structure of the house behind it can turn soft and spongy, losing all their structural integrity. The bolts that are meant to hold everything together are now just anchored into decaying wood, capable of pulling out under the weight of a few people or a heavy piece of furniture. This is the mistake that the professional method aims to correct.
The Professional Solution: A Step-by-Step Guide to a Safe Connection
The provided diagram details the modern, engineered solution that prevents this catastrophic failure. It introduces a simple yet revolutionary concept: creating a dedicated drainage space. Let’s break it down step by step.
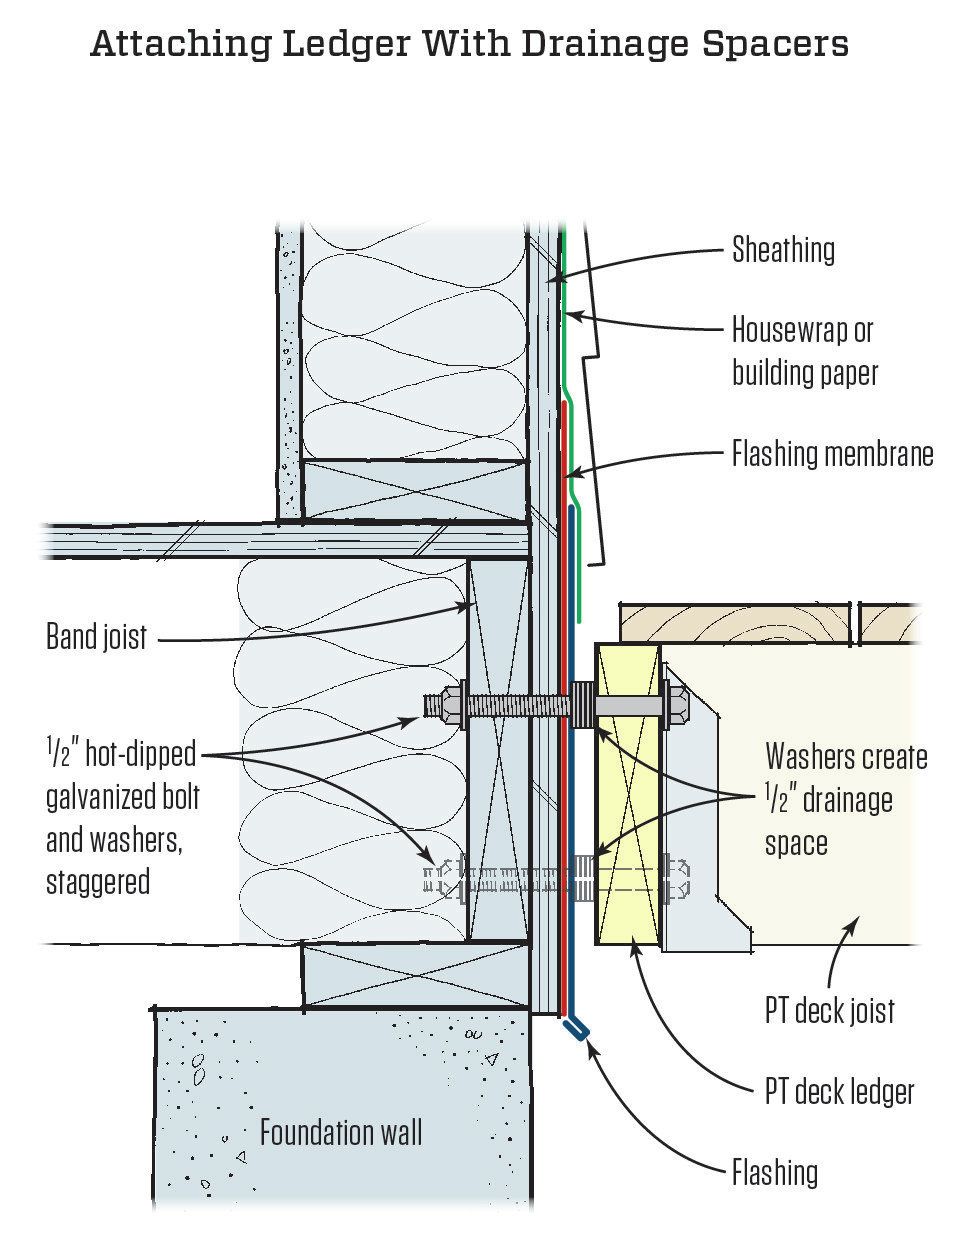
Step 1: Preparing the House Wall
Before anything is attached, the house wall itself must be made waterproof. The diagram shows several layers working together.
- Sheathing: This is the outer board layer of the house wall.
- Housewrap or Building Paper: A special weather-resistant barrier that wraps around the sheathing. Its job is to stop water from getting into the wall cavity but allow moisture vapor to escape.
- Flashing Membrane & Flashing: These are crucial waterproof layers, typically made of a self-adhering rubberized asphalt or metal. As shown, flashing is installed over the building paper and tucked behind it at the top and over it at the bottom, creating a shingled effect that directs any water down and out, away from the wall structure.
Step 2: Creating the All-Important Drainage Space
This is the single most critical step that corrects the common mistake. Instead of placing the ledger board directly against the wall, the diagram shows the use of “washers” or specialized spacers to create a ½-inch (approximately 13mm) drainage space.
This small gap is the hero of the design. It allows any water that gets behind the ledger board to drain away freely. Just as importantly, it allows air to constantly circulate, which dries out any residual moisture. By eliminating trapped water, you eliminate the conditions for rot.
Step 3: Ensuring a Secure and Durable Attachment
With the drainage space established, the ledger is attached through the spacers to the house’s band joist (the structural wood frame of the floor system).
- ½-inch Hot-Dipped Galvanized Bolts: The diagram specifies large, strong bolts. The “hot-dipped galvanized” coating is essential. This thick zinc coating protects the steel bolts from rusting and corroding, a critical consideration in Phnom Penh’s humid environment. Simple steel bolts would rust and fail over time.
- Washers: Washers are used under the bolt head and nut to distribute the load and prevent the bolt from crushing the wood fibers.
- Staggered Pattern: The bolts are staggered in a high-low pattern. This distributes the structural forces more evenly along the ledger and into the house frame, preventing the wood from splitting along a single grain line.
An Expert’s Warning for Phnom Penh
This isn’t just a theoretical issue. Local construction experts are seeing the consequences of the “direct-attach” mistake.
“We are seeing a boom in additions that use wood, but the expertise in wood construction has not always kept pace,” warns Mr. Rathak, a (fictional) Cambodian structural engineer with Mekong Engineering Consultants. “The principles in this diagram are the standard of care in North America and Europe for a reason. Here, in our six-month rainy season, they are even more critical.”
“The most common mistake is assuming you can attach wood to a building the same way you would attach metal or concrete,” Rathak continues. “Wood is an organic material; it breathes and it absorbs water. Bolting a pressure-treated ledger directly to a rendered concrete wall is just as dangerous as bolting it to a wood-frame wall. The ledger itself will trap water against the concrete and rot from the back side out. That half-inch gap is non-negotiable for a safe, long-lasting structure.”
What Homeowners and Builders Should Do
For property owners, this information is a crucial call to action.
- Inspect Your Existing Deck: Look closely at where your deck or balcony joins the house. Can you see a small, consistent gap between the wood ledger and the wall? Do you see any dark water stains on the wall below the deck, or does the wood feel soft when prodded with a screwdriver? If so, it is imperative to have it inspected by a qualified engineer.
- For New Construction: If you are planning to build a deck, have this specific conversation with your architect and builder. Show them this diagram. Insist that a proper drainage gap and correct flashing be included in the construction plan. The small additional cost of spacers and proper bolts is negligible compared to the cost of a catastrophic failure and potential rebuilding.
In conclusion, this technical diagram is more than just a drawing. It’s a blueprint for safety. That simple half-inch of air, a detail so easy to overlook, is the silent guardian that protects a deck from its greatest enemy: trapped water. As Phnom Penh continues its development, adopting these international best practices is essential to ensure that our new structures are not only beautiful but also safe and built to last.