A brilliantly clear diagram on “Surface Drainage Techniques” by Luisfurushio.com is providing homeowners with a masterclass in how to protect their property from water damage. It illustrates a complete, proactive system for managing rainwater—the number one enemy of any house foundation.
The principles it showcases are a universal blueprint for a dry, stable home. However, the biggest mistake a homeowner can make is to copy the scale of this system without first considering their local climate. The effectiveness of this perfect plan depends entirely on whether it is “sized” correctly to handle the intensity of local rainfall, a crucial step that separates a functional system from one that will fail when it’s needed most.
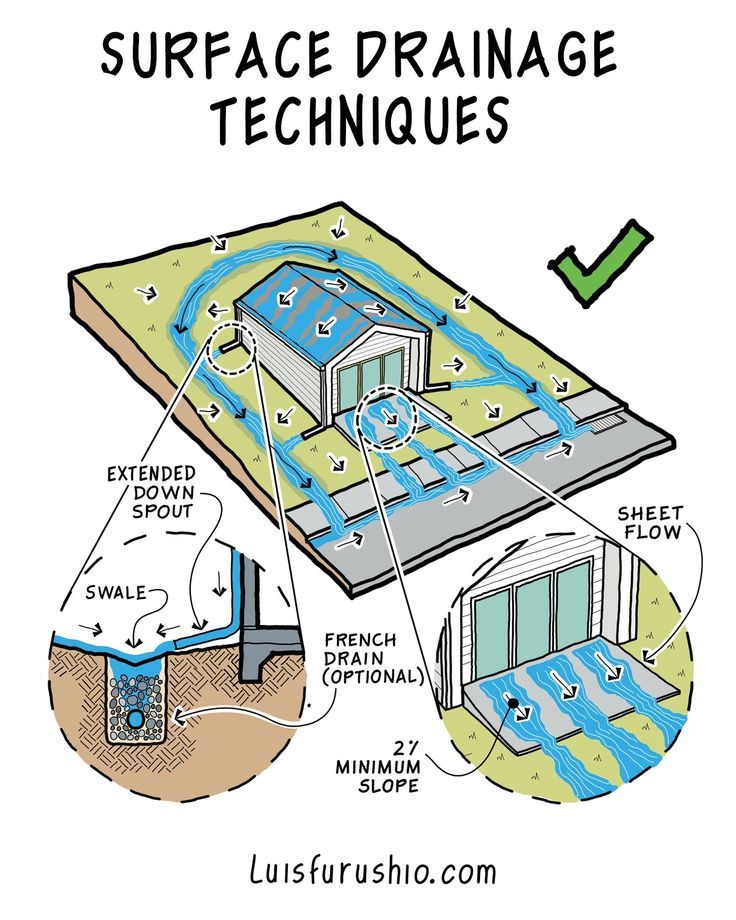
The Four Pillars of a Dry Yard
The diagram illustrates an elegant, four-part system where each component works together to control water from the moment it lands on your property.
Pillar 1: The Slope (Controlling Sheet Flow)
The first and most important rule of drainage is that water must always flow away from the foundation. The diagram shows that all surfaces, from the lawn to the paved patio, are graded with a slope. This causes water to move across the surface in a wide, shallow layer called Sheet Flow, preventing it from pooling against the house walls. A 2% minimum slope is the standard, meaning the ground should drop at least 2 inches for every 8 feet of distance from the house.
Pillar 2: The Swale (A Landscaped Canal)
A Swale is a wide, shallow depression in the landscape. Its job is to act like a vegetated canal, intercepting the sheet flow and directing it in a controlled path to a safe discharge point, such as the street or a storm drain.
Pillar 3: The Downspout (Managing Roof Water)
A home’s roof collects a massive, concentrated volume of water. The diagram correctly shows an Extended Down Spout that carries this water far away from the foundation and deposits it directly into the swale, preventing it from saturating the ground next to the house.
Pillar 4: The French Drain (The Underground Escape Route)
For situations where the ground is saturated or the volume of water is too high for the swale alone, the diagram shows an optional French Drain. This is a gravel-filled trench containing a perforated pipe that acts as a high-capacity underground express lane, quickly carrying excess water away.
The Critical Mistake – A Light-Duty System for a Heavy-Duty Storm
The critical error is not in the techniques themselves, but in their implementation. A homeowner might build a system that looks exactly like the one in the diagram, only to see it overwhelmed in a major storm.
- The Problem: Underestimating Water Volume and Intensity. The amount of rain a drainage system needs to handle is not about average annual rainfall; it’s about the peak flow rate during the most intense storms. A region that gets gentle, all-day drizzles has very different drainage needs than a region that experiences torrential downpours or rapid snowmelt. A system designed for the former will be completely inadequate for the latter.
- The Correction: “Climate-Sizing” Your System. Before you start digging, you must assess your local weather patterns.
- For Moderate-Rainfall Regions: For areas with predominantly gentle or moderate rain, the system as depicted—with subtle swales and a French drain as a potential add-on—is likely sufficient.
- For Heavy-Rainfall Regions: For areas prone to thunderstorms, atmospheric rivers (like the US Pacific Northwest), or tropical downpours (like the US Gulf Coast), every component of the system must be “super-sized.” The swales need to be deeper and wider to handle a larger volume. The French drain is not optional; it is essential, and it should be built with a larger diameter pipe. Gutters and downspouts should also be oversized to prevent overflowing during a cloudburst.
[Image showing a suburban street with flash flooding during a heavy thunderstorm]
Conclusion: Plan for the Worst, Enjoy the Best
“This diagram should be required viewing for every homeowner. It shows you how to solve water problems before they start,” says Sarah Jenkins, a (fictional) editor at Practical Homebuilding magazine. “But the biggest mistake people make is under-sizing. They dig a small, polite-looking trench in a region that gets torrential rain. Their ‘swale’ is full and overflowing ten minutes into the first real storm of the season.”
“You have to design your drainage system for the worst storm you’re likely to see, not the average spring shower,” she advises. “A little extra digging and a slightly larger pipe upfront can save you from a five-figure foundation repair bill down the road.”
This guide provides the perfect visual vocabulary for a resilient, water-managed property. By taking these universal principles and scaling them to meet the specific demands of your local climate, you can protect your home—your single largest investment—from the destructive power of water and enjoy peace of mind, no matter what the forecast holds.