📰 Today’s Build Bulletin: Reflection Pool Estate
1. Site Layout & Excavation
Headline: “Groundwork for Grandeur!”
Step-by-Step:
-
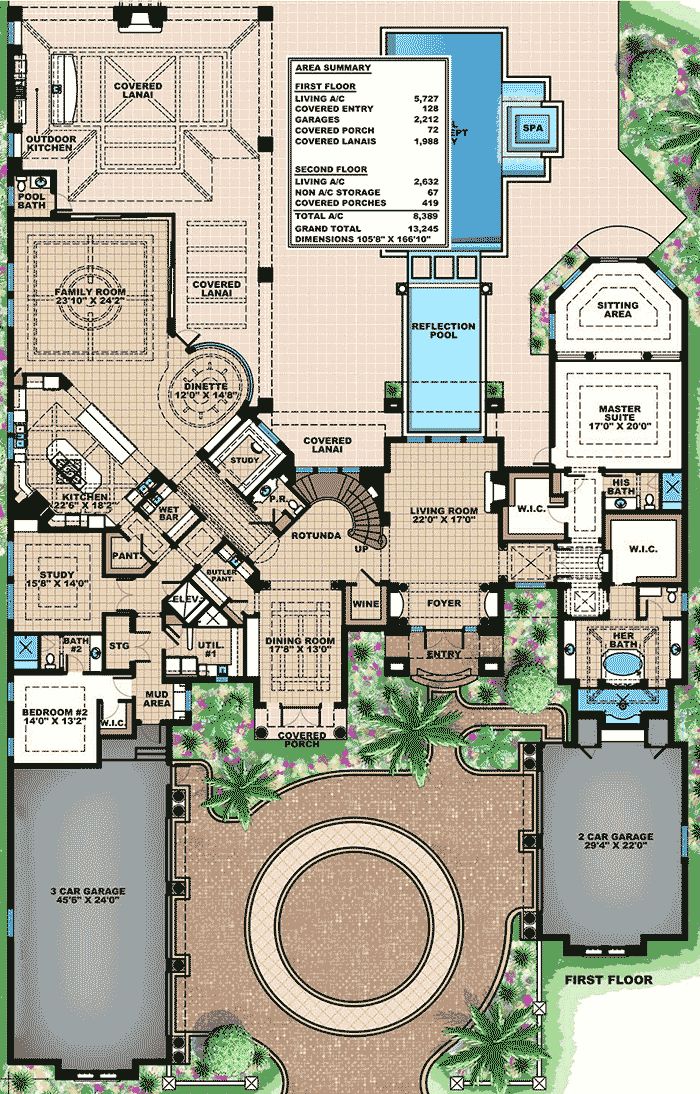
Survey & Stakeout: Pin out the main house footprint, 45′-6″×24′-0″ three-car garage, 29′-4″×22′-0″ two-car garage, and central reflection pool.
-
Clearing & Grading: Strip topsoil, remove vegetation, and level terrain to design elevations, adding erosion controls.
-
Excavation: Excavate for pool shell, lanai pads, and garage footings; stockpile soil on-site.
2. Foundation & Structural Slabs
Headline: “Rock-Solid Base Poured!”
Step-by-Step:
-
Footing Trenches: Dig continuous footings under all load-bearing walls and garage perimeters.
-
Formwork & Rebar: Assemble wood forms and place #4 rebar as per structural plans.
-
Concrete Pour & Screed: Pump high-strength mix for garage slabs, pool deck, and covered lanais; screed for flatness.
-
Curing: Cover with plastic sheeting and mist for 5–7 days to prevent cracking.
3. Reflection Pool & Outdoor Kitchen Shell
Headline: “Centerpiece Takes Shape!”
Step-by-Step:
-
Rebar Cage & Plumbing: Install rebar matrix in pool walls, rough in PVC for skimmers, jets, and pool bath fixtures.
-
Gunite Application: Spray shotcrete to form pool shell; trowel smooth.
-
Outdoor Kitchen Pad: Pour separate concrete pad; set stub-outs for sink, grill gas line, and electrical.
-
Curing & Waterproofing: Cure shell under wet burlap, then apply pool-grade waterproofing membrane.
4. Framing & Roof Decking
Headline: “Walls Rise Around the Oasis!”
Step-by-Step:
-
Sill Plate & Anchors: Bolt treated sill plates to the cured slabs at 6′-o.c.
-
Wall Studs: Frame 2×6 exterior walls for the family room (23′×34′), kitchen, dining, and master wing.
-
Lanai Beams: Install heavy timber beams for 12′-ceiling covered lanais and outdoor living areas.
-
Roof Trusses & Sheathing: Crane in prefabricated trusses; nail plywood decking and underlayment.
5. Envelope & Weatherproofing
Headline: “Sealed for Luxury Living!”
Step-by-Step:
-
Sheathing & Barrier: Apply ZIP panels or OSB with house wrap; tape seams and flash all openings.
-
Windows & Doors: Install oversized sliders for pool access, picture windows in the living room, and garage doors.
-
Roofing: Lay synthetic underlayment and architectural shingles or metal roofing with proper flashings.
-
Trim & Gutters: Fit soffits, fascia, and seamless gutters to manage all lanai runoff.
6. MEP Rough-Ins
Headline: “Systems Wired for Comfort!”
Step-by-Step:
-
Electrical: Pull circuits for recessed cans, landscape lighting, pool equipment, and kitchen appliances.
-
Plumbing: Run PEX to kitchen, pool bath, bar, and powder rooms; set floor drains in lanai.
-
HVAC: Hang ductwork for multi-zone comfort; set condenser pads for poolside spa and indoor areas.
-
Low-Voltage: Prewire for audio, security cameras around the lanai, and smart-home controls.
7. Exterior Finishes & Decking
Headline: “Coastal Chic Unveiled!”
Step-by-Step:
-
Pool Tile & Coping: Set waterline tile and stone coping; grout and seal.
-
Lanai Pavers: Lay pavers in a running bond across covered lanais and around the pool deck.
-
Siding & Stone Accents: Install painted stucco or board-and-batten siding; veneer columns and garage skirting with natural stone.
-
Landscaping Prep: Install edging, plant salt-tolerant shrubs, and prepare turf zones.
8. Interior Fit-Out
Headline: “From Drywall to Décor!”
Step-by-Step:
-
Insulation & Drywall: Spray-foam external walls; hang and finish gypsum board.
-
Millwork & Cabinets: Fit kitchen island, butler’s pantry units, and built-in shelving in the family room.
-
Flooring & Paint: Lay porcelain tile in wet areas; hardwood in living spaces; apply two-tone paint.
-
Fixture Mounting: Install light fixtures, pool bath plumbing fixtures, and outdoor kitchen appliances.
9. Final Systems & Punch List
Headline: “Oasis Activated!”
Step-by-Step:
-
Pool Startup: Connect pump, filter, heater, and jets; balance water chemistry.
-
Outdoor Kitchen Commission: Hook up gas line, test grill ignition, and run water to sink.
-
Landscape & Lighting: Plant palms, mulch beds, and program landscape lighting zones.
-
Walk-Through & Handover: Complete a detailed punch list, verify all systems, and secure the certificate of occupancy.
🔗 Dive into the comments for full photo sequences, downloadable material lists, and expert pro tips on building your dream pool-side retreat!