📰 Today’s Featured Knot Guides
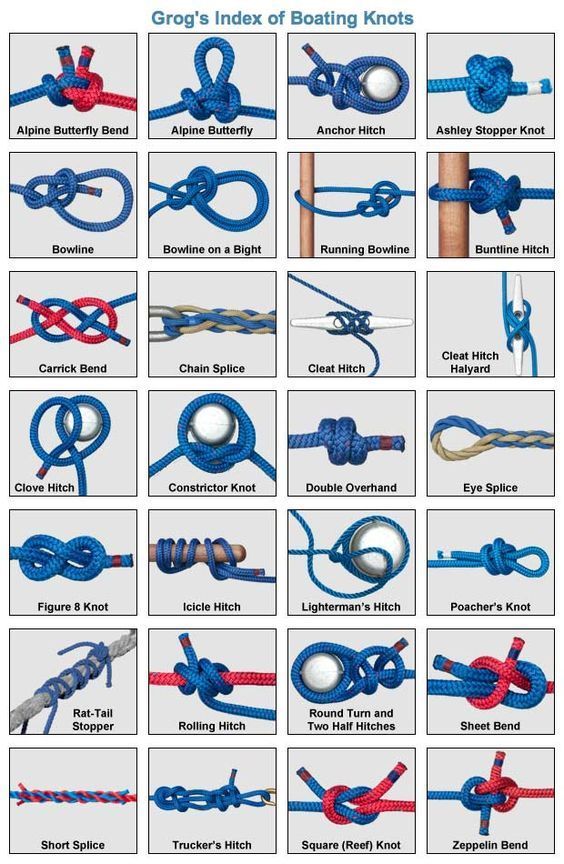
1. Alpine Butterfly Knot
Why It Matters: Creates a secure loop in the middle of a rope—ideal for isolating damaged sections or attaching mid-line hardware.
Step-by-Step:
-
Form a Bight: Fold the rope back onto itself to make a loop (bight).
-
Twist Twice: Twist the bight two full turns so that you see two loops side by side.
-
Pull Through: Lift the upper loop and pass it under the lower loop, pulling it through the twists.
-
Dress the Knot: Tighten all three rope segments evenly to form the characteristic “butterfly” shape.
-
Test Security: Apply load on the loop to ensure the knot holds firm.
2. Bowline
Why It Matters: The “king of knots”—creates a fixed loop at the rope’s end that won’t slip under load, yet unties easily.
Step-by-Step:
-
Make the Rabbit Hole: Form a small loop (“rabbit hole”) near the working end.
-
Rabbit Comes Out: Pass the rope’s free end (“rabbit”) up through the hole.
-
Around the Tree: Wrap the free end around the standing part (“around the tree”).
-
Back Down the Hole: Bring the free end back down through the original loop.
-
Dress & Tighten: Pull the standing part and free end to snug the knot, ensuring a neat, symmetrical shape.
3. Figure-Eight Knot
Why It Matters: A simple stopper knot that prevents a line from slipping through hardware or unraveling.
Step-by-Step:
-
Form a Loop: Make a simple loop in the rope.
-
Cross Over: Take the working end and pass it over the standing part.
-
Complete the Eight: Feed the working end under the standing part and out through the original loop.
-
Dress the Knot: Tighten by pulling both ends, shaping a clear “8” pattern.
-
Inspect: Ensure no twists remain for maximum strength.
4. Cleat Hitch
Why It Matters: The go-to knot for quickly securing a line to a dock cleat.
Step-by-Step:
-
Initial Turn: Wrap the line once around the base of the cleat.
-
Figure-Eight Pattern: Cross over the top of the cleat horn, under the opposite horn, forming a figure-eight.
-
Locking Hitch: Make a final loop under one horn to lock the line in place.
-
Tighten & Snug: Pull taut to secure.